Upgrading to Windows 11 may result in Valorant TPM 2.0 error while launching the game. We have a detailed guide to fix this Valorant TPM 2.0 error in Windows 11. Read this article till the end to get back to playing the game without any interruptions.

How to Fix Valorant TPM 2.0 Error in Windows 11
Quick Answer
Try to update your Windows 11 OS. Go to Windows Settings > Windows Update, then click on Check for Updates and follow the instructions to update Windows.
What Causes TPM 2.0 Error in Valorant?
Now, let’s look at the possible causes of the TPM 2.0 error in Valorant:
- TPM 2.0 and Secure Boot disabled
- TPM 2.0 chip missing
- Conflicts with other software programs
First, let’s define TPM 2.0 and why it’s so important. TPM 2.0 stands for Trusted Platform Module 2.0, a hardware-based security feature that helps in the protection of sensitive information on your computer, such as passwords and encryption keys. It’s intended to improve system and data security, which is especially important when it comes to gaming and online security.
Riot Games has always worked to eliminate cheating and offer the best possible gameplay environment. And Riot’s Vanguard is one of the best anti-cheat systems out there. With the addition of these two elements to their list of minimal requirements, players will find it much harder to cheat in the game because of the additional layer of security that is enforced. Read the article till the end to fix Valorant TMP 2.0 error on your Windows 11 PC.
Method 1: Basic Troubleshooting Methods
Here are some basic steps to take if you are experiencing an error in Valorant.
1A. Restart Riot Client
Most players recommend closing and restarting your Riot Client or Valorant several times to see if the error persists. To restart the game, follow the instructions in our How to Restart Valorant Riot Client in Windows 10 guide.
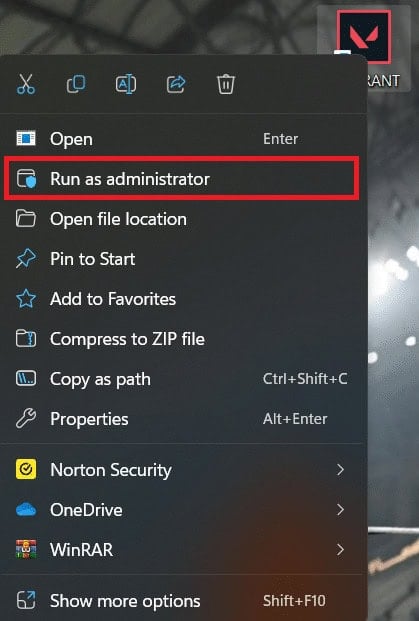
1B. Run Valorant in Administrator Mode
This is super easy, all you must do is follow these steps:
1. Right-click on Valorant and select Run as administrator.
Method 2: Check if TPM 2.0 is Enabled
To check TPM 2.0 is enabled on a Windows 11 device, follow these steps:
Note: Check that your device supports TPM 2.0 and Secure Boot before enabling them. The specifications of your device can be found on the manufacturer’s website or in the device’s manual.
1. Press Windows + R keys together to open Run dialog box.
2. Type tpm.msc and click on OK.
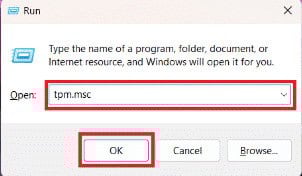
3A. If TPM is already enabled, a message stating The TPM is ready for use will appear.
3B. If TPM is not enabled, a message stating Compatible TPM cannot be found will appear.

Also Read: How to Use Digital Vibrance in Valorant
Method 3: Enable TPM 2.0 and Secure Boot
In this method when you are rebooting your PC, you must enable TPM 2.0 and Secure boot in your BIOS settings. Before your PC boots, you can configure your motherboard and system using the BIOS menu. Before proceeding, it is recommended that you look up the BIOS settings menu for your motherboard. Here are the steps to check your motherboard’s manufacturer and model details:
1. Type cmd into the Windows search bar and press Enter key, to open Command Prompt.
2. Type the following command in Command Prompt. The manufacturer and model of your motherboard will be displayed. As shown below.
wmic baseboard get product,Manufacturer

Now, follow these below-mentioned steps to enable TPM 2.0 and Secure Boot:
Note: The menus may differ depending on the manufacturer and model of your motherboard, so before making any changes, look up the settings for your motherboard on the manufacturer’s website or in the device’s manual.
1. Restart your PC.
2. You can see the screen splash to identify which key to press to enter setup mode, and each brand system defines which keys they are with.
Here is a list of bios key setups according to their brands.
- Dell: F2 or F12.
- HP: ESC or F10.
- Acer: F2 or Delete.
- ASUS: F2 or Delete.
- Lenovo: F1 or F2.
- MSI: Delete.
- Toshiba: F2.
- Samsung: F2.
3. Once in the BIOS menu, go to the Secure BOOT and TPM 2.0 settings and enable them.

Method 4: Update Windows
Keeping a check on any available Windows updates is always a good thing to do. If you happen to be using an outdated version of Windows, this might result in the TPM 2.0 Error. So, to keep this or any kind of error at bay, you must update your Windows to the latest version available. To do so, read out our guide on How to Download and install Updates on Windows 11.

Also Read: How to Fix Valorant FPS Drops
Method 5: Disable Discord Automatic Boot
We know it can sound off, but disabling Discord’s automatic boot can sometimes help you get rid of the TPM 2.0 error and get you back in the game. So, here are the steps to disable Discord’s automatic boot:
1. Launch Discord on your PC.
2. Click on the gear icon to access the Discord settings.
![]()
3. Scroll down and click on Windows settings on the left-hand menu.
4. Turn off the toggle for Open Discord, if it’s on.

5. Close and restart your PC, and then launch Valorant, the error should be gone.
Method 6: Close All Valorant-Related Processes
Another thing you can do is exit the game and end all its processes using Task Manager. To learn how to close any background-running processes or programs, To end task follow the steps given below,
1. Launch Task Manager on your Windows PC.
2. Inside the Task Manager, from the Processes tab, navigate to Valorant.
3. Right-click on the Valorant.
4. From the pop-up menu, click on End Task.

Also Read: Fix Invalid Access to Memory Location Error in Valorant
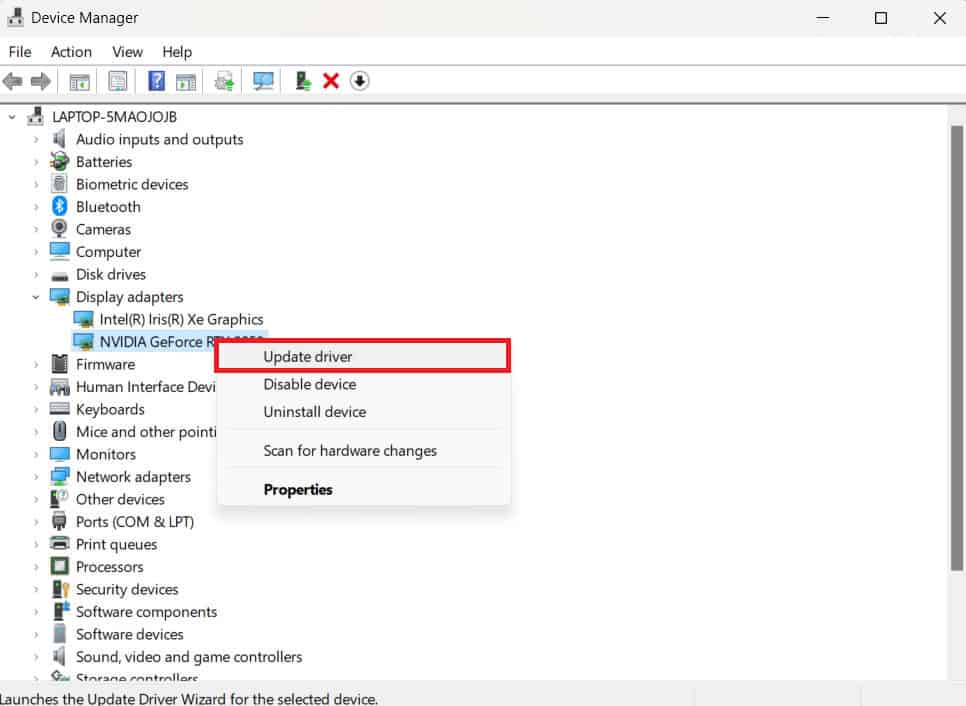
Method 7: Update Graphics Driver
The program that manages your computer’s graphics hardware and components is called a graphics driver. For the best PC performance, it is essential to keep these graphic drivers updated. These drivers can affect Valorant and occasionally result in the TPM 2.0 error on your Windows 11 system if they are old or have any faulty graphics. Follow the steps in our guide on How to Update Graphics Drivers in Windows 11 and implement the same.
Method 8: Reinstall Valorant
We understand that this method can be bothersome because you must uninstall and then reinstall to return to the game. If all other options have been exhausted and previous methods have failed you, you should consider this option. So, here are the steps to uninstall Valorant first:
1. Type Control Panel in the search box and double-click on the Control Panel.
2. Click on Uninstall a program
3. Search for Valorant, right-click on it, and select Uninstall.

4. Wait for the uninstallation process to finish before attempting to reinstall Valorant.
5. To reinstall Valorant, open the Riot Client app on your PC.
6. Sign in to your Riot account.

7. Look for Valorant click on the Valorant tile, and then click on Install.
The installation will take several minutes or hours depending on your internet speed, so have patience and run the game once the installation is fully complete. Valorant TPM 2.0 error must be gone now.
Also Read: Fix Valorant Error Code 62
Method 9: Contact Valorant Support
The Valorant Support Center is the final option. If none of the methods works, it is always best to contact the Riot Support team and inform them of the error you are experiencing. Here’s how to get in touch with Riot Support.
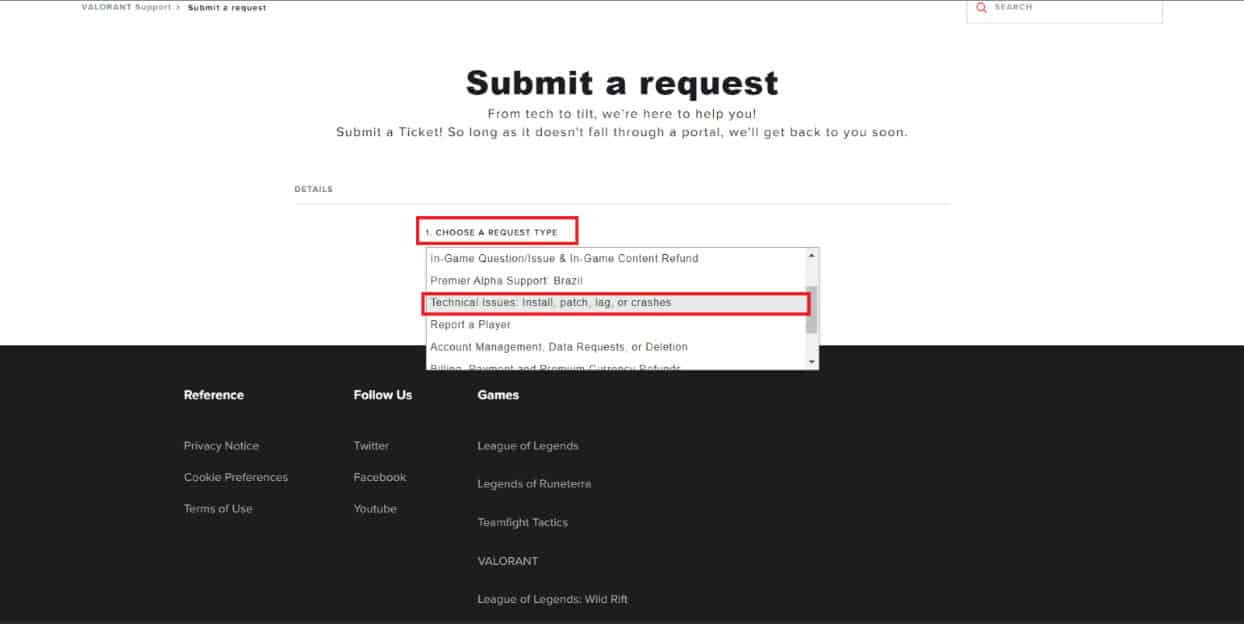
1. In your web browser, navigate to the Valorant Support page.
2. Select a REQUEST TYPE, as shown below.
3. Fill out the boxes with the necessary information and click on the SUBMIT button.
Recommended: 12 Best Agent in Valorant for Beginners
We hope that this article helps you to fix Valorant TPM 2.0 Error on Windows 11 and you can resume playing your favorite game without interruptions. If you have any queries or suggestions, you can leave them in the comment section below