Users have reported experiencing Disconnecting issues with their WiFi after upgrading to Windows 10, well some users also face this issue regardless of the upgrade. Wireless Network is detected and available, but for some reason, it gets disconnected and then doesn’t automatically reconnect.
![WiFi keeps disconnecting in Windows 10 [SOLVED]](https://techcult.com/wp-content/uploads/2017/06/WiFi-keeps-disconnecting-in-Windows-10-SOLVED.png)
Now sometimes the main issue is WiFi Sense which is a featured designed in Windows 10 to make it easier to connects to WiFi networks, but it usually does more harm than good. WiFi Sense enables you to automatically connect to an open wireless hotspot that another Windows 10 user has previously connected to and shared. WiFi Sense is by default enabled and sometimes just turning it off seems to fix the issue.
There can be other cause as to why the WiFi keeps Disconnecting on Windows 10 such as:
- Corrupted/Outdated Wireless Drivers
- Power Management Issue
- Home Network marked as Public.
- Intel PROSet/Wireless WiFi Connection Utility Conflict
WiFi keeps disconnecting in Windows 10 [SOLVED]
Make sure to create a restore point just in case something goes wrong.
Method 1: Mark your Home Network as Private instead of Public
1. Click on the Wi-Fi icon in the System Tray.
2. Then again click on the connected Wi-Fi network to bring out the sub-menu and click on Properties.

3. Make Network as Private instead of Public.

4. If above didn’t work for you then type Homegroup in Windows Search bar.

5. Click the option HomeGroup and then click Change network location.

6. Next, click Yes to make this network a private network.

7. Now right-click on the Wi-Fi icon in the system tray and select “Open Network & Internet Settings.”

8. Scroll down then click on Network and Sharing Centre.

9. Verify that the network listed shows as Private Network then close the window, and you’re done.

This would definitely fix WiFi keeps disconnecting in Windows 10 but continues to the next method.
Method 2: Disable WiFi Sense
1. Press Windows Key + I to open Settings then click on Network & Internet.

2. Now select Wi-Fi from the left-hand menu and Disable everything under Wi-Fi Sense in the right window.

3. Also, make sure to disable Hotspot 2.0 networks and Paid Wi-Fi services.
4. Disconnect your Wi-Fi connection and then again reconnect.
See if you’re able to Fix WiFi Extender keeps disconnecting in Windows 10 issue . If not, then continue with the next method.
Method 3: Fix Power Management Issues
1. Press Windows Key + R then type devmgmt.msc and hit Enter.

2. Expand Network adapters then right-click on your installed network adapter and select Properties.

3. Switch to Power Management Tab and make sure to uncheck “Allow the computer to turn off this device to save power.“

4. Click Ok and close the Device Manager.
5. Now press Windows Key + I to open Settings then Click System > Power & Sleep.

6. Now click Additional power settings.
7. Next, click “Change plan settings” next to the power plan which you use.

8. At the bottom click on “Change advanced power settings.”

9. Expand Wireless Adapter Settings, then again expand Power Saving Mode.
10. Next, you will see two modes, ‘On battery’ and ‘Plugged in.’ Change both of them to Maximum Performance.

11. Click Apply, followed by Ok. Reboot your PC to save changes.
This would help Fix WiFi keeps disconnecting in Windows 10 issue, but there are other methods to try if this one fails to do its job.
Method 4: Automatically Update the Wireless Drivers
1. Press Windows Key + R then type devmgmt.msc and hit Enter.

2. Expand Network adapters then right-click on your installed network adapter and select Update Driver Software.

3. Then choose Search automatically for updated driver software.
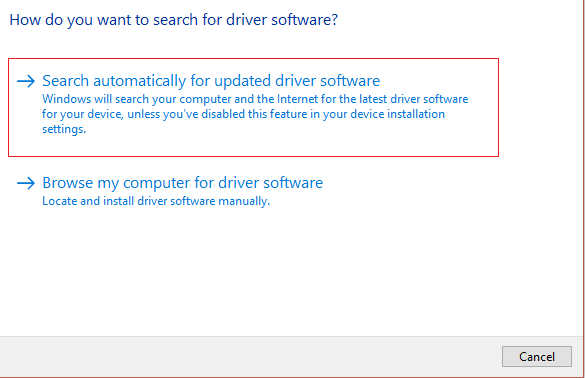
4. Reboot your PC to save changes. If the problem persists, then follow the next step.
5. Again select Update Driver Software but this time chooses ‘Browse my computer for driver software.‘

6. Next, at the bottom click ‘Let me pick from a list of device drivers on the computer.’

7. Select the latest driver from the list and click Next.
8. Let the Windows install drivers and once complete close everything.
9. Reboot your PC to save changes.
Method 5: Reinstall WiFi Adapter Driver
If you’re still facing the Wifi disconnecting issue, then you need to download the latest drivers for Network adapter on another computer and then install these drivers on the PC on which you’re facing the issue.
1. On another machine, visit the manufacturer website and download the latest Network Adapter drivers for Windows 10. Copy them to an external storage drive and then onto the device with network issues.
2. Press Windows Key + X then select Device Manager.

3. Locate the network adapter in the devices list, then right-click on the adapter name and click on Uninstall Device.

4. In the prompt that opens up, make sure to checkmark ‘Delete the driver software for this device.’ Click on Uninstall.

5. Run the setup file that you downloaded as an Administrator. Go through the setup process with defaults, and your drivers will be installed. Reboot your PC to save changes.
Method 6: Run Network Troubleshooter
1. Press Windows Key + I to open Settings then click on Update & Security.
![]()
2. From the left-hand menu, select Troubleshoot.
3. Under Troubleshoot, click on Internet Connections and then click Run the troubleshooter.
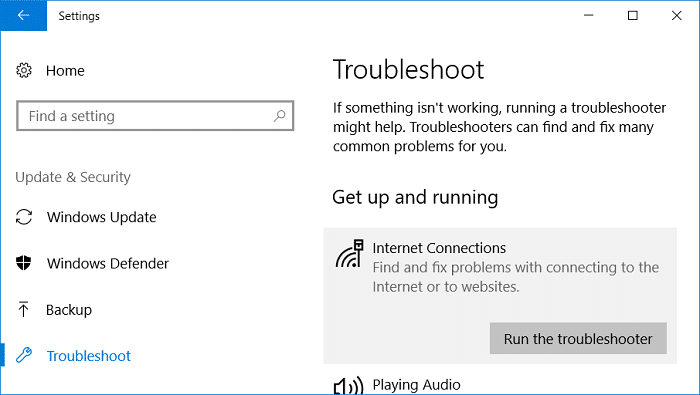
4. Follow further on-screen instructions to run the troubleshooter.
5. If the above didn’t fix the issue then from the Troubleshoot window, click on Network Adapter and then click on Run the troubleshooter.

5. Reboot your PC to save changes and see if you’re able to fix frequent WiFi disconnecting issues.
Method 7: Reset TCP/IP configuration
1. Type command prompt in Windows Search then click on Run as administrator under Command Prompt.

2. Type the following commands one by one and press Enter after typing each command:
ipconfig /release
ipconfig /renew
netsh winsock reset
netsh int ip reset
ipconfig /flushdns
ipconfig /registerdns

3. Reboot your PC to save changes, and you will be good to go.
Method 8: Use Google DNS
You can use Google’s DNS instead of the default DNS set by your Internet Service Provider or the network adapter manufacturer. This will ensure that the DNS your browser is using has nothing to do with the YouTube video not loading. To do so,
1. Right-click on the network (LAN) icon in the right end of the taskbar, and click on Open Network & Internet Settings.
![]()
2. In the settings app that opens, click on Change adapter options in the right pane.

3. Right-click on the network you want to configure, and click on Properties.

4. Click on Internet Protocol Version 4 (IPv4) in the list and then click on Properties.

Also Read: Fix Your DNS Server might be unavailable error
5. Under the General tab, choose ‘Use the following DNS server addresses’ and put the following DNS addresses.
Preferred DNS Server: 8.8.8.8
Alternate DNS Server: 8.8.4.4

6. Finally, click OK at the bottom of the window to save changes.
7. Reboot your PC and once the system restart, see if you’re able to fix YouTube videos won’t load. ‘An error occurred, try again later’.
Method 9: Reset Network Connection
1. Press Windows Key + I to open Settings then click on Network & Internet.

2. From the left-hand menu, select Status.
3. Now scroll down and click on Network reset at the bottom.

4. Again click on Reset now under Network reset section.

5. This will successfully reset your network adapter, and once it is complete, the system will be restarted.
Method 10: Disable 802.1 1n Mode
1. Press Windows Key + R then type the following command and hit Enter:
control /name Microsoft.NetworkAndSharingCenter

2. Now select your Wi-Fi and click on Properties.

3. Inside Wi-Fi properties, click on Configure.

4. Navigate to the Advanced tab then select 802.11n Mode and from the value drop-down select Disabled.

5. Click OK and Reboot your PC to save changes.
Method 11: Change Channel Width
1. Press Windows Key + R then type ncpa.cpl and hit Enter to open Network Connections.

2. Now right-click on your current WiFi connection and select Properties.
3. Click on the Configure button inside the Wi-Fi properties window.

4. Switch to the Advanced tab and select the 802.11 Channel Width.

5. Change the value of 802.11 Channel Width to Auto then click OK.
6. Close everything and reboot your PC to save changes.
You may be able to fix Wifi disconnecting in Windows 10 issue with this method but if for some reason it didn’t work for you then continue.
Method 12: Install Intel PROSet/Wireless Software and Drivers for Windows 10
Sometimes the problem is caused due to outdated Intel PROSet Software, hence updating it seems to Fix WiFi keeps disconnecting issue. Therefore, go here and download the latest version of PROSet/Wireless Software and install it. This is third-party software that manages your WiFi connection instead of Windows, and if PROset/Wireless Software is outdated, it can cause frequent WiFi disconnecting issue.
Recommended:
- Fix File Explorer won’t open in Windows 10
- How to Fix Windows 10 Won’t Remember Saved WiFi Password
- Steam lags when downloading something [SOLVED]
- Troubleshoot Windows Update stuck downloading updates
That’s it you have successfully Fix WiFi keeps disconnecting in Windows 10 but if you still have any queries regarding this post feel free to ask them in the comment’s section.



This was my fix. Your router operates on channels with a certain amount of bandwidth. Think of that bandwidth like a multi lane highway and users are cars on that highway. If you are on a bandwidth with too many wireless users your experience will be slow and sluggish. If your router channel selection is set to “auto” it will continuously disconnect you from your connection to look for a different channel. Fix: Log into your router. In your browser type “198.162.1.1” Unless you’ve changed it the login and pw are default set at “admin” and “admin”. Once into your router page click on the 2G or 5G tab, or do for both if you use both. Change your Channel from auto to one of the several channel numbers available. If you choose a busy channel you can go in and change it again until you find one that works well in your area and your router will not be constantly searching for less populated channels. There is a great app you can use to see the traffic on each channel called InSSIDer. It shows you graphs of channel population so you can choose accurately. Good luck!!
That’s a lot of stuff to do and it still didn’t fix my issue either of my windows machines. I ended up using linux on my laptop and a wifi -> ethernet adapter for my desktop.
I just did the power settings shown above to disable Windows from power management of my WiFi adapter. Also set power management to High performance and Never sleep.
I also enabled IPv6 for the adapter. That worked.
After downloading from the link supplied (Intel Pro) it didn’t work, but then i looked on that site and found drivers that did work and didn’t disconnect me (so far so good).
https://downloadcenter.intel.com/download/28794/Windows-10-Wi-Fi-Drivers-for-Intel-Wireless-Adapters?product=59485
i have no idea whats different but when i search home group nothing shows up, and theres no such thing as wifi sense for me, and yes i am on windows 10
I had the same issue and i tried all the steps above and still no luck. It turns out that there are two pieces to this puzzle. I was trying to connect my laptop (5G enabled) to the wifi (2.4G enabled)
I had to change the Mode on the network/Wifi adaptor properties page (Advanced Tab) to
802.11 b/g (not 5G) and this did the trick.
802.11 b/g worked for me as well. Thanks Cornel.
i entered these three commands in cmd and it fixed my frequently disconnecting wifi internet (“connected, no internet”) caused by windows 10 update
netsh winsock reset
netsh int ip reset
ipconfig /flushdns
I tried about 10 suggestions over a period of a week and nothing worked until I did this. Go to Device Manager, choose Network Adapter, find your router, retrodate the driver. Select the option that asks if you want to see what versions you have available on your computer and choose the oldest version.
Mantab, Cak!
Such a very helpful article. Thumbs up!
My solution for my “always on PC” was to make a scheduled task, about hourly, to always execute “netsh wlan connect WIFI-NAME”. The downside was when executed while wifi was still connected, there would be a few second disconnect. But for me, that was acceptable.