
The Windows operating system currently holds a 96% market share in the world of personal computers. To capitalize on this opportunity, hardware manufacturers try and create products that add a lot of features to the existing computer builds.
But none of this is standardized. Every manufacturer works with its own software features which are closed source to distinguish themselves from their competitors.
If every hardware is different, how will the operating system know how to use the hardware?
This is taken care of by the device drivers. Since Windows cannot build support for all the hardware devices on the planet, they left it up to the hardware manufacturers to develop compatible drivers.
The Windows Operating System only offers us an interface to interact with the installed devices and drivers on the system. This interface is called the Device Manager.
What is a Device Manager?
It is a software component of the Microsoft Windows operating system, which is like a command center of all the hardware peripherals connected to the system. The way it works is by giving us a brief and organized overview of all the windows approved hardware devices that are operating in the computer.
This could be electronic components such as keyboard, mouse, monitors, hard disk drives, processors, etc. It is an administrative tool that is a part of the Microsoft Management Console.
Device Manager comes preloaded with the operating system, however, there are other third-party programs available in the market that can be used to achieve the same desired results but it is encouraged not to install these third-party applications due to the inherent security risks they possess.
Microsoft started bundling this tool with the operating system with the introduction of Windows 95. Initially, it was just designed to display and interact with pre-existing hardware. Over the next few revisions, the hot-plugging capability was added, which enables the kernel to notify the device manager of any new hardware-related changes that are taking place. Such as plugging in a USB thumb drive, insertion of a new network cable, etc.
Device Manager helps us to:
- Modify hardware configuration.
- Change and retrieve hardware drivers.
- Detecting conflicts between the hardware devices that are plugged into the system.
- Identify problematic drivers and disable them.
- Display the hardware information such as the device manufacturer, model number, classification device, and more.
Why Do We Need a Device Manager?
There are a lot of reasons why we might need a device manager, but the most important reason we need the device manager is for software drivers.
A software driver is as Microsoft defines software that allows your computer to communicate with hardware or devices. But why do we need that, so let’s say you’ve got a sound card you should be able to just plug it in with no drivers and your music player should generate a digital signal that the sound card should make.
That’s basically how it would have worked if there was only one sound card in existence. But the real problem is that there are literally thousands of sound devices and all of them will work completely differently from each other.
And for everything to work correctly software makers would need to rewrite their software with specialized signaling for your sound card along with every card that ever existed and every card that ever will exist.
So a software driver acts as an abstraction layer or translator in a way, where the software programs only have to interact with your hardware in one standardized language and the driver handles the rest.
Also Read: What is Fragmentation and Defragmentation
Why do drivers cause so many issues?
Our hardware devices come with a lot of capabilities that the system needs to interact in a particular way. Even though standards exist to help the hardware manufacturers to make the perfect driver. There are other devices and other pieces of software that can cause conflicts. Also, there are separate drivers that need to be maintained for multiple operating systems like Linux, Windows, and others.
Each with its own universal language that the driver needs to translate to it. This leaves plenty of room for one of the variants of a driver for a particular piece of hardware to have an imperfection or two.
How to Access the Device Manager?
There are various ways by which we can access the device manager, in most of the versions of Microsoft windows we can open device manager from the command prompt, the control panel, from the run tool, right-clicking the start menu, etc.
Method 1: From the start menu
Go to the lower left side of the desktop, Right-click on the start menu, a huge list of various administrative shortcuts will appear, locate and click on the “device manager”.
Method 2: Quick Access Menu
On the desktop, keep holding the Windows key while you press ‘X’, then select the device manager from the pre-populated administrative tools.

Method 3: From the Control Panel
Open the Control Panel, click on Hardware and Sound, under the Devices and Printers, select Device Manager.
Method 4: Via Run
Press Windows key + R to open the run dialog box, then in the dialog box besides Open type “devmgmt.msc” and tap OK.

Method 5: Using the Windows search box
Besides the windows icon in the desktop, there is an icon with a magnifying glass, press that to expand the search box, in the search box type “Device Manager” and hit Enter. You will start to see the results populate, click on the first result that is displayed in the Best Match Section.

Method 6: From the Command Prompt
Open the Run dialog using Windows+R hotkeys, enter ‘cmd’ and tap OK. After that, you should be able to see the command prompt window. Now, in the Command Prompt, Enter ‘start devmgmt.msc’ (without quotes) and hit Enter.

Method 7: Open Device Manager through Windows PowerShell
Powershell is a more advanced form of command prompt which is used to run any external programs as well as automate an array of system administration tasks not available to the command prompt.
To open the device manager in Windows Powershell, Access the start menu, scroll down in the all applications list till you reach Windows PowerShell prompt, Once opened type ‘devmgmt.msc‘ and press Enter.
These are some of the ways we can access the device manager, there are plenty of other unique ways we can access the device manager depending on the version of windows operating system you are running, but for the sake of convenience, we will limit ourselves to the above-mentioned methods.
How do you put the device manager to use?
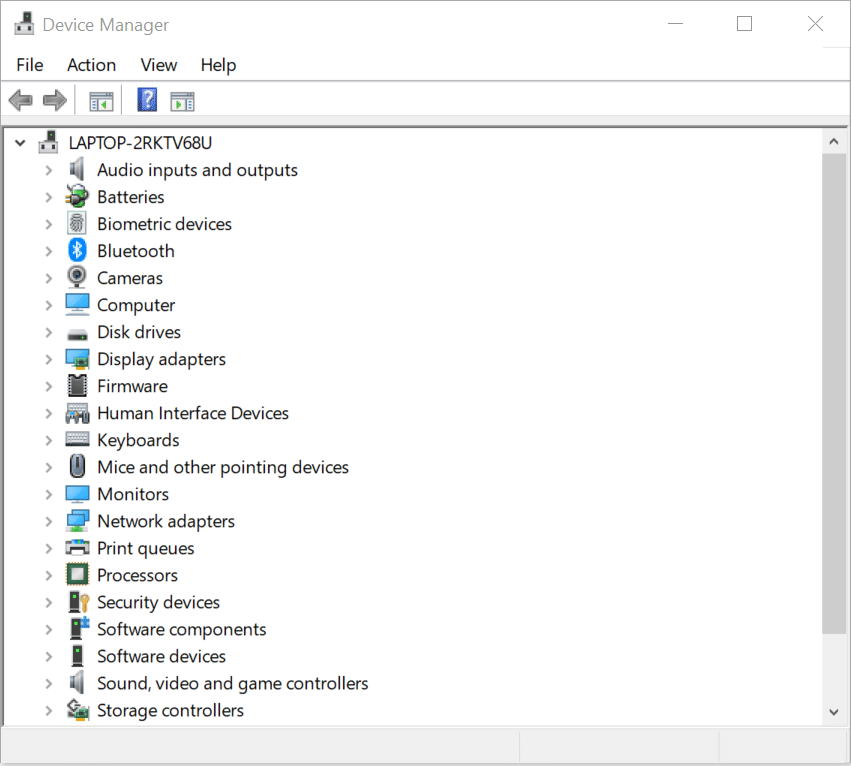
The moment we open the device manager tool we are greeted with a list of all the hardware components and their software drivers that are currently installed in the system. These include Audio inputs and outputs, Bluetooth devices, Display adapters, Disk Drives, Monitors, Network Adapter, and more, these are separated by different categories of peripherals, which can be expanded to display all the hardware devices that are currently connected under that category.
To make changes or to modify a particular device, from the hardware list select the category it falls under, then from the displayed components choose the desired hardware device.
Upon selecting the device, an independent dialog box appears, this box displays the properties of the device.
Depending on the type of device or hardware component selected, we will see tabs such as General, Driver, Details, Events, and Resources.
Now, let’s see what each of these tabs can be used for,
General
This section provides a brief overview of the hardware selected, that displays the name of the component selected, the type of device it is, the Manufacturer of that hardware device, the physical location of the device in the system that is relative to it and the status of the device.
Driver
This is the section that displays the software driver for the selected hardware component. We get to see the developer of the driver, the date it got released, the driver version, and the digital verification of the driver developer. In this section, we also get to see other driver-related buttons such as:
- Driver details: This displays the details of the driver files that have been installed, the location where they have been saved and various dependent file names.
- Update driver: This button helps us manually update the driver by either searching for the driver update online or driver that has been downloaded from the internet.
- Roll Back Driver: Sometimes, certain new driver updates are not compatible with our current system or there are certain new features that are not required that have been bundled with the driver. In these situations, we may have a reason to go back to a previously working version of the driver. By selecting this button we will be able to do so.
- Disable driver: Whenever we buy a new system, it comes preloaded with certain drivers that the manufacturer deems necessary. However, as an individual user may not see the requirement of certain drivers due to any number of reasons say privacy then we can disable the webcam by pressing this button.
- Uninstall device: We can use this to completely remove the drivers necessary for the component to function or even the system to recognize the existence of the hardware component. This is an advanced option, which should be used with caution as uninstalling certain drivers may lead to total Operating System failure.
Details
If we want to control individual properties of a hardware driver, we can do so in this section, here we get to select from various properties of the driver and a corresponding value for a particular property. These can be later modified based on the requirement.
Events
Upon installing these software drivers, they instruct the system to run a plethora of tasks periodically. These timed tasks are called events. This section displays the timestamp, description, and information associated with the driver. Do note that all of these events can also be accessed via the event viewer tool.
Resources
This tab displays various resources and their setting and the configuration the settings are based on. If there are any device conflicts due to certain resource settings that will also be displayed here.
We can also automatically scan for hardware changes by right-clicking on one of the device categories that are displayed along with the properties of that category.
Additionally, we can also access some of the general device options such as update driver, disable driver, uninstall devices, scan for hardware changes, and device properties by right-clicking on the individual device shown in the expanded category list.
The Device manager tool’s window also has icons that are displayed on the top. These icons correspond to the previous device actions that we have already discussed earlier.
Also Read: What are Administrative Tools in Windows 10?
Identification of various error icons and codes
If you were to take any information from this article with you, this would be the most important takeaway for you. Understanding and identifying various error icons will make it easier to figure out the device conflicts, issues with hardware components, and malfunctioning devices. Here’s a list of those icons:
Hardware not recognized
Whenever we add a new Hardware peripheral, without a supporting software driver or when the device is improperly connected or plugged, we will end up seeing this icon which is denoted by a yellow question mark over the device icon.
Hardware not working properly
Hardware devices sometimes tend to malfunction, it is quite hard to know when a device has stopped functioning as it should. We may not know until we start to use that device. However, windows will try to check if a device is functioning or no, while the system is booting. If Windows recognizes the problem which the connected device has it shows a black exclamation on a yellow triangle icon.
Disabled device
We may see this icon which is denoted by a grey arrow pointing down in the lower right side of the device. A device could be automatically be disabled by the IT administrator, by a user, or maybe by mistake
Most of the time the device manager displays the error code along with the corresponding device, to make it easier for us to make sense of what does the system thinks of what could be going wrong. Following is the error code along with the explanation.
| Reason with error code | |
| 1 | This device is not configured correctly. (Error Code 1) |
| 2 | The driver for this device might be corrupted, or your system may be running low on memory or other resources. (Error Code 3) |
| 3 | This device cannot start. (Error Code 10) |
| 4 | This device cannot find enough free resources that it can use. If you want to use this device, you will need to disable one of the other devices on this system. (Error Code 12) |
| 5 | This device cannot work properly until you restart your computer. (Error Code 14) |
| 6 | Windows cannot identify all the resources this device uses. (Error Code 16) |
| 7 | Reinstall the drivers for this device. (Error Code 18) |
| 8 | Windows cannot start this hardware device because its configuration information (in the registry) is incomplete or damaged. To fix this problem you should uninstall and then reinstall the hardware device. (Error Code 19) |
| 9 | Windows is removing this device. (Error Code 21) |
| 10 | This device is disabled. (Error Code 22) |
| 11 | This device is not present, is not working properly, or does not have all its drivers installed. (Error Code 24) |
| 12 | The drivers for this device are not installed. (Error Code 28) |
| 13 | This device is disabled because the firmware of the device did not give it the required resources. (Error Code 29) |
| 14 | This device is not working properly because Windows cannot load the drivers required for this device. (Error Code 31) |
| 15 | A driver (service) for this device has been disabled. An alternate driver may be providing this functionality. (Error Code 32) |
| 16 | Windows cannot determine which resources are required for this device. (Error Code 33) |
| 17 | Windows cannot determine the settings for this device. Consult the documentation that came with this device and use the Resource tab to set the configuration. (Error Code 34) |
| 18 | Your computer’s system firmware does not include enough information to properly configure and use this device. To use this device, contact your computer manufacturer to obtain a firmware or BIOS update. (Error Code 35) |
| 19 | This device is requesting a PCI interrupt but is configured for an ISA interrupt (or vice versa). Please use the computer’s system setup program to reconfigure the interrupt for this device. (Error Code 36) |
| 20 | Windows cannot initialize the device driver for this hardware. (Error Code 37) |
| 21 | Windows cannot load the device driver for this hardware because a previous instance of the device driver is still in memory. (Error Code 38) |
| 22 | Windows cannot load the device driver for this hardware. The driver may be corrupted or missing. (Error Code 39) |
| 23 | Windows cannot access this hardware because its service key information in the registry is missing or recorded incorrectly. (Error Code 40) |
| 24 | Windows successfully loaded the device driver for this hardware but cannot find the hardware device. (Error Code 41) |
| 25 | Windows cannot load the device driver for this hardware because there is a duplicate device already running in the system. (Error Code 42) |
| 26 | Windows has stopped this device because it has reported problems. (Error Code 43) |
| 27 | An application or service has shut down this hardware device. (Error Code 44) |
| 28 | Currently, this hardware device is not connected to the computer. (Error Code 45) |
| 29 | Windows cannot gain access to this hardware device because the operating system is in the process of shutting down. (Error Code 46) |
| 30 | Windows cannot use this hardware device because it has been prepared for safe removal, but it has not been removed from the computer. (Error Code 47) |
| 31 | The software for this device has been blocked from starting because it is known to have problems with Windows. Contact the hardware vendor for a new driver. (Error Code 48) |
| 32 | Windows cannot start new hardware devices because the system hive is too large (exceeds the Registry Size Limit). (Error Code 49) |
| 33 | Windows cannot verify the digital signature for the drivers required for this device. A recent hardware or software change might have installed a file that is signed incorrectly or damaged, or that might be malicious software from an unknown source. (Error Code 52) |
Recommended: How to Switch to OpenDNS or Google DNS on Windows
Conclusion
As the technologies of the Operating systems kept improving it became important for a singular source of device administration. The Device manager was developed to make the operating system aware of the physical changes and keep a track of the mas they take place as more and more peripherals are being added. Knowing when the hardware is malfunctioning and requiring immediate attention would help individuals and institutions alike in a short as well as long run.


