
Has your internet speed been giving you nightmares as of late? If you’re experiencing slow speed while browsing then you need to switch to OpenDNS or Google DNS in order to make your internet fast again.
If shopping websites don’t load up fast enough for you to add things to your cart before they run out of stock, cute cat and dog videos rarely play without buffering on YouTube and in general, you attend zoom call sessions with your long-distance mate but can only hear them talk while the screen displays the same face they made 15-20 mins ago then it might be time for you to change your Domain Name System (more commonly abbreviated as DNS).

What is a Domain Name System you ask? A Domain Name System is like the phonebook for the internet, they match websites to their corresponding IP addresses and aid in displaying them on your request, and switching from one DNS server to another can not only increase your browsing speed and but also make internet surfing on your system a lot more secure.
How to Switch to OpenDNS or Google DNS on Windows?
In this article, we will discuss the same, go over a couple of available DNS server options and learn how to switch to a faster, better and safer Domain Name System on Windows and Mac.
What Is A Domain Name System?
As always, we start by learning a little more about the subject at hand.
The internet works on IP addresses and to perform any kind of search on the internet one needs to enter these complex and difficult to remember series of numbers. Domain Name Systems or DNS, as mentioned earlier, translates IP addresses into easy to remember and meaningful domain names that we frequently enter into the search bar. The way a DNS server works is every time we type in a domain name, the system searches/maps the domain name to a corresponding IP address and fetches it back to our web browser.
Domain name systems are ordinarily assigned by our internet service providers (ISPs). The servers they set are usually stable and trustworthy. But does that mean they are also the fastest and best DNS servers out there? Not necessarily.
The default DNS server you have been assigned may be clogged with traffic from multiple users, making use of some inefficient software and on a serious note, may even be tracking your internet activity.
Fortunately, you can switch to another, more public, faster and safer DNS server quite easily across various platforms. Some of the most popular and used DNS servers out there include OpenDNS, GoogleDNS and Cloudflare. Each of them has its own advantages and disadvantages.
Cloudflare DNS servers (1.1.1.1 and 1.0.0.1) are hailed as the fastest servers by multiple testers and also have built-in security features. With GoogleDNS servers (8.8.8.8 and 8.8.4.4), you get a similar assurance for a faster web browsing experience with added security features (All IP logs are deleted within 48 hours). Finally, we have OpenDNS (208.67.222.222 and 208.67.220.220), one of the oldest and longest operating DNS servers. However, OpenDNS requires the user to create an account in order to access the server and its features; which are focused on website filtering and kid safety. They also offer a couple of paid packages with additional features.
Another pair of DNS servers you might want to try are the Quad9 servers (9.9.9.9 and 149.112.112.112). These again give preference to a speedy fast connection and security. The security system/threat intelligence is claimed to be borrowed from more than a dozen leading cybersecurity companies across the globe.
Also Read: 10 Best Public DNS Servers in 2020
How to Switch Domain Name System (DNS) on Windows 10?
There are a few methods (three to be precise) to switch to OpenDNS or Google DNS on Windows PC that we will be covering in this particular article. The first one involves changing adapter settings via the control panel, the second one makes use of the command prompt and the last method (and probably the easiest of all) has us heading into the windows settings. Okay without any further ado, let’s dive right into it now.
Method 1: Using Control Panel
1. As obvious, we start off by opening the control panel on our systems. To do so, press the Windows key on your keyboard (or click on the start menu icon on your taskbar) and type control panel. Once found, hit enter or click on Open in the right panel.

2. Under Control Panel, locate Network and Sharing Center and click on the same to open.
Note: In some older version of Windows, the Network and Sharing Center is included under Network and Internet option. So start by opening the Network and Internet window then locate & click on Network and Sharing Center.

3. From the left-hand panel, click on Change Adapter Settings displayed at the top of the list.

4. In the following screen, you will see a list of items your system has previously connected to or is currently connected to. This includes Bluetooth connections, ethernet and wifi connections, etc. Right-click on the name of your internet network connection and select Properties.

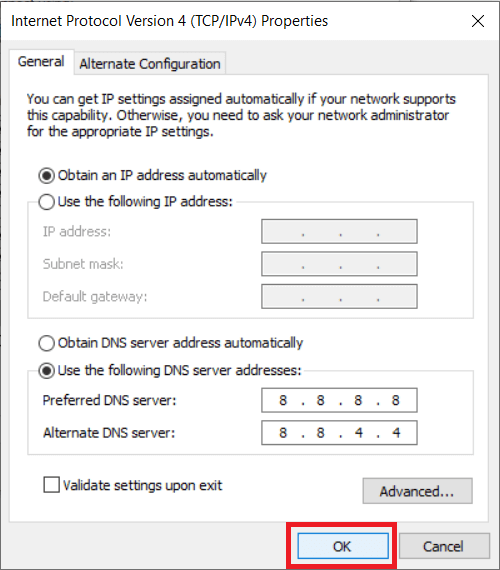
5. From the list of displayed properties, check and select Internet Protocol Version 4 (TCP/IPv4) by clicking on the label. Once selected, click on the Properties button in the same panel.

6. This is where we enter the address of our preferred DNS server. First, enable the option to use a custom DNS server by clicking on “Use the following DNS server addresses”.
7. Now enter your Preferred DNS server and an alternate DNS server.
- To use Google Public DNS, enter the value 8.8.8.8 and 8.8.4.4 under the Preferred DNS server and Alternate DNS server sections respectively.
- To use OpenDNS, enter the values 208.67.222.222 and 208.67.220.220.
- You could also consider trying Cloudflare DNS by entering the following address 1.1.1.1 and 1.0.0.1

Optional Step: You can also have more than two DNS addresses at the same time.
a) To do so, first, click on the “Advanced…” button.

b) Next, switch to the DNS tab and click on Add…

c) In the following pop-up box, type the address of the DNS server you would like to use and press enter (or click on Add).

8. Finally, click on the OK button to save all the changes we just made and then click on Close.
This is the best way to switch to OpenDNS or Google DNS on Windows 10, but if this method is not working for you then you can try the next method.
Method 2: Using Command Prompt
1. We start by running Command Prompt as Administrator. Do so by searching for Command Prompt in the start menu, right-click on the name and select Run As Administrator. Alternatively, press the Windows key + X on your keyboard simultaneously and click on Command Prompt (Admin).

2. Type the command netsh and press enter to change Network Settings. Next, type in interface show interface to obtain the names of your network adapters.

3. Now, to change your DNS server, type the following command and press enter:
interface ip set dns name="Interface-Name" source="static" address="X.X.X.X"
In the above command, first, replace “Interface-Name” with your respective interface name that we obtained in the previous name and next, replace “X.X.X.X” with the address of the DNS server you would like to use. IP addresses of various DNS servers can be found in step 6 of method 1.

4. To add an alternate DNS server address, type the following command and hit enter.
interface ip add dns name=”Interface-Name” addr=”X.X.X.X” index=2
Again, replace “Interface-Name” with the respective name and “X.X.X.X” with the alternate DNS server address.
5. To add extra DNS servers, repeat the last command and replace the index value with 3 and increase the index value by 1 for each new entry. For example interface ip add dns name=”Interface-Name” addr=”X.X.X.X” index=3)
Also Read: How to set up a VPN on Windows 10
Method 3: Using Windows 10 Settings
1. Open up Settings by searching for it in the search bar or pressing Windows key + X on your keyboard and clicking on Settings. (Alternatively, Windows Key + I will directly open settings.)
2. In the Settings windows, look for Network & Internet and click to open.

3. From the list of items displayed in the left panel, click on WiFi or Ethernet depending on how you get your internet connection.
4. Now from the right-side panel, double-click on your network connection name to open options.

5. Locate the heading IP settings and click on the Edit button under the label.

6. From the drop-down that appears, select Manual to be able to manually switch to a different DNS server.

7. Now toggle on the IPv4 switch by clicking on the icon.
![]()
8. Finally, type the IP addresses of your preferred DNS server and an alternate DNS server in the text boxes labeled the same.
(IP addresses of various DNS servers can be found in step 6 of method 1)

9. Click on Save, close settings and perform a computer restart to enjoy a faster web browsing experience on return.
While the easiest of the three, this method does have a couple of drawbacks. The list includes the limited number (only two) of DNS addresses one can enter (the methods discussed earlier let the user add multiple DNS addresses) and the fact that the new configurations only apply when a system restart is performed.
Switch to OpenDNS or Google DNS on Mac
While we are at it, we will also show you how to switch your DNS server on a mac and worry not, the process is a lot simpler compared to the ones on Windows.
1. Click on the Apple logo at the top left corner of your screen to open the Apple menu and proceed by clicking on System Preferences…

2. In the System Preferences menu, look for and click on Network (Should be available in the third row).

3. Over here, click on the Advanced… button located at the bottom right of the Network panel.

4. Switch to the DNS tab and click on the + button below the DNS servers box to add new servers. Type in the IP address of the DNS servers you would like to use and press on OK to finish.
Recommended: Change Your MAC Address on Windows, Linux or Mac
I hope the above tutorial was helpful and using any of the above methods you will be able to easily switch to OpenDNS or Google DNS on Windows 10. And switching to a different DNS server helped you get back to faster internet speeds and reduced your load times (and frustration). If you are facing any issues/difficulty in following the above guide, please get in touch with us in the comments section below and we will try to sort it out for you.


