
Fix WiFi icon is greyed out in Windows 10: If you have recently upgraded to Windows 10 then chances are you might not be able to connect to Wifi, in short, the Wifi icon is greyed out and you don’t see any available WiFi connections. This happens when the Wifi toggle switch built-in into the Windows is greyed out and no matter what you do, you can’t seem to turn on the Wifi. Few users were so frustrated with this issue that they completely reinstalled their OS but that also didn’t seem to help.
![]()
While running the Troubleshooter will only show you the error message “Wireless capability is turned off” which means the physical switch present on the keyboard is turned off and you need to manually turn it ON in order to fix the issue. But sometime this fix also doesn’t seem to work as WiFi is directly disabled from BIOS, hence you see there can be many issues leading to WiFi icon is greyed out. So without wasting any time let’s see how to actually Fix WiFi icon is greyed out in Windows 10 with the below-listed troubleshooting steps.

Note: Make sure Airplane mode is not ON because of which you can’t access the WiFi settings.
Fix WiFi icon is greyed out in Windows 10
Make sure to create a restore point just in case something goes wrong.
Method 1: Turn on the Physical Switch for WiFi on Keyboard
You may have accidentally press the physical button to switch off WiFi or some program may have disabled it. If this is the case you can easily fix WiFi icon is greyed out with just a press of a button. Search your keyboard for the WiFi icon and press it to enable WiFi again. In most cases it’s Fn(Function key) + F2.

Method 2: Enable Your WiFi Connection
1.Right click on the network icon in the notification area.
2.Select Open Network and Sharing Center.

3.Click Change adapter settings.

3.Again right-click on the same adapter and this time choose Enable.

4.Again try to connect to your wireless network and see if you’re able to Fix WiFi icon is greyed out in Windows 10.
Method 3: Run Network Troubleshooter
1.Right-click on the network icon and select Troubleshoot Problems.
![]()
2.Follow the on-screen instructions.
3.Now press Windows key + W and type Troubleshooting hit enter.
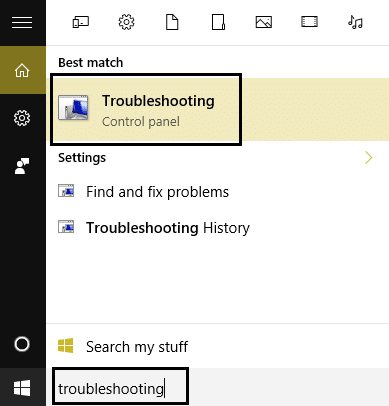
4.From there select “Network and Internet.“

5.In the next screen click on Network Adapter.

6.Follow the on-screen instruction to Fix WiFi icon is greyed out in Windows 10.
Method 4: Turn on Wireless capability
1.Press Windows key + Q and type network and sharing center.
2.Click Change adapter settings.
3.Right-click the WiFi connection and select Properties.

4.Click Configure next to the wireless adapter.

5.Then click the Power Management tab.
6.Uncheck “Allow the computer to turn off this device to save power.”

7.Restart your PC.
Method 5: Enable WiFi from BIOS
Sometimes none of above steps would be useful because the wireless adapter has been disabled from BIOS, in this case, you need to enter BIOS and set it as default, then log in again and go to “Windows Mobility Center” through Control Panel and you can turn the wireless adapter ON/OFF.

If this doesn’t fix then Reset the BIOS to default settings.
Method 6: Turn WiFi On From Windows Mobility Center
1.Press Windows key + Q and type windows mobility center.
2.Inside Windows Mobility Center tun ON your WiFi connection.

3.Restart your PC to save changes.
Method 7: Enable the WLAN AutoConfig Service
1.Press Windows Key + R then type services.msc and hit Enter.

2.Find the WLAN AutoConfig Service then right-click on it and select Properties.
3.Make sure the Startup type is set to Automatic and the service is running, if not then click Start.

4.Click Apply followed by OK.
5.Reboot your PC to save changes.
Method 8: Registry Fix
1.Press Windows Keys + R then type regedit and hit Enter to open Registry Editor.

2.Navigate to the following registry key:
Computer\HKEY_CURRENT_USER\Software\Classes\Local Settings\Software\Microsoft\Windows\CurrentVersion\TrayNotify
3.Make sure you have highlighted TrayNotify in the left window pane and then in the
right window find Iconstreams and PastIconStream registry keys.
4.Once found, right-click on each of them and select Delete.
5.Reboot your PC to save changes.
Method 9: Uninstall Wireless Network Adapter Drivers
1.Press Windows Key + R then type “devmgmt.msc” and hit Enter to open Device Manager.

2.Expand Network Adapters and find your network adapter name.
3.Make sure you note down the adapter name just in case something goes wrong.
4.Right-click on your network adapter and uninstall it.

5.If ask for confirmation select Yes.
6.Restart your PC and try to reconnect to your network.
7.If you’re not able to connect to your network then it means the driver software isn’t automatically installed.
8.Now you need to visit your manufacturer’s website and download the driver from there.

9.Install the driver and reboot your PC.
By reinstalling the network adapter, you can Fix WiFi icon is greyed out in Windows 10.
Method 10: Update BIOS
Performing BIOS update is a critical task and if something goes wrong it can seriously damage your system, therefore, an expert supervision is recommended.
1.The first step is to identify your BIOS version, to do so press Windows Key + R then type “msinfo32” (without quotes) and hit enter to open System Information.

2.Once the System Information window opens locate BIOS Version/Date then note down the manufacturer and BIOS version.

3.Next, go to your manufacturer’s website for e.g in my case it’s Dell so I will go to Dell website and then I will enter my computer serial number or click on the auto detect option.
4.Now from the list of drivers shown I will click on BIOS and will download the recommended update.
Note: Do not turn off your computer or disconnect from your power source while updating the BIOS or you may harm your computer. During the update, your computer will restart and you will briefly see a black screen.
5.Once the file is downloaded, just double click on the Exe file to run it.
6.Finally, you have updated your BIOS and this may be able to Fix WiFi icon is greyed out or WiFi Option Not Showing in Windows 10.
Recommended for you:
- Fix Host Process for Windows Services has stopped working
- Fix The application has failed to start because the side-by-side configuration is incorrect
- How to fix Can’t connect to this network error
- Fix WiFi doesn’t have a valid IP configuration error
That’s it you have successfully Fix WiFi icon is greyed out in Windows 10 but if you still have any questions regarding this guide then feel free to ask them in the comment’s section.


Tried them all. Nothing worked.
Thank you!! Was trying so many different sites since last 2 hours but had the best fix
Just create a new Admin profile and use that. Works all the tie
Thank you so much . Very helpful . Choice 9 finally work !
Thanks, you just save me from thinking it was a hardware problem
We should not allow to change the network selection of windows local user.
Network Selection: LAN and WiFi