
Fix Background Intelligent Transfer Service won’t start: For Windows Update to function Background Intelligent Transfer Service (BITS) is very important as it basically acts as a download manager for Windows Update. BITS transfers files between client and server in the background and also provide progress information when needed. Now if you are having issues in downloading updates then it will be most probably caused because of BITS. Either the configuration of BITS is corrupted or BITS is not able to start.

If you will go to services window you will find out that Background Intelligent Transfer Service (BITS) won’t start. These are the type of errors which you will face while trying to start BITS:
Background intelligent transfer service did not start properly
Background intelligent transfer service will not start
Background intelligent transfer service has stopped working
Windows could not start the Background Intelligent Transfer service on the local computer. For more information review the system event log. If this is a non-Microsoft service contact the service vendor and refer to service-specific error code -2147024894. (0x80070002)
Now if you are facing a similar issue with BITS or with Windows update then this post is for you. Without wasting any time let’s see how to actually Fix Background Intelligent Transfer Service won’t start issue with the below-listed troubleshooting guide.
Fix Background Intelligent Transfer Service won’t start
Make sure to create a restore point just in case something goes wrong.
Method 1: Start BITS from Services
1.Press Windows Keys + R then type services.msc and hit Enter.

2.Now find BITS and then double click on it.
3.Make sure the Startup type is set to Automatic and the service is running, if not then click on Start button.

4.Click Apply followed by OK.
5.Reboot your PC and again try to update Windows.
Method 2: Enable dependent Services
1.Press Windows Keys + R then type services.msc and hit Enter.
2.Now find the below-listed services and double click on each of them to change their properties:
Terminal Services
Remote Procedure Call (RPC)
System Event Notification
Windows Management Instrumentation Driver Extensions
COM+ Event System
DCOM Server Process Launcher
![]()
3.Make sure their Startup type is set to Automatic and the above services are running, if not then click on Start button.

4.Click Apply followed by OK.
5.Reboot your PC to save changes and see if you’re able to Fix Background Intelligent Transfer Service won’t start.
Method 3: Run System File Checker
1.Press Windows Key + X then click on Command Prompt(Admin).

2.Now type the following in the cmd and hit enter:
Sfc /scannow
sfc /scannow /offbootdir=c:\ /offwindir=c:\windows (If above fails then try this one)

3.Wait for the above process to finish and once done restart your PC.
Method 4: Run Windows Update Troubleshooter
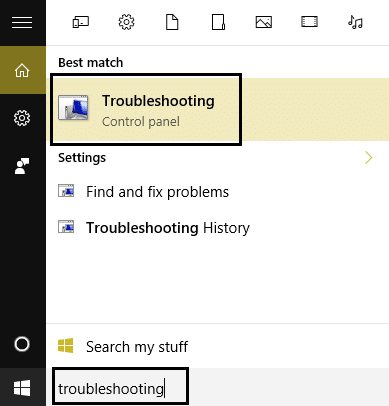
1.Type “troubleshooting” in Windows Search bar and click on Troubleshooting.
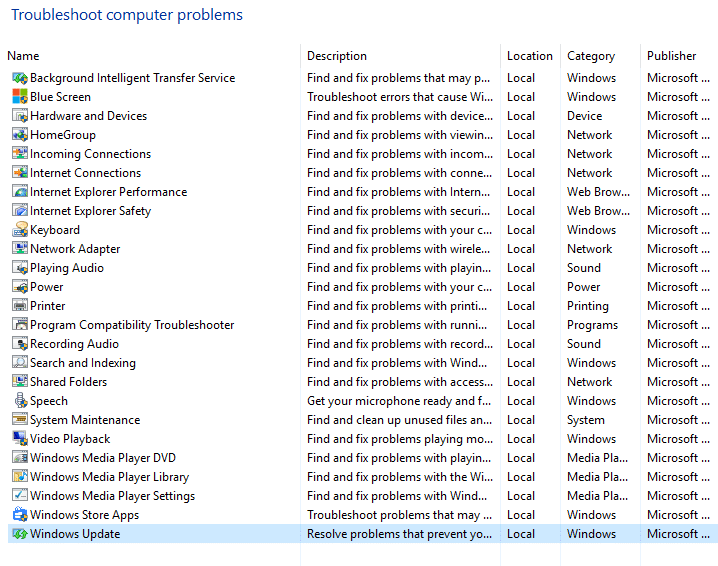
2.Next, from the left window pane select View all.
3.Then from the Troubleshoot computer problems list select Windows Update.
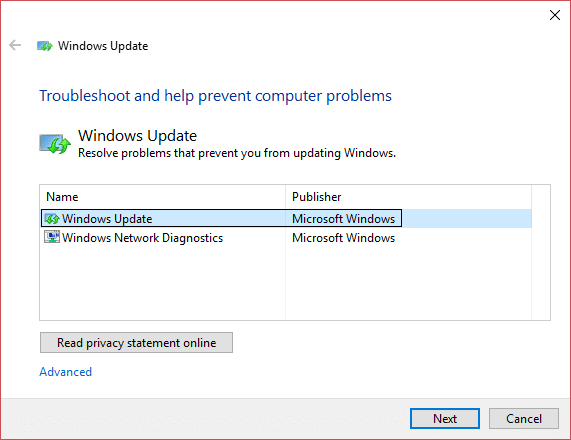
4.Follow on-screen instructions and let the Windows Update Troubleshoot run.
5.Restart your PC and see if you are able to Fix Background Intelligent Transfer Service won’t start.
Method 5: Run DISM Tool
1.Press Windows Key + X and select Command Prompt(Admin).
2.Type the following command in cmd and hit enter after each one:
a) Dism /Online /Cleanup-Image /CheckHealth
b) Dism /Online /Cleanup-Image /ScanHealth
c) Dism /Online /Cleanup-Image /RestoreHealth

3.Let the DISM command run and wait for it to finish.
4. If the above command doesn’t work then try on the below:
Dism /Image:C:\offline /Cleanup-Image /RestoreHealth /Source:c:\test\mount\windows
Dism /Online /Cleanup-Image /RestoreHealth /Source:c:\test\mount\windows /LimitAccess
Note: Replace the C:\RepairSource\Windows with the location of your repair source (Windows Installation or Recovery Disc).
5.Reboot your PC to save changes and see if you’re able to Fix Background Intelligent Transfer Service won’t start, if not then continue to the next method.
Method 6: Reset the Download Queue
1.Press Windows Key + R then type the following and hit Enter:
%ALLUSERSPROFILE%\Application Data\Microsoft\Network\Downloader\

2.Now look for qmgr0.dat and qmgr1.dat, if found make sure to delete these files.
3.Press Windows Key + X then select Command Prompt (Admin).
4.Type the following command into cmd and hit Enter:
net start bits

5.Again try to update window and see if it works.
Method 7: Registry Fix
1.Press Windows Key + R then type regedit and hit Enter to open Registry Editor.

2.Navigate to the following registry key:
HKEY_LOCAL_MACHINE\SYSTEM\CurrentControlSet\Control\BackupRestore\FilesNotToBackup
3.If the above key exists then continues, if not then right-click on BackupRestore and select New > Key.

4.Type FilesNotToBackup and then hit Enter.
5.Exit Registry Editor and press Windows Key + R then type services.msc and hit Enter.
6.Find BITS and double-click on it. Then in the General tab, click on start.
Recommended for you:
- Fix Can’t adjust screen brightness in Windows 10
- How To Fix Windows Update Error 80246008
- Fix Network Adapter Error Code 31 in Device Manager
- Fix ERR_CONNECTION_ABORTED in Chrome
That’s it you have successfully Fix Background Intelligent Transfer Service won’t start but if you still have any queries regarding this guide then feel free to ask them in the comment’s section.


