
If you go to Windows 10 Settings, then navigate to Update & Security, but suddenly an error message pops up saying “Your PC isn’t connected to the internet. To get started, connect to the internet and try again.” Now since you must be already connected to the Internet, how come Windows don’t recognize this and more importantly how to fix this annoying issue, we will obviously discuss all of this shortly. The error is not limited to Windows 10 Settings app as you could face a similar error while trying to access the Windows App Store.

Now to verify if you can access the Internet, you could open any browser and visit any webpage to see if you’re connected to the Internet or not. Well, obviously you will be able to browse web pages normally, and all the other application or programs will be able to access the Internet. Why do the Windows don’t recognize this, and why does the error message keep popping up? Now there is no clear answer as to why but there are various fixes that you could try to resolve the error message and again access your system normally. So without wasting any time let’s see how to actually Fix Your PC isn’t connected to the internet error while trying to access Windows App Store or Windows Update with the help of below-listed troubleshooting guide.
Your PC Isn’t Connected to the Internet Error [SOLVED]
Make sure to create a restore point just in case something goes wrong.
If you face issues with Windows Store App then directly try method 6 (Reset Windows Store Cache), if it doesn’t fix your issue then again start with the below method.
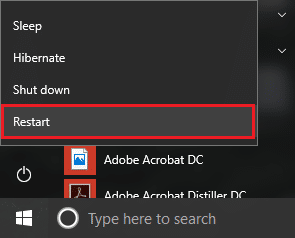
Method 1: Restart your PC
Sometimes a normal Restart can fix the internet connectivity issue. So open Start Menu then click on Power icon and select restart. Wait for the system to reboot and then again try to access Windows Update or open Windows 10 Store App and see if you can Fix Your PC isn’t connected to the internet error.
Method 2: Temporarily Disable Antivirus and Firewall
Sometimes the Antivirus program can cause an error, and to verify this is not the case here, you need to disable your antivirus for a limited time so that you can check if the error still appears when the antivirus is off.
1. Right-click on the Antivirus Program icon from the system tray and select Disable.

2. Next, select the time frame for which the Antivirus will remain disabled.

Note: Choose the smallest amount of time possible, for example, 15 minutes or 30 minutes.
3. Once done, again try to connect to open Google Chrome and check if the error resolves or not.
4. Search for the control panel from the Start Menu search bar and click on it to open the Control Panel.
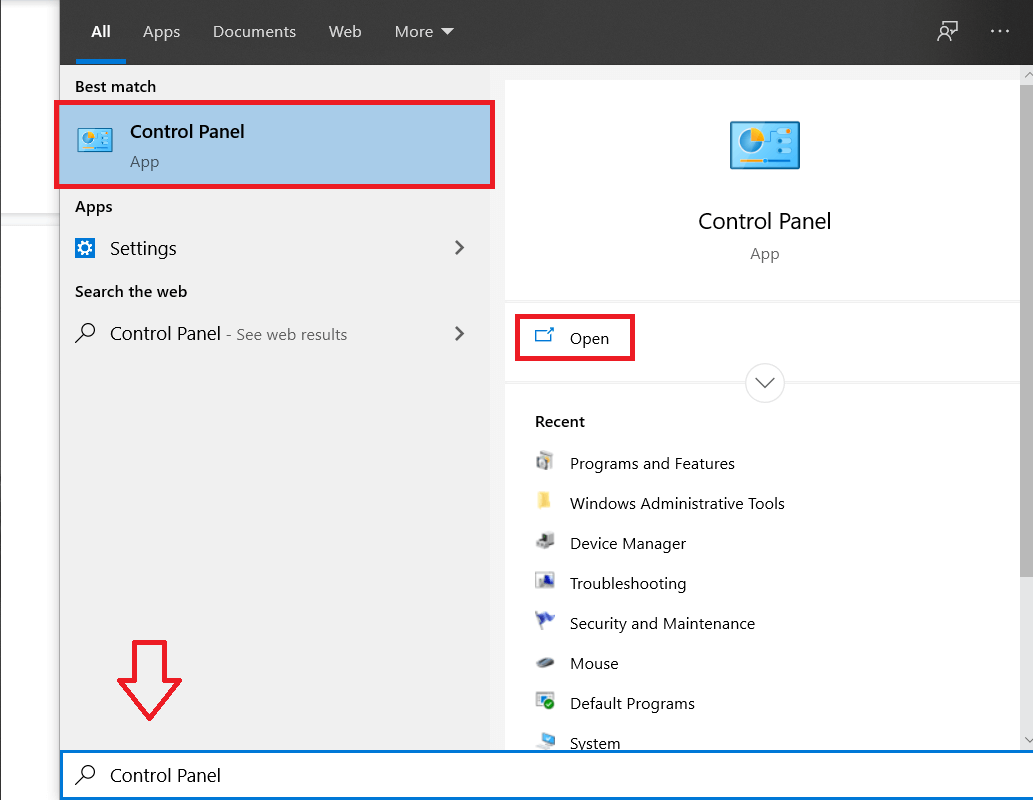
5. Next, click on System and Security then click on Windows Firewall.

6. Now from the left window pane click on Turn Windows Firewall on or off.

7. Select Turn off Windows Firewall and restart your PC.

Again try to open Google Chrome and visit the web page, which was earlier showing the error. If the above method doesn’t work, please follow the same steps to turn on your Firewall again.
Method 3: Flush DNS and Reset TCP/IP
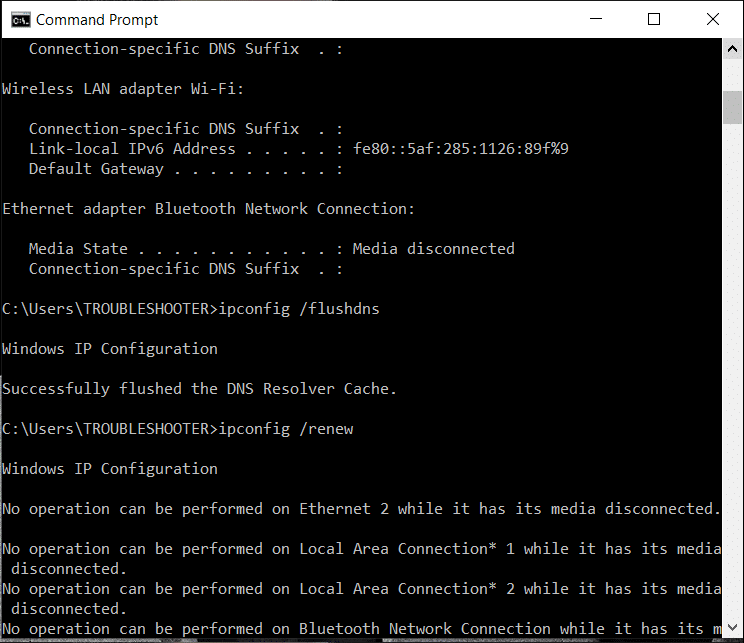
1. Open Command Prompt. The user can perform this step by searching for ‘cmd’ and then press Enter.

2. Now type the following command and press Enter after each one:
ipconfig /release
ipconfig /flushdns
ipconfig /renew
3. Again, open Admin Command Prompt and type the following and hit enter after each one:
ipconfig /flushdns
nbtstat –r
netsh int ip reset
netsh winsock reset

4. Reboot to apply changes. Flushing DNS seems to Fix Your PC isn’t connected to the internet error.
Method 4: Uncheck Proxy
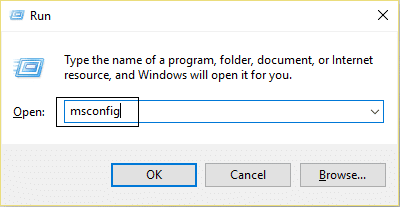
1. Press Windows Key + R then type msconfig and click OK.
2. Select the boot tab and check Safe Boot. Then click Apply and OK.

3. Restart your PC and once restarted again press Windows Key + R then type inetcpl.cpl.

4. Hit Ok to open internet properties and from there select Connections.
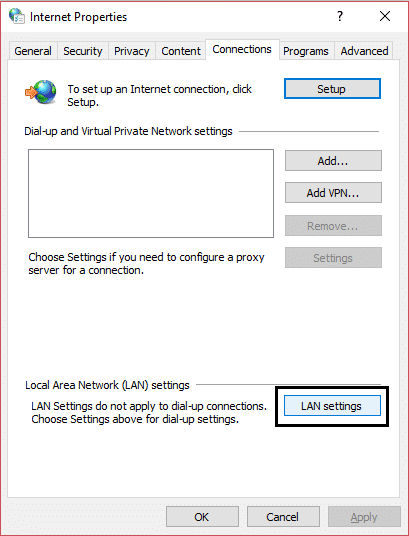
5. Uncheck “Use a proxy server for your LAN“. Then click OK.

6. Again open msconfig and uncheck Safe boot option then click apply and OK.
7. Restart your PC, and you may be able to Fix Your PC isn’t connected to the internet error.
Method 5: Restart your Router
Resetting the modem and your router can help fix the network connection in some cases. This helps create a new connection to your Internet service provider (ISP). When you do this, everyone that is connected to your Wi-Fi network will be temporarily disconnected.

Method 6: Reset Windows Store Cache
1. Press Windows Key + R then type “wsreset.exe” and hit enter.
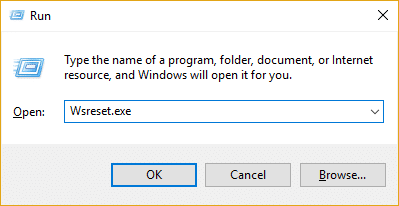
2. Let the above command run which will reset your Windows Store cache.
3. When this is done restart your PC to save changes.
Method 7: Adjust Date/Time
1. Press Windows Key + I to open Settings and then select Time & Language.
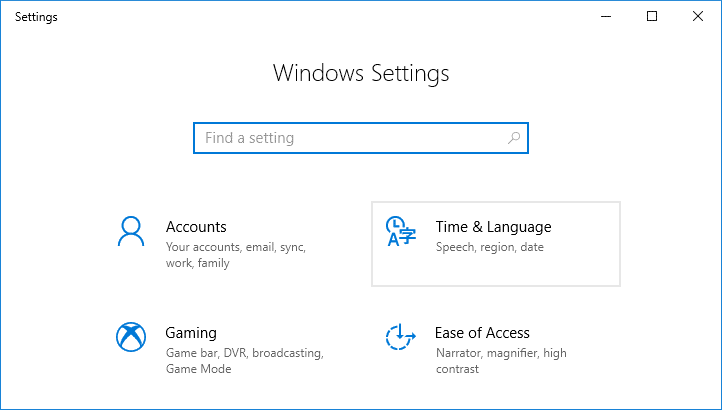
2. Then find the Additional date, time, & regional settings.

3. Now click on Date and Time then select the Internet Time tab.

4. Next, click on Change settings and make sure “Synchronize with an Internet time server” is checked then click on Update Now.

5. Click OK then click Apply followed by OK. Close the control panel.
6. In settings window under Date & time, make sure “Set time automatically” is enabled.

7. Disable “Set time zone automatically“ and then select your desired Time zone.
8. Close everything and restart your PC.
Method 8: Run Network Troubleshooter
1. Right-click on the network icon and select Troubleshoot problems.
![]()
2. Follow the on-screen instructions.
3. Open Control Panel and search Troubleshooting in the Search Bar on the top right side and click on Troubleshooting.
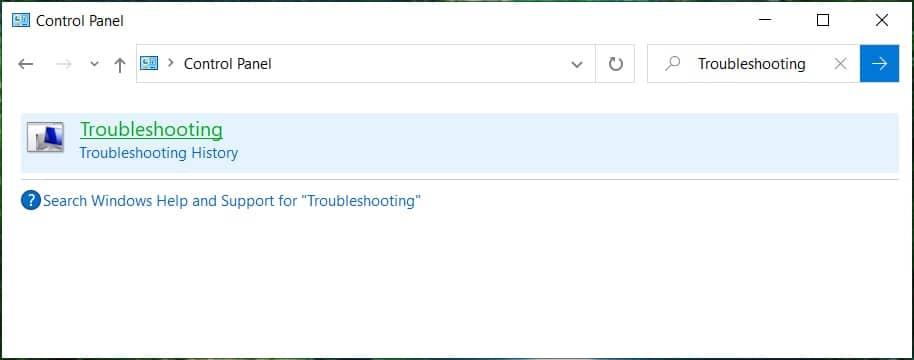
4. From there, select “Network and Internet.”

5. In the next screen, click on Network Adapter.

6. Follow the on-screen instruction to Fix Your PC isn’t connected to the internet error.
Method 9: Diagnose Network Manually
1. Open Command Prompt. The user can perform this step by searching for ‘cmd’ and then press Enter.
2. Type the following command in cmd and hit Enter after each one:
reg delete “HKCU\Software\Microsoft\WindowsSelfHost” /f
reg delete “HKLM\Software\Microsoft\WindowsSelfHost” /f

3. Reboot your PC and see if you can resolve the error message, if not then continue.
4. Again open Command Prompt with admin rights and copy all the below commands then paste it into cmd and hit Enter:
sc config BFE start= auto
sc config Dhcp start= auto
sc config DiagTrack start= auto
sc config DPS start= auto
sc config lmhosts start= auto
sc config MpsSvc start= auto
sc config netprofm start= auto
sc config NlaSvc start= auto
sc config nsi start= auto
sc config Wcmsvc start= auto
sc config WinHttpAutoProxySvc start= auto
sc config Winmgmt start= auto
sc config NcbService start= demand
sc config Netman start= demand
sc config netprofm start= demand
sc config WinHttpAutoProxySvc start= demand
sc config WlanSvc start= demand
sc config WwanSvc start= demand
net start DPS
net start DiagTrack
net start BFE
net start MpsSvc
net start nsi
net start NlaSvc
net start Dhcp
net start BITS
net start wuauserv
net start WinHttpAutoProxySvc
net start Wcmsvc
5. Wait for the above commands to finish and then reboot your PC to save changes.
Method 10: Disable and then Re-enable Network Adapter
1. Press Windows Key + R then type ncpa.cpl and hit Enter.

2. Right-click on your wireless adapter and select Disable.

3. Again right-click on the same adapter and this time choose Enable.

4. Restart your and again try to connect to your wireless network and see if the issue is resolved or not.
Method 11: Reset Internet Explorer
1. Press Windows Key + R then type inetcpl.cpl and hit enter to open Internet Properties.
2. Navigate to the Advanced then click the Reset button in the bottom under Reset Internet Explorer settings.

3. In the next window that comes up, make sure to select the option “Delete personal settings option.”

4. Then click Reset and wait for the process to finish.
5. Reboot your PC to save changes and again try to access the web page.
Method 12: Perform Clean Boot
Sometimes 3rd party software can conflict with Windows Network Connection and therefore, you should not be able to use the internet. To fix your PC isn’t connected to the internet error, you need to perform a clean boot on your PC and diagnose the issue step by step.

Method 13: Create New User Account
1. Press Windows Key + I to open Settings and then click Accounts.

2. Click on Family & other people tab in the left-hand menu and click Add someone else to this PC under Other people.

3. Click, I don’t have this person’s sign-in information in the bottom.

4. Select Add a user without a Microsoft account in the bottom.

5. Now type the username and password for the new account and click Next.

Method 14: Repair Install Windows 10
This method is the last resort because if nothing works out, then, this method will surely repair all problems with your PC. Repair Install using an in-place upgrade to repair issues with the system without deleting user data present on the system. So follow this article to see How to Repair Install Windows 10 Easily.
Recommended:
- Fix No Sound From Laptop Speakers
- Fix MSCONFIG Won’t Save Changes on Windows 10
- How to Fix Windows Update error 0x80248007
- Fix Unable to change process priority in Task Manager
That’s it you have successfully Fix Your PC Isn’t Connected to the Internet Error [SOLVED] but if you still, have any queries regarding this post feel free to ask them in the comment’s section.


