
The in-built Windows Defender does not Start or won’t turn on issue appears majorly due to conflict with another antivirus software installed on your PC. If you are stuck with it, then you are on the right page.
Fix Windows Defender Does Not Start or Won’t Turn On
It usually appears in 2 forms:
- Windows Defender is automatically turned off and when you try to enable it, you won’t be able to Start Windows Defender at all. When you click on “Turn ON” option, you will receive an error message “This app has been turned off and isn’t monitoring your computer.”

- If you go to Settings > Update & Security > Windows Defender, you will see that the Real-time protection in Windows Defender is turned on, but it’s greyed out.

In some cases, the issue is caused because of the incorrect date and time of the system or an outdated Windows OS.
Method 1: Disable third-party Antivirus Service
1. Right-click on the Antivirus Program icon from the system tray and select Disable.

2. Next, select the time frame for which the Antivirus will remain disabled.

Note: Choose the smallest amount of time possible, for example, 15 minutes or 30 minutes.
3. Once is done, again try to access Windows Defender and check if you’re able to Fix Windows Defender Does Not Start Issue.
Method 2: Set Correct Date & Time
1. Click on the date and time on the taskbar and then select “Date and time settings.”
2. If on Windows 10, make “Set Time Automatically” to “on.”

3. For others, click on “Internet Time” and tick mark on “Automatically synchronize with an Internet time server.”

4. Select Server “time.windows.com” and click update and “OK”. You don’t need to complete the update. Just click, OK.
Again check if you can Fix Windows Defender Does Not Start issue or not then continue with the next method.
Method 3: Start Windows Defender Services
1. Press Windows Key + R then type services.msc and hit Enter.

2. Find the following services in the Services window:
Windows Defender Antivirus Network Inspection Service
Windows Defender Antivirus Service
Windows Defender Security Center Service
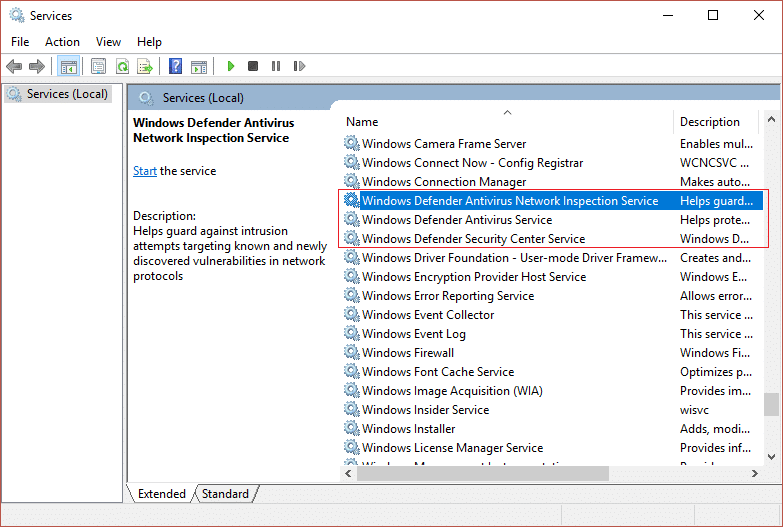
3. Double-click on each of them and make sure their Startup type is set to Automatic and click Start if the services are not already running.

4. Click Apply, followed by OK.
5. Reboot your PC to save changes.
Method 4: Enable Windows Defender from Registry Editor
1. Press Windows Key + R then type regedit and hit Enter to open Registry Editor.

2. Navigate to the following registry key:
HKEY_LOCAL_MACHINE\SOFTWARE\Policies\Microsoft\Windows Defender
3. Make sure you have highlighted Windows Defender in the left window pane and then double click on DisableAntiSpyware DWORD in the right window pane.

Note: If you don’t find the Windows Defender key and DisableAntiSpyware DWORD, you need to manually create them.
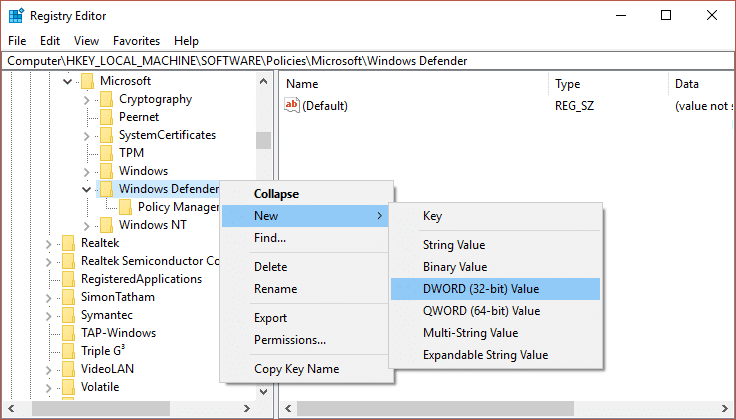
4. In the Value data box of DisableAntiSpyware DWORD, change the value from 1 to 0.
1: Disable Windows Defender
0: Enable Windows Defender
5. Reboot your PC to save changes and see if you can Fix Windows Defender Does Not Start.
Method 5: Run SFC and DISM Tool
1. Open Command Prompt. The user can perform this step by searching for ‘cmd’ and then press Enter.

2. Now type the following in the cmd and hit enter:
Sfc /scannow
sfc /scannow /offbootdir=c:\ /offwindir=c:\windows (If above fails then try this one)

3. Wait for the above process to finish and once done, restart your PC.
4. Again open cmd and type the following command and hit enter after each one:
Dism /Online /Cleanup-Image /CheckHealth
Dism /Online /Cleanup-Image /ScanHealth
Dism /Online /Cleanup-Image /RestoreHealth

5. Let the DISM command run and wait for it to finish.
6. If the above command doesn’t work, then try on the below:
Dism /Image:C:\offline /Cleanup-Image /RestoreHealth /Source:c:\test\mount\windows
Dism /Online /Cleanup-Image /RestoreHealth /Source:c:\test\mount\windows /LimitAccess
Note: Replace the C:\RepairSource\Windows with your repair source (Windows Installation or Recovery Disc).
7. Reboot your PC to save changes and see if you’re able to Fix Windows Defender Does Not Start.
Method 6: Run Windows Update Troubleshooter
1. Open Control Panel and then search Troubleshooting in the Search Bar on the top right side and click on Troubleshooting.
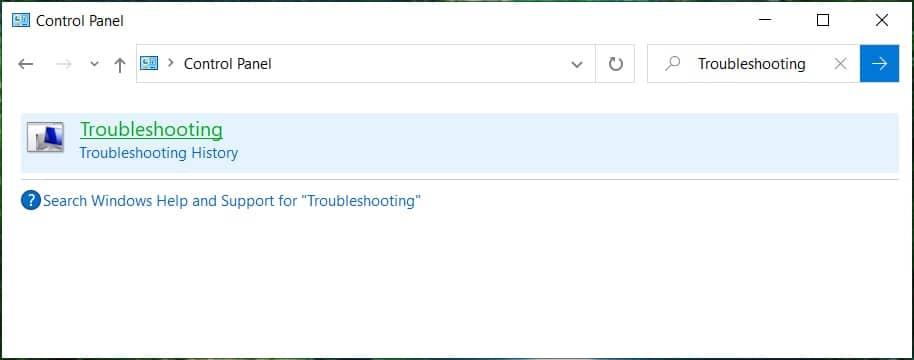
2. Next, from the left window pane select View all.
3. Then from the Troubleshoot computer problems list select Windows Store Apps.
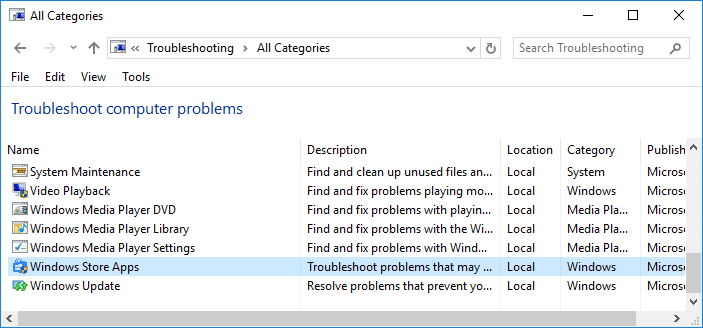
4. Follow on-screen instruction and let the Windows Update Troubleshoot run.
5. Restart your PC, and you may be able to Fix Windows Defender Does Not Start.
Method 7: Uncheck Proxy
1. Press Windows Key + R then type inetcpl.cpl and hit enter to open Internet Properties.

2. Next, Go to Connections tab and select LAN settings.

3. Uncheck Use a Proxy Server for your LAN and make sure “Automatically detect settings” is checked.

4. Click Ok then Apply and reboot your PC.
Method 8: Run Windows Update
1. Press Windows Key + I to open Settings then click on Update & Security.
![]()
2. From the left-hand menu select Windows Update.
3. Now under Update Settings in the right window pane click on Advanced options.

4. Uncheck the option “Give me updates for other Microsoft products when I update Windows.“

5. Restart your Windows and again check for updates.
6. You may have to run Windows Update more than once to complete the update process successfully.
7. Now as soon as you get the message “Your device is up to date“, again go back to Settings then click Advanced options and checkmark “Give me updates for other Microsoft products when I update Windows.”
8. Again check for updates and you should be able to install Windows Defender Update.
Method 9: Manually Update Windows Defender
If Windows Update cannot download Definition update for Windows Defender, you need to manually update Windows Defender to Fix Windows Defender Does Not Start. Read pur guide here to Perform Windows Defender Definition Update.
Method 10: Run CCleaner and Malwarebytes
1. Download and install CCleaner & Malwarebytes.
2. Run Malwarebytes and let it scan your system for harmful files. If malware is found it will automatically remove them.

3. Now run CCleaner and select Custom Clean.
4. Under Custom Clean, select the Windows tab and checkmark defaults and click Analyze.
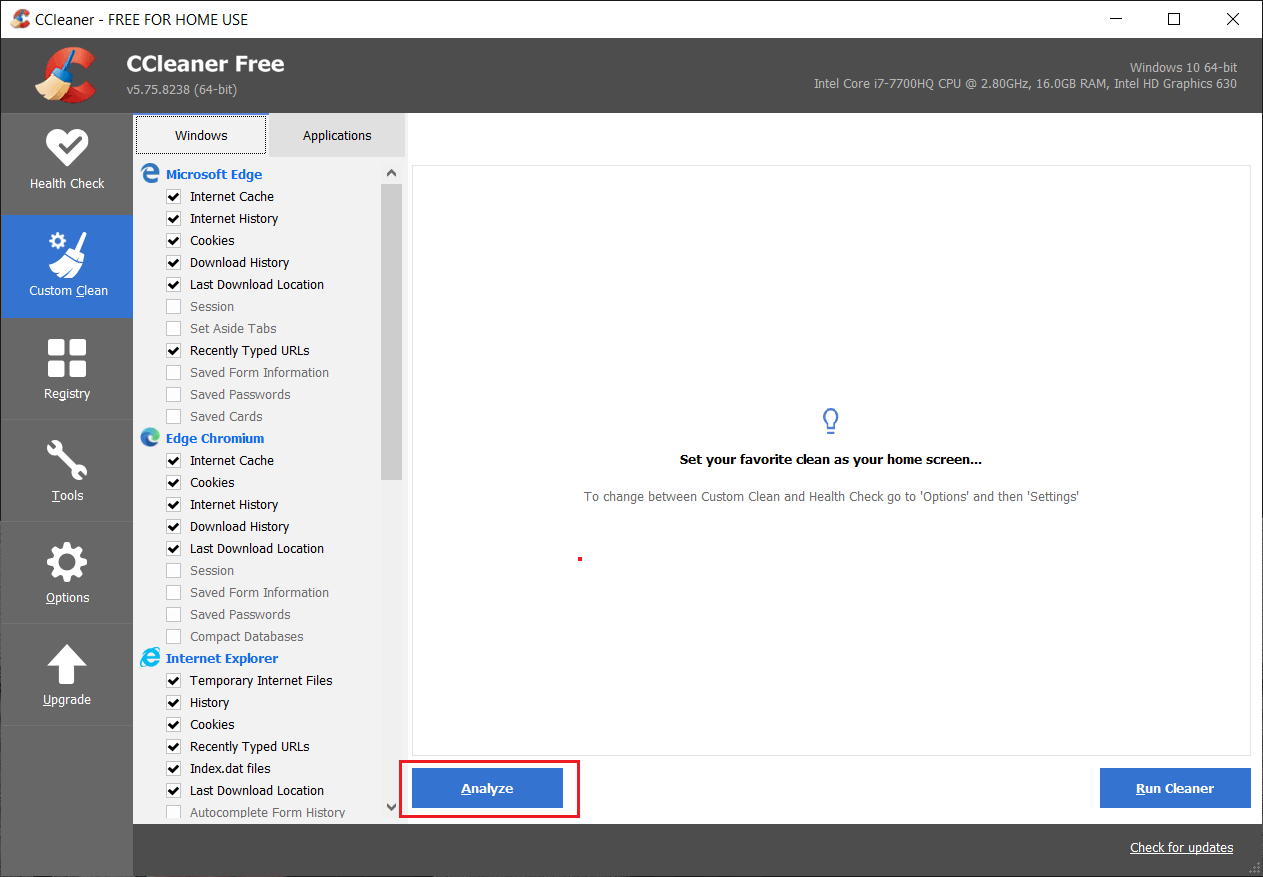
5. Once Analyze is complete, make sure you’re certain to remove the files to be deleted.
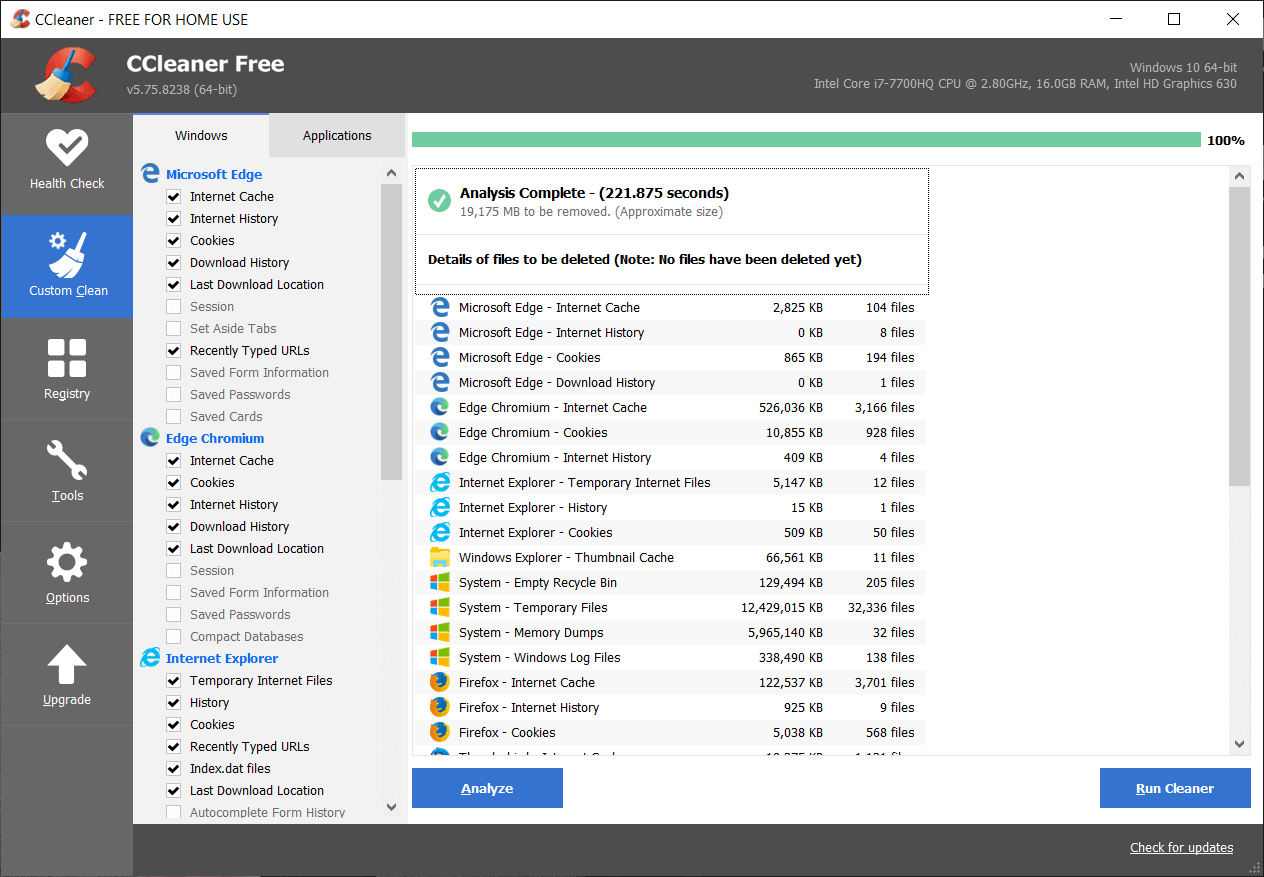
6. Finally, click on the Run Cleaner button and let CCleaner run its course.
7. To further clean your system, select the Registry tab, and ensure the following are checked:
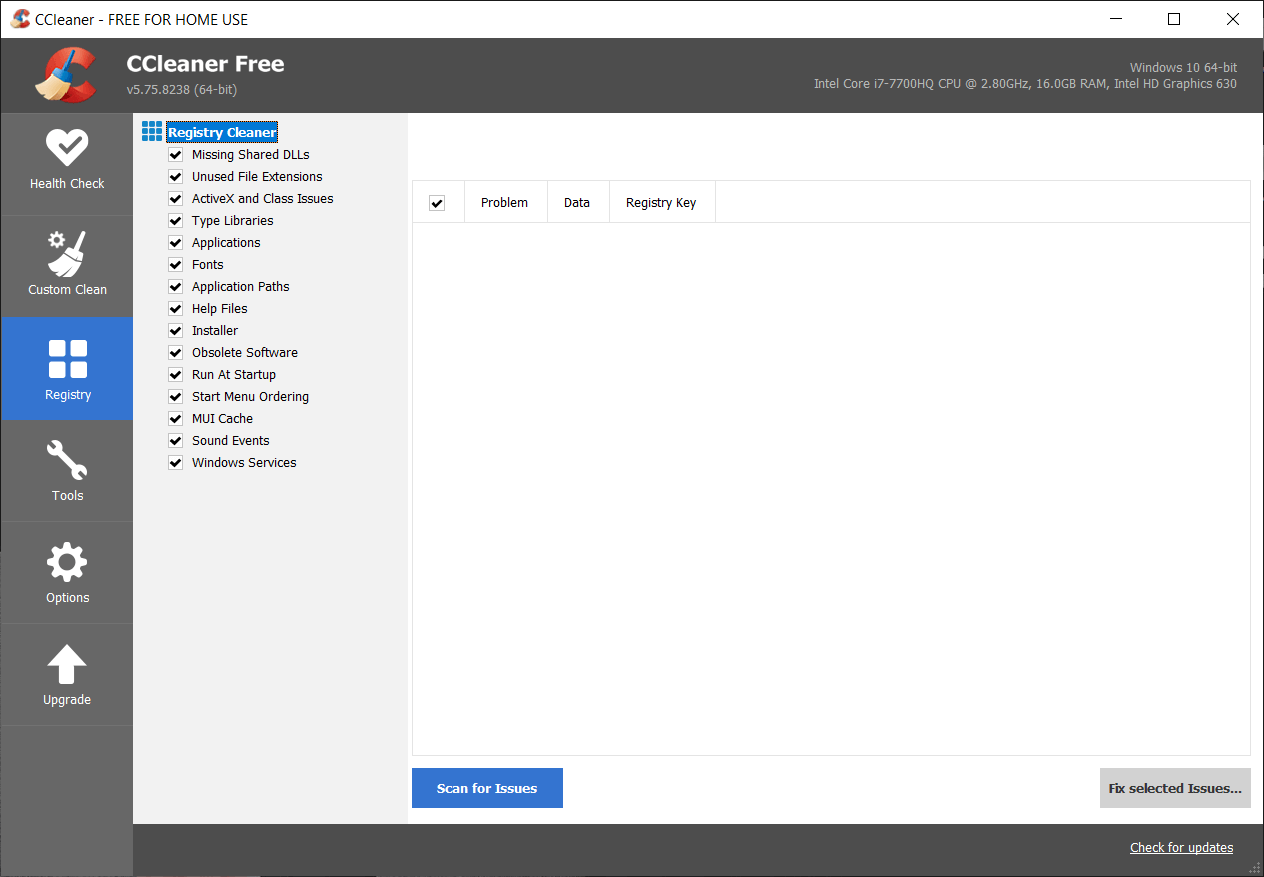
8. Click on the Scan for Issues button and allow CCleaner to scan, then click on the Fix Selected Issues button.
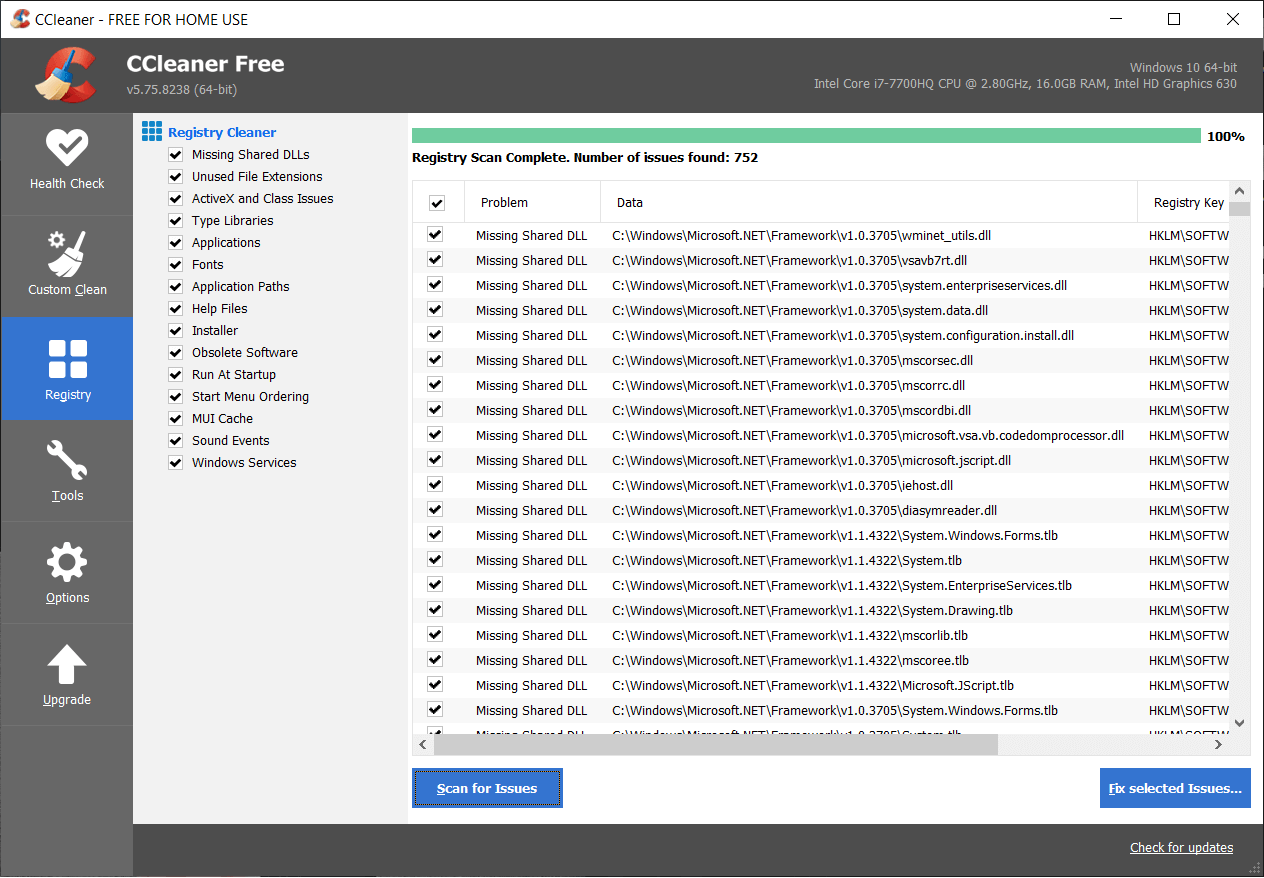
9. When CCleaner asks “Do you want backup changes to the registry?” select Yes.
10. Once your backup has completed, click on the Fix All Selected Issues button.
11. Restart your PC to save changes.
Method 11: Refresh or Reset your PC
1. Press Windows Key + I to open Settings then select Update & Security.
2. From the left-hand menu select Recovery and click on “Get started” under Reset this PC.

3. Select the option to Keep my files.

4. Follow the instructions on the screen to complete the process.
5. This will take some time, and your computer will restart.
Method 12: Repair Install Windows 10
This method is the last resort because if nothing works out then, this method will surely repair all problems with your PC. Repair Install uses an in-place upgrade to repair issues with the system without deleting user data present on the system. So follow this article to see How to Repair Install Windows 10 Easily.
Recommended for you: Fix Window Defender Error 0x800705b4
That’s it you have successfully fix Windows Defender Does Not Start in Windows 10 but if you still have any questions regarding this guide then feel free to ask them in the comment section.


Windows 10 does not look like the pictures at the start of this article