
If you use File history, then you may have received the following warning “Reconnect your drive. Your file will be temporarily copied to your hard drive until you reconnect you File History drive and run a backup.” File history is a backup tool introduced in Windows 8 and Windows 10, which allows for easy automated backups of your personal files (data) on an external drive. Any time your personal files change, there will be a copy stored on the external drive. File History periodically scans your system for changes and copies the changed files to the external drive.

Reconnect your drive (Important)
Your File History drive was
disconnected for too long. Reconnect
it and then tap or click to keep saving
copies of your files.
The problem with System Restore or existing Windows backups was that they leave your personal files from the backups, leading to data loss of your personal files and folders. So this is why the concept of File History was introduced in Windows 8 to better protect the system and your personal file too.

Reconnect your drive warning may occur if you have removed the external hard drive for too long on which your personal files are backed up, or it doesn’t have enough space to save temporary versions of your files. This warning message may also occur if the File history is disabled or turned off. So without wasting any time let’s see how to actually Fix Reconnect your drive warning on Windows 10 with the below-listed troubleshooting guide.
Fix Reconnect your drive warning on Windows 10
Make sure to create a restore point just in case something goes wrong.
Method 1: Run the Hardware Troubleshooter
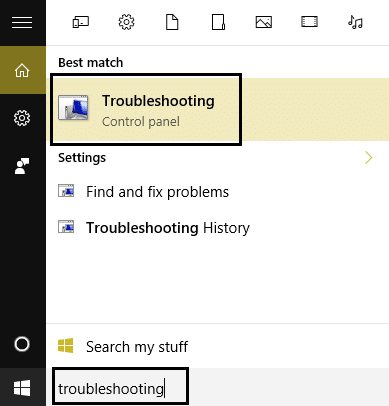
1. Type troubleshooting in the Windows Search bar and click on Troubleshooting.
2. Next, click on Hardware and Sound.

3.Then from the list select Hardware and Devices.

4. Follow on-screen instructions to run the troubleshooter.
5. After running Troubleshooter again try to connect your drive and see if you’re able to Fix Reconnect your drive warning on Windows 10.
Method 2: Enable File History
1. Press Windows Key + I to open Settings then click Update & Security.
![]()
2. From the left-hand side, menu clicks Backup.
3. Under “Backup using File History” click the + sign next to Add a drive.

4. Make sure to connect the external drive and click that drive in the above prompt you will get when you click Add a drive option.
5. As soon as you select the drive File History will begin archiving the data and an ON/OFF toggle will start appearing under a new heading “Automatically back up my file.”

6. Now you could wait for the next scheduled backup to run or you could manually run the backup.
7. So click More option below Automatically backup my file in Backup Settings and click Backup now.

Method 3: Run Chkdsk on External Drive
1. Note the driver letter in which Reconnect your drive warning occurs; for example, in this example, the drive letter is H.
2. Right-click on the Windows button (Start Menu) and select “Command Prompt(Admin).”

3. Type the command in cmd: chkdsk (drive letter:) /r (Change drive letter with your own). For Example, the drive letter is our example is “I:” hence the command should be chkdsk I: /r

4. If you are asked to recover files, select Yes.
5. If the above command doesn’t work try: chkdsk I: /f /r /x
Note: In the above command I: is the drive on which we want to check disk, /f stands for a flag which chkdsk the permission to fix any errors associated with the drive, /r let chkdsk search for bad sectors and perform recovery and /x instructs the check disk to dismount the drive before beginning the process.
In many cases, only the windows check disk utility seems to Fix Reconnect your drive warning on Windows 10 but if it didn’t work don’t worry continue to next method.
Method 4: Delete File History Configuration Files
1. Press Windows Key + R then type the following command and hit Enter:
%LOCALAPPDATA%\Microsoft\Windows\FileHistory

2. If you not able to browse to the above folder, then manually navigate to:
C:\Users\your user folder\AppData\Local\Microsoft\Windows\FileHistory\
3. Now under FileHistory Folder you will see two folders one Configuration and other one Data, make sure to delete the contents of both of these folders. (Do not delete the folder itself, only the content inside these folders).

4. Reboot your PC to save changes.
5. Again turn on the file history and add the external drive again. This would fix the issue, and you could run the backup as it should.
6. If this doesn’t help then again go back to the file history folder and rename it to FileHistory.old and again try to add the external drive in File History Settings.
Method 5: Format your external hard drive and run File History again
1. Press Windows Key + R then type diskmgmt.msc and hit Enter to open Disk Management.

2. If you’re not able to access disk management via the above method, then press Windows Key + X and select Control Panel.

3. Type Administrative in the Control Panel search and select Administrative Tools.

4. Once inside Administrative Tools, double click on Computer Management.
5. Now from the left-hand menu, select Disk Management.
6. Find your SD card or USB drive then right-click on it and select Format.

7. Follow-on-screen option and make sure to uncheck the Quick Format option.
8. Now again follow method 2 to run File History backup.
This should help you resolve your drive warning on Windows 10 but if you are still not able to format the drive, then continue with the next method.
Method 6: Add a different drive to File History
1. Press Windows Key + X then select Control Panel.
2. Now click System and Security then click File History.
![]()
3. From the left-hand side menu, click on the Select drive.

4. Make sure you have inserted your external drive to select for File History Backup and then select this drive under the above setup.

5. Click Ok, and you’re done.
Recommended:
- Disable SmartScreen Filter in Windows 10
- Fix Screen Goes to Sleep when Computer Turned ON
- Fix Error 1962 No Operating System Found
- Fix Driver WUDFRd failed to load
That’s it you have successfully Fix Reconnect your drive warning on Windows 10 but if you still have any questions regarding this guide then feel free to ask them in the comment’s section.


HI THERE!MY PROBLEM IS I AM NEW TO THE LAPTOP MY MOUSE WORK’S, BUT NOW I CAN NOT GET LAPTOP TO LET ME US IT’S FINGER CONTROL?!, THE MOUSE IS THE ONLY WAY I CAN WORK LAPTOP I HOPE IT IS FIXABLE? TIRED OF THE MOUSE!.
THE LAPTOP WILL ONLY LET MOUSE WORK!, I NEED THE LAPTOP FINGER MOVER TO WORK! BUT I CAN GET THE LAPTOP TO WORK WITH MY CONTROL OF FINGER & ALL THAT IT CAN DO! “EXT”!. ANY COMMENT WILL HOPEFULLY HELP THANK YOU IN ADVANCE!!! “LATTER”.