
RSAT is a handy tool developed by Microsoft, which manages Windows Server’s present in the remote location. Basically, there is MMC snap-in “Active Directory Users and Computers” in the tool, enabling the user to do changes and manage the remote server. Also, the RSAT tools allow you to manage the following:
- Hyper-V
- File Services
- Installed server roles and features
- Additional Powershell Functionality

Here, MMC means Microsoft Management Console and MMC snap-in is like an add-on to the module. This tool is helpful to add new users and reset the password to the organizational unit. In this article, we are going to learn how to install RSAT on Windows 10.
Install Remote Server Administration Tools (RSAT) on Windows 10
Note: RSAT can only be installed on Windows Pro and Enterprise editions, it is not supported on the Windows 10 home edition.
1. Navigate to Remote Server Administration Tool under Microsoft download center.
2. Now select the language of the page content and click on the download button.

3. Once you click on the download button, a page will open. You need to choose the file of the RSAT (Choose the latest version) according to your system architecture and click on the “Next” button.

4. After you click the Next button, the download will start on your computer. Install RSAT to the desktop using the downloaded file. It will ask for permission, click on the “Yes” button.

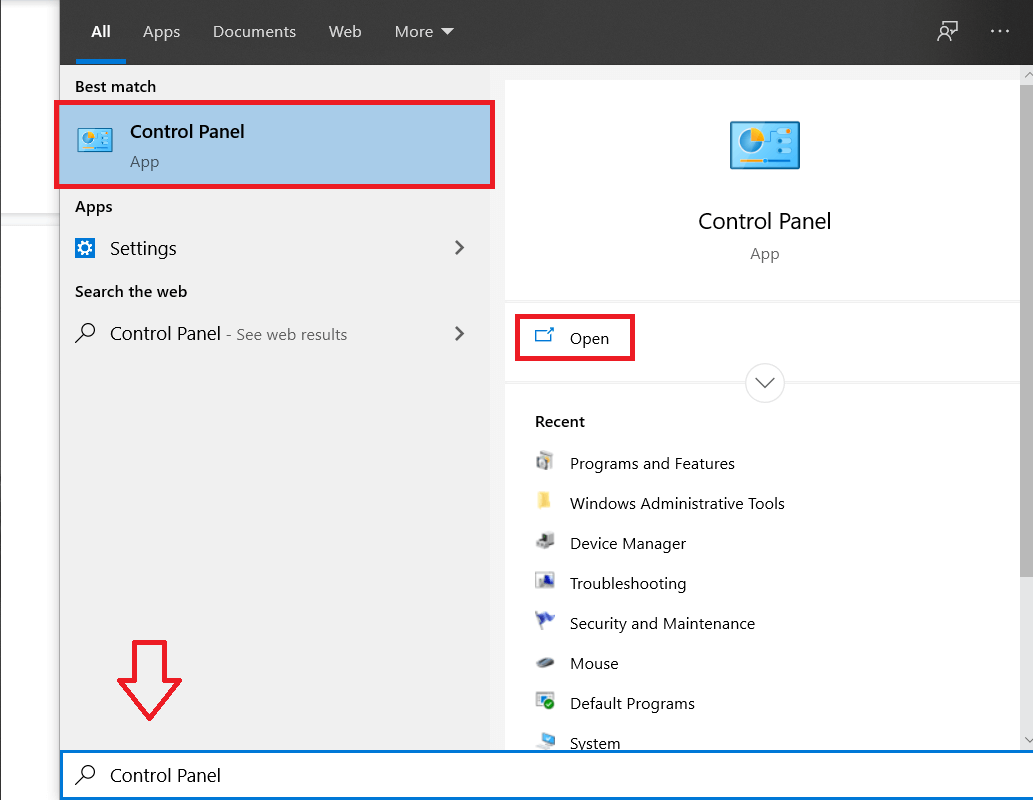
5. Search for control under Start Menu then click on Control Panel from the search result.
6. In the control panel, type “Program and Features” in the search bar then click on “Turn Windows features on or off” at the right side of the screen.

7. This will open the Windows features wizard. Make sure to checkmark “Active Directory Lightweight Directory Services”.

8. Navigate to “Services for NFS” then expand it and checkmark “Administrative Tools“. Similarly checkmark “Remote Differential Compression API Support“.

9. Click OK to save changes.
You have successfully installed & enabled Active Directory Users and Computers on Windows 10. You can see the “Active Directory User” through “Administrative Tool” under the Control Panel. You can follow these steps to find the tool.
1. Again, search for Control Panel under Start Menu then click on it.
2. Select “Administrative Tools” under the control panel.

3. This will open the list of the tool present, here you will find the tool “Active Directory Users and Computers”.

Install Remote Server Administration Tools (RSAT) using Command Line Window
This Active Directory User can also be installed with the help of the command line window. There are basically three commands you need to type in the command prompt to install & run the Active Directory user tool.
Following are the commands which you need to give in command line window:
dism/online/enable-feature/featurename:RSATClient-Roles-AD
dism/online/enable-feature/featurename:RSATClient-Roles-AD-DS
dism/online/enable-feature/featurename:RSATClient-Roles-AD-DS-Snapln
After every command just hit Enter to execute the command on your PC. After all the three-command executed, Active Directory User Tool will be installed in the system. Now you can use Remote Server Administration Tools (RSAT) on Windows 10.
If All Tabs are not Showing in the RSAT
Suppose you are not getting all the options in the RSA Tool. Then go to the “Administrative Tool” under the Control Panel. Then find the “Active Directory Users and Computers” tool in the list. Right-click on the tool and menu list will appear. Now, select “Properties” from the context menu.

Now check the target, it should be “%SystemRoot%\system32\dsa.msc”. If the target is not maintained, make the target mentioned above. If the target is correct and you’re still facing this problem, then try to check the latest update available for the Remote Server Administration Tools (RSAT).

If you found that the latest version is available, you need to uninstall the older version of the tool and install the latest version.
Recommended:
- Fix Failed To Enumerate Objects In The Container Error
- 5 Way to Extract Images from PDF File
- How to Activate YouTube Dark Mode
- Permanently Disable Cortana on Windows 10
I hope the above steps were helpful and now you can easily Install Remote Server Administration Tools (RSAT) on Windows 10, but if you still have any questions regarding this guide, please feel free to ask them in the comments section.


