
The restoration point is a useful system utility in all Microsoft Windows computers; it was developed to offer a way for a system to return to its default state if and when an error occurs. When a restore point is created, the operating system rescues system functions and user data. Therefore, it is important to know how to use and create the system restore utility on your Windows 11 computer from settings as well as from system boot.

How to Use System Restore Windows 11
Restore points can be created manually, or they can be created automatically by installing a new program or driver. Your data will not be impacted by restoring but will get rid of any programs, drivers, and updates put in after the restore point is created. The system restoration is often turned on by default. The following steps help you verify that system restore is enabled on your Windows 11 computer.
Note: Make sure that the AC adapter is plugged throughout the restore process because it will take some time to restore the system from a restore point. Please don’t force the computer to shut down to avoid any problems.
1. Search Create a restore point in the search box and tap open.

2. If the system protection is turned on, it means that the system restore point is enabled, but if it is not enabled tap Configure.
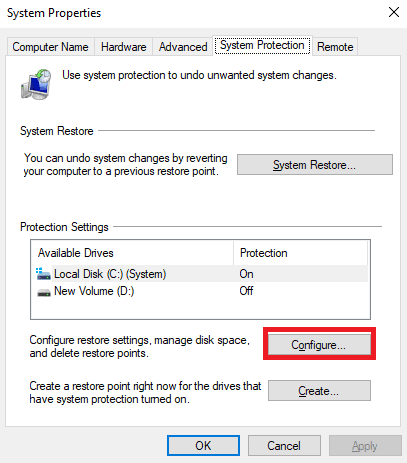
3. Tap OK after choosing Turn on System Protection and setting the maximum disc usage.

Also Read: How to Add Create Restore Point Context Menu in Windows 11
How to Create System Restore Point Windows 11
The restore point is created to provide a means to revert a system to its previous state if some error or a problem has occurred. When a restore point is created, your computer captures the existing state, including your system files and some other user files. In the following steps let’s find out how you can create a restore point in your Windows 11 computer.
1. Open Create a restore point utility from the Start Menu.
2. In the System Protection tab click on Create.

3. Give a name to the restore point, for example, Restore Point 1.

4. Finally, click on Create and save the changes.

How to Use System Restore from System Boot in Windows 11
When an unexpected error occurs with Windows computers, you may risk losing your data. This can be a scary situation, and with little to no options left at hand, you would want to take the right steps. In the following steps we will explore, how you can recover your data by accessing the system restore utility from system boot in Windows 11 computers.
1. When you turn on your computer wait for the Windows logo to appear and then press the power button two to three times to access the Advanced startup.
2. Once the Advanced startup options appear, click on Advanced options.

3. Now, click on Troubleshoot.

4. Click on Advanced options and then System Restore.

5. Click Next and select the available Restore Point.
6. Scan for the affected programs, and click Next.
7. Finally, click Finish.
Also Read: How to Create a System Restore Point in Windows 10
We hope this article helped you learn how to create and use system restore in Windows 11. Keep reading our blog for such helpful guides! Feel free to leave your suggestions & and queries in the comment section below.


