
Minecraft can be played for hours without getting bored but its default skin and texture appear basic to many users. Minecraft is heavily customizable and users can modify its aesthetics as they desire. Windows 10 Texture packs and Skins can be used to enhance the appearance of Minecraft. Windows 10 Minecraft Texture packs and Skins are available in a wide variety and can be downloaded online. If you are someone looking for tips about the same, we bring to you a helpful guide that will teach you how to install Texture packs Minecraft Windows 10.
How to Install Minecraft Texture Packs on Windows 10
Many types of texture packs can be loaded in Minecraft but texture packs for the Minecraft Java version are not compatible with Minecraft UWP (Universal Windows Platform) version. Texture packs for Minecraft UWP versions like Bedrock Edition are available in-game store while texture packs Minecraft Java version can be downloaded online. Here are some famous texture packs.
- Flows HD: This allows you to create amazing and complex things.
- Ascension HD: Enhances brightness and visibility of the game.
- Defscape: It has a smooth texture experience.
- EVO: Adds realism to the game by upgrading graphics performance.
Let us now move straight to the steps to install skins and texture packs in Minecraft. We will begin by learning how to install texture packs Minecraft windows 10.
1. Press the Windows key, type chrome, and click on Open.

2. Search for the texture pack of your choice and download it.
Note: Always look for ratings in texture pack and download them from reputable sites e.g. ResourcePack.

3. After the download is complete, you will see a zip file of the texture pack. Extract it to your preferred location.
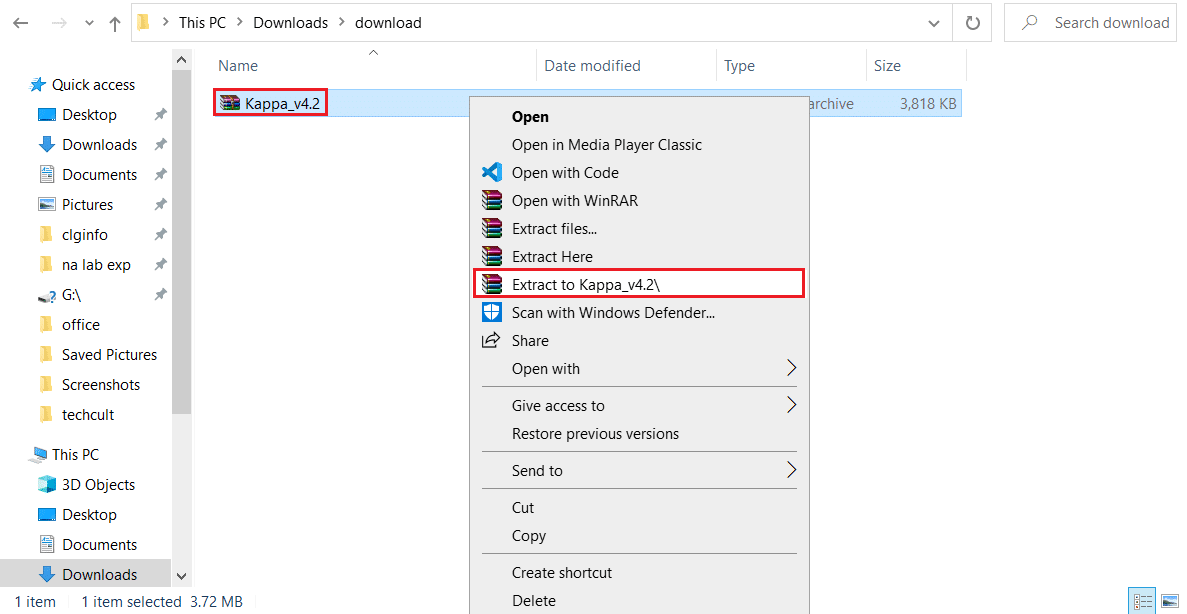
4. Go to the location where you extracted the texture pack zip file and copy it by clicking on it and pressing Ctrl + C keys together.
5. Press Windows + R keys simultaneously to open the Run dialog box.

6. Type AppData in Run Dialog Box and click OK. It will open AppData folder.

7. In the AppData folder, navigate to this path
Local\Packages\Microsoft.MinecraftUWP_8wekyb3d8bbwe\LocalSlate\games\com.mojang\resource_packs

8. Paste extracted file you copied in Step 4 in resource_packs folder. You can do that by right-clicking an empty space in the resource_packs folder and selecting Paste from the menu.
9. Open Minecraft Launcher and go to Settings.

10. In the left column, locate and click on the Global Resources button.
11. In the right pane, you should see your downloaded texture pack in the Available Packs section. Select it and click on Plus (+) symbol to enable it. You can enable multiple texture packs at once.
Note: If you are unable to locate your downloaded texture pack in the Available Packs section then it may be incompatible with your Minecraft version.
Now you know how to install texture packs Minecraft Windows 10.
Also Read: 3 Ways to Zoom Out in Minecraft
How to Install Minecraft Skin Packs
After learning how to install texture packs Minecraft Windows 10, let us learn about installing Skins in Minecraft. Downloading and installing skins in Minecraft is much simpler than texture packs. Follow the steps below to do the same.
1. Open your preferred browser and search for Minecraft skins online.
2. Download any Skin you like. It will be saved as a PNG file.
Note: In some cases, multiple PNG files might get downloaded. They will just be different varieties of the same skin.
3. Open Minecraft Launcher.
4. Go to the Skin tab.

5. In the Library section click on the Plus (+) symbol above New skin.
6. In add new skin window, give new skin any name you want and click on the Browse option.
7. In the popup window, browse and select the skin you downloaded in Step 2. Click on the Open option.
8. After the skin is loaded, click on Save & Use.
Now new skin will appear on your Avatar when you play Minecraft.
Frequently Asked Questions (FAQs)
Q1. What is the cost of Minecraft textures?
Ans: Texture packs normally cost $2.99 for players of legacy console edition but the price may vary for other versions of Minecraft. Many free texture packs are also available online.
Q2. Is Minecraft free to play on Windows 10?
Ans: Minecraft offers a free trial of the game and the length of the trial depends on the device you are downloading it on. After the free trial expires, you will need to pay for the game to play it.
Recommended:
- How to Use Bookmarks on Twitter
- Fix Minecraft Launcher is Currently Not Available in Your Account
- Fix Minecraft Connection Timed Out No Further Information Error
- Fix Minecraft Failed to Authenticate Your Connection in Windows 10
We hope that this guide was helpful and you were able to understand what are Windows 10 texture packs in Minecraft and how to install Minecraft texture packs on Windows 10. If you have any queries or suggestions then feel free to drop them in the comments section.


