
Windows 10 Class Not Registered error is generally associated with an app or program whose DLL files are un-registered. Therefore, when you try to open the particular app or program, you will see a pop box with the error “Class Not Registered.”

When the program’s unregistered DLL files are called, windows cannot link the file to the program, hence causing the Class Not Registered error. This problem usually occurs with Windows Explorer and Microsoft Edge browsers, but it’s not limited. Let’s see how to fix the Class Not Registered error in Windows 10 without wasting any time.
Note: Before making any changes to your system, make sure to create a restore point.
Fix Class Not Registered error in Windows 10 [SOLVED]
Method 1: Run SFC (System File Checker)
1. Press Windows Key + X then select Command Prompt (Admin).

2. Type the following in cmd and hit enter:
sfc /scannow

3. Let the process finish, and then reboot your PC.
Method 2: Run DISM
1. Press Windows Key + X then select Command Prompt (Admin).
2. Type the following command in cmd and press Enter after each one:
DISM /Online /Cleanup-Image /CheckHealth
DISM /Online /Cleanup-Image /RestoreHealth

3. Restart your PC to apply changes and see if you’re able to Fix the Class Not Registered error in Windows 10.
Method 3: Start Internet Explorer ETW Collector Service
1. Press Windows Key + R, then type “services.msc” and hit Enter to open Windows services.

2. Scroll down until you find Internet Explorer ETW Collector Service.

3. Right-click on it and select Properties, make sure its startup type is set to Automatic.
4. Again, right-click on it and select Start.
5. Check if you’re able to Fix the Class Not Registered error in Windows 10; if not, then continue with the next method.
Method 4: Fix DCOM(Distributed Component Object Model) errors
1. Press Windows Key + R, then type “dcomcnfg” and hit enter to open Component Services.

2. Next, From the left pane, navigate to Component Services>Computers>My Computer>DCOM Config.

3. If it asks you to register any of the components, click Yes.
Note: This may happen several times depending upon the unregistered Components.

4. Close everything and restart your PC.
Method 5: Re-Register Windows Store Apps
1. Type PowerShell in the Windows search, then right-click on it and select Run as administrator.
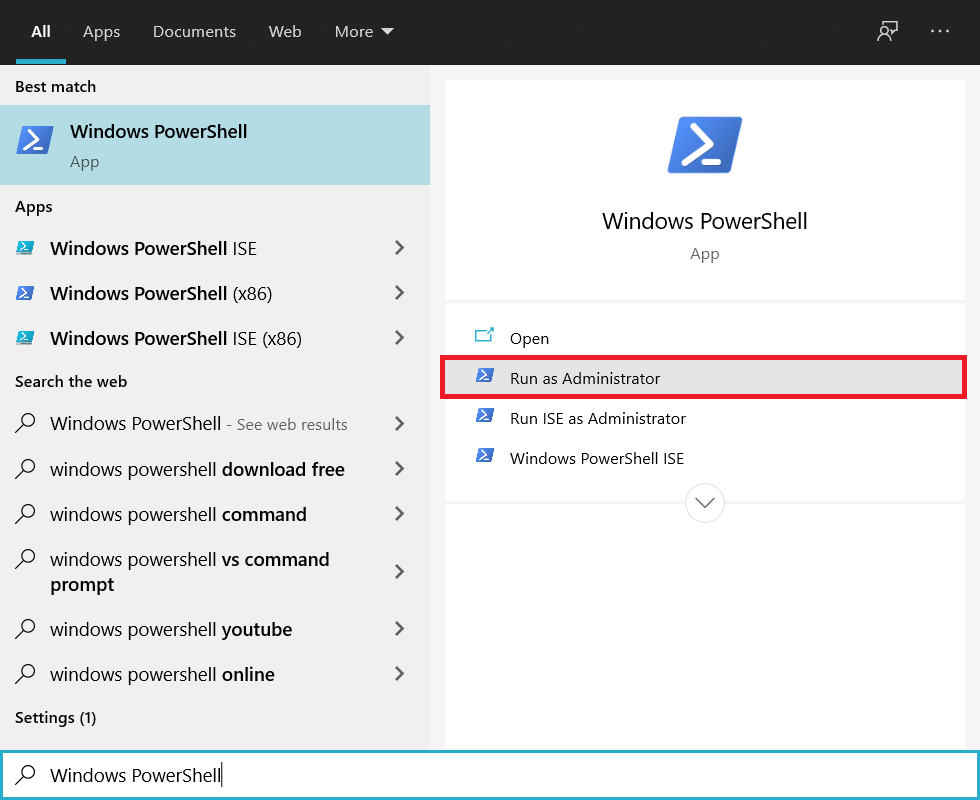
2. Type the following command in the PowerShell and press Enter:
Get-AppXPackage | Foreach {Add-AppxPackage -DisableDevelopmentMode -Register "$($_.InstallLocation)\AppXManifest.xml"}

3. This will re-register Windows store apps.
4. Restart your PC and see if you’re able to Fix the Class Not Registered error in Windows 10.
Method 6: Re-Register Windows .dll files
1. Press Windows Key + X then select Command Prompt (Admin).
2. Type the following command in cmd and press Enter after each one:
FOR /R C:\ %G IN (*.dll) DO "%systemroot%\system32\regsvr32.exe" /s "%G"
regsvr32 ExplorerFrame.dll

3. This will search for all .dll files and will re-register them with the regsvr command.
4. Reboot your PC to apply changes.
Method 7: Remove Microsoft as the Default Browser
1. Navigate to Settings>System>Default apps.
2. Under Web browser changes Microsoft Edge to Internet Explorer or Google Chrome.

3. Restart your PC.
Method 8: Create a New User Account
1. Press Windows Key + I to open Settings and then click Accounts.

2. Click on the Family & other people tab in the left-hand menu and click Add someone else to this PC under Other people.

3. Click I don’t have this person’s sign-in information at the bottom.

4. Select Add a user without a Microsoft account at the bottom.

5. Now, type the username and password for the new account and click Next.

That’s it; you have successfully Fix the Class Not Registered error in Windows 10 but if you still have questions regarding this guide, then feel free to ask them in the comments section.


Hi
It worked for me. Method 6 was the answer of my problem.
thanks.
Me again
The error came back, I’m trying method 6 again and again.
Can you please give me a permanent answer?
thanks.
Hi Vahid,
Did you find a soloution to this problem?
I already do all of this method. This not work. Please help me!