Powerwash is a feature to reset your Chromebook if you want to get rid of any major glitches and bugs. If you are unable to use this feature on your device like HP Chromebook, then don’t fret! We have a helpful guide to fix this Chromebook Powerwash not working issue.

How to Fix Chromebook Powerwash Not Working
You never know when you might land in a situation where you’re unable to Powerwash your HP Chromebook. This feature is needed if you want to change the owner or remove any errors occurring on your device. This guide will walk you through the reasons why Chromebook Powerwash is not working and provide solutions to fix it.
Quick Answer
Try switching to Developer mode to your Powerwash Chromebook. Also you can try reinstalling Chrome OS by following these steps below:
1. Firstly, install and launch the Chromebook Recovery Utility tool on your working PC.
2. Select your device model and click on Continue.
3. Insert a USB flash drive.
4. Then, click on Continue > Create now to create a recovery drive.
5. Next, go to recovery mode on your Chromebook.
6. Now, insert the recovery drive on your Chromebook and select Recover using external disk.
Why is Powerwash Not Working on Chromebook?
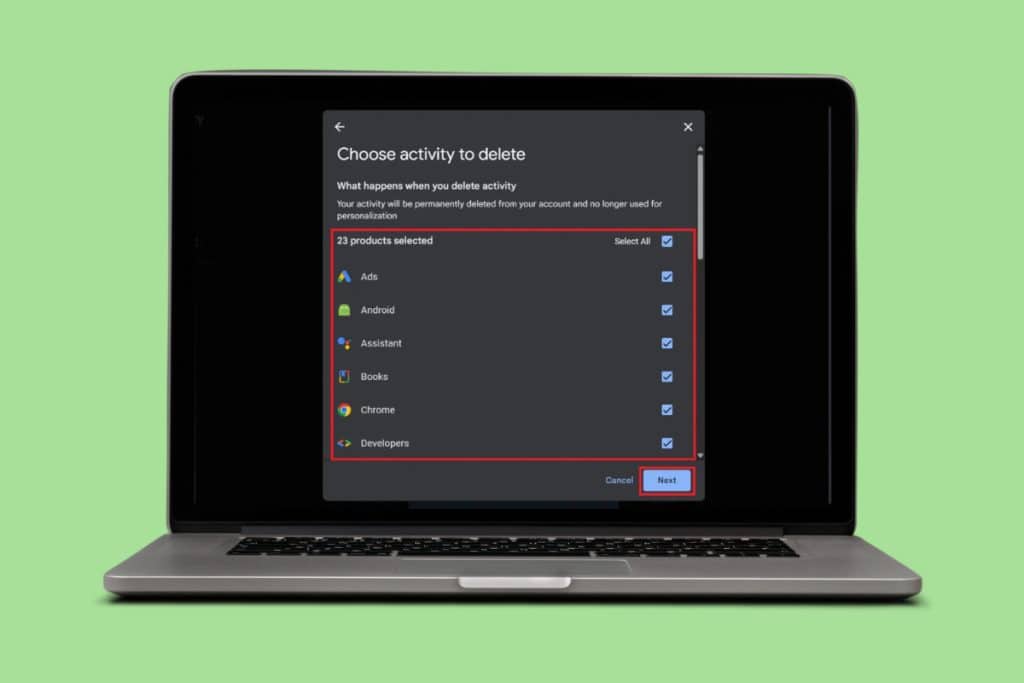
There are a bunch of reasons why Powerwash is not working on your HP Chromebook. They include corrupt system files, some bugs, or someone who might have accidentally deleted crucial system files.
What to do if Chromebook Powerwash does not Work?
Essentially, there are some fixes that you can try if Powerwash does not work on your Chromebook. That said, we’ll start off with some basic troubleshooting methods.
Basic Troubleshooting Methods
You can first try the following hacks at first:
- Try the Ctrl + Alt + Shift + R keys combination, which is the key sequence for Powerwash multiple times.
- Shut down and restart your Chromebook.
- Try Powerwashing after logging in.
- Try the Powerwash key sequence as soon as the laptop starts booting.
- Ask other people to try the Powerwash sequence.
If none of these basic troubleshooting solutions seem to fix HP Chromebook Powerwash not working issue, go ahead and try the next two methods.
Method 1: Use Developer Mode
Developer Mode is a means to do many things with your Chromebook, including replacing the operating system, accessing advanced settings, and installing apps. Essentially, you can have more control over your device through this mode. However, most of Developer Mode’s functionality should be handled by people with expertise, and as the name suggests – developers. That said, let’s see how you can leverage Developer Mode to Powerwash your Chromebook.
1. Press the Esc + Refresh + Power keys simultaneously.
Note: Kindly read and acknowledge the text in the screen that follows to understand the possible risks of switching to Developer Mode.
2. Press the Ctrl + D keys together, then hit the Enter key.
Note: Read and acknowledge all the warning text that follows to understand what will happen next.
3. Hit the Ctrl + D keys at same time again.
Now, your Chromebook will automatically begin to Powerwash. If you’re unable to switch to Developer Mode, you can move to the next method.
Also Read: How to Reset a Managed Chromebook
Method 2: Reinstall Chrome OS
Before beginning to reinstall Chrome OS on your Chromebook, please make sure to collect the following devices beforehand:
- Your Chromebook in which you’re unable to use Powerwash.
- Another computer, preferably a Chromebook. Can be a Windows or a Mac computer too, but need to have Google Chrome installed on them.
- A USB flash drive that is ready to be formatted, and has at least 8 GB of storage.
Reinstalling the latest version of Chrome OS should fix all the issues and files that are causing the Powerwash problem and any other problems that exist in your Chromebook. For that, we need to create a recovery drive, and then enter into recovery mode on the affected Chromebook.
Here are the steps for the same to fix HP Chromebook Powerwash not working problem.
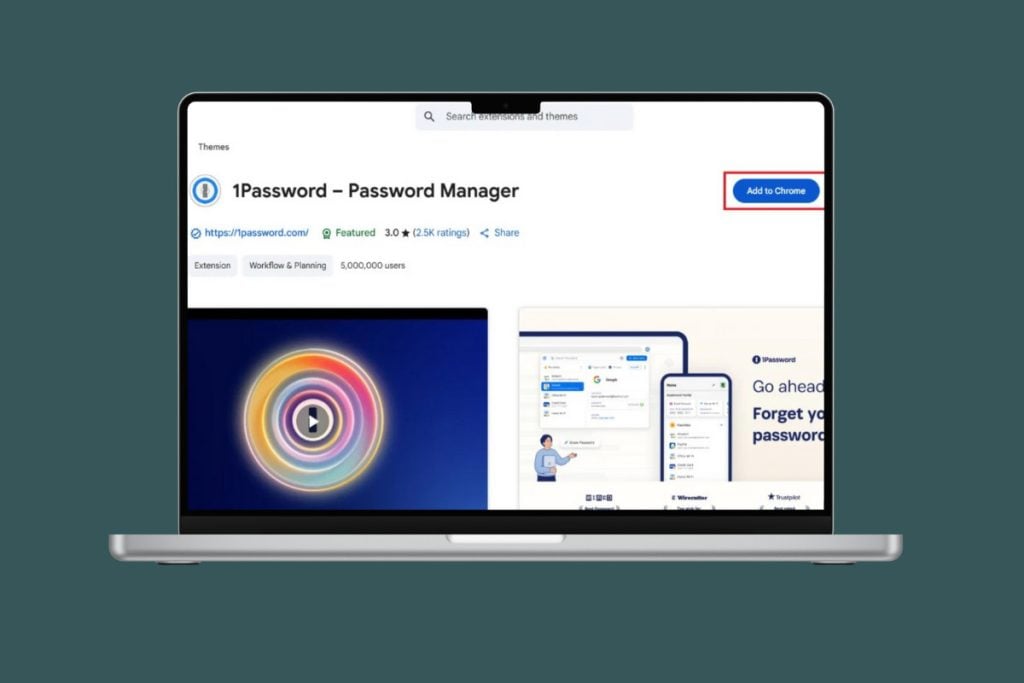
1. On the other computer, visit the page of the Chromebook Recovery Utility extension.

2. Click on Add to Chrome.
3. Click on Add extension.

4. Click on the Extensions icon on the top right.
![]()
5. Click on Chromebook Recovery Utility.

6. In the new window, click on Get started.

7. Click on Select a model from a list, and select your laptop model.

8. Upon selection, click on Continue.
9. Insert a USB flash drive that’s ready to be formatted.
10. Select the USB drive from the dropdown menu.
11. Click on Continue.
12. Then, click on Create now option.
14. Eject the flash drive from your computer.
Now that your recovery drive is created, let’s see how to enter recovery mode.
Note: Before you proceed, make sure to unplug all external devices, such as a mouse or external keyboard, from your Chromebook.
1. Hold the Esc + Refresh keys simultaneously, then press the Power key.
2. Let go of the Power key thereafter.
3. Once you see a message on your screen, release other keys.
After entering Recovery Mode, insert the recovery drive and select Recover using external disk to begin recovery. Follow the on-screen instructions, and Chrome OS will be re-installed on your Chromebook.
We hope you liked our guide about fixing Powerwash not working on Chromebook. Do let us know if these methods worked for you, and don’t forget to add your queries and suggestions in the comment section.