Discord is a popular communication platform for online communities, offering feature-packed voice and text channels, customizable user roles, and various bots. Among these, a rules bot is particularly useful for enforcing guidelines and maintaining organization in your community. Setting up a rules bot requires administrative access to your server and some technical know-how, but with guidance and a basic understanding of Discord’s configuration tools, anyone can do it. In this article, we’ll cover how to set up rules bot discord and how to use rules bot discord, thereby providing you with all the information you need to create a safe, organized and thriving community.

How to Set Up Rules Bot on Discord
There are several bot platforms available, but for Discord, you can use either Discord’s built-in bot feature or a third-party bot platform. Then, you can create and set up rules by following our guide. So, continue reading!
Quick Answer
Setting up a rules bot in Discord involves several steps, which are outlined below:
1. Create a new Discord bot.
2. Add the bot to your Discord server.
3. Now, set up the rules.
What is Rule Bot in Discord?
Before delving into how to use a rules bot discord it is very important to know what is rule bot in Discord. A rule bot in Discord is a powerful tool that enforces guidelines to ensure members adhere to community standards. It can be integrated into a Discord server to simplify moderation for large and active communities, automating the enforcement of rules and freeing moderators to focus on content creation. Rules can range from simple etiquette to complex content regulations. Rule bots also offer customizable settings and automation to streamline the moderation process and enhance the overall experience for members.
So far you might be wondering how to set up rules bot discord. Here are the steps to set up the Rule Bot:
1. Go to the Discord Developer Portal and create a New Application.

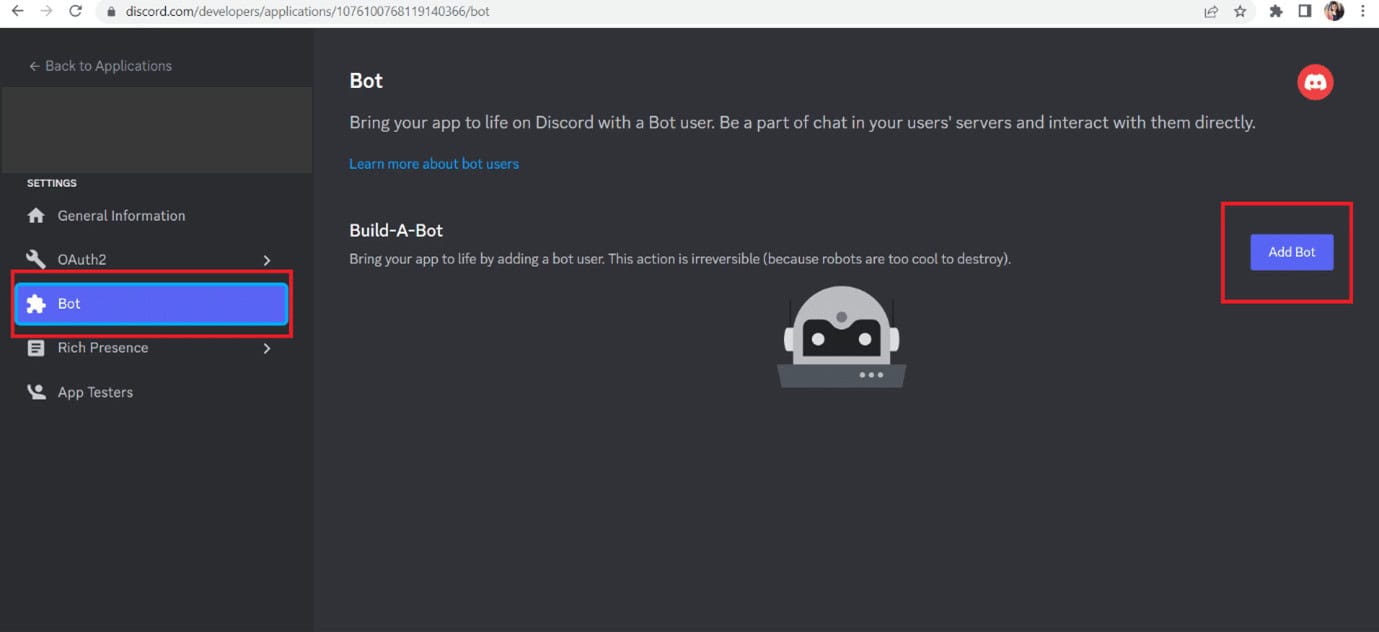
2. Select Bot tab and then click on Add Bot.
3. Now, Copy the bot token, which will be used to authorize the bot.

4. Go to the server where you want to add the bot and click on the Server Settings menu.

5. Click on Roles and Create Role for the bot.

6. Then, click on Copy ID.

7. Go back to the Discord Developer Portal and select your bot.

8. In the left-hand menu, click on the OAuth2 tab.

9. Under the Scopes section, select the bot checkbox.

10. A set of permissions will appear below the Scopes section. Select the permissions you want your bot to have.
11. Now, copy the Generated URL.

12. Open a new tab in your web browser and paste the URL.

13. Select the server you want to add the bot to from the dropdown menu of ADD TO SERVER option.

14. Complete the captcha to verify that you are not a robot.
15. Now you can Set up channels and permissions for the bot and can add rules to the bot by using commands or a dashboard interface.
Note: Make sure to test the bot thoroughly after setup to ensure that it is working as intended.
Also Read: How to Hide Words in Discord
How to Add Rules Bot on Discord
By now you know how to set up rules bot Discord. In order to know how to add rules Bot Discord first enable the Community feature by following the steps below:
1. Open Discord by visiting their website or by launching the desktop application.
2. Then sign in to your account.
3. Now, access the Discord server where you want to establish rules.
4. Click on the name of the server you want to set rules for.
5. Then select the Server Settings option from the drop-down menu that appears after clicking Next.
6. From the left sidebar on the Server Overview screen, select the Community section.
7. Then, click on Enable Community to activate the feature.
8. Now, click on Get Started to convert your server into a community server.
9. On the Safety Checks screen, verify your email address if you haven’t already done so.
Note: Make sure the Explicit Media Content Filter is turned on before proceeding.
10. After completing the safety checks, click on the Next button.
11. On the Set up the basics screen, select the rules or guidelines channel and the community updates channel using the drop-down menus.
12. Select the Create one for me option if you don’t have these channels.
13. After setting up the channels, click on the Next button.
14. On the Finishing touches page, you will see the options below. Check these boxes, and then click Finish Setup.
- Set default notifications to Mentions Only
- Remove moderation permissions from @everyone
- Agree and understand
After enabling the Community feature and converting your server to a community server, you can proceed to add rules to your Discord server. Follow these steps to do it using the desktop app:
1. Open the Discord desktop application and log in with your credentials.
2. Access the server’s settings by clicking on the server’s name at the top left of the Discord app.
3. Then select Server Settings from the dropdown menu.
4. Click on the Membership Screening option present under the Community section on the left-hand side of the screen.
Note: After enabling the Membership Screening feature, new members will be required to accept your rules before they can send messages and reactions in any of the channels.
5. Then, click on Get Started to add the server rules.
6. Type in the server rule that you want to apply or select from the provided list of sample rules.
7. Click on the Add a rule option to add more rules.
8. Then, click on Save after adding each rule.
9. Provide a brief introduction about your server under the Description section.
10. Finally, click the Enable button to activate the rules.
Also Read: How to Add Reaction Roles on Discord Carl Bot
How to Use Rules Bot Discord
As you know by now how to add rules bot discord? Let’s understand how to use rules bot discord. We understand, as your Discord server grows, it can become more challenging to keep up with moderation tasks. By setting up a rule bot, you can create an efficient and effective system for managing your server. Follow the below-mentioned steps to do so:
Step I: Set Up Channels
Firstly you need to set up channels. Follow the below steps for this.
Option I: On Mobile
1. Launch the Discord application on your mobile device.

2. Choose your Server from the menu located on the left-hand side.

3. Tap on the three dots in the upper right-hand corner of the screen.
4. Now, select Settings.
5. Then, choose Roles.
6. Now, tap on the plus sign (+) to initiate the creation of a new role.
7. Assign the name verified to the new role you created and grant it the permissions designated for members.
8. Select the Create button to finalize the creation of the new role.
9. Follow the same steps again to create a new role named unverified.
Option II: On PC
1. Launch the Discord application on your computer.
2. Then, choose your server from the list located on the left-hand side of the screen.
3. Now, click on the downward caret, located next to the name of the server.
![]()
4. Choose the option labeled Server Settings from the drop-down menu.

5. Then, click on Roles, on the left-hand side of the screen.
6. Then, click on Create Role.
7. Assign the name verified to the new role and choose a color to represent it.
8. In the Permissions section, assign the permissions designated for members to the newly created role.
9. Then select Save Changes to apply the changes made to the role.
10. Repeat the aforementioned steps to create a new role named unverified and assign it appropriate permissions.
Also Read: Are Discord Polls Anonymous?
Step II: Invite Rule Bot
Once you have created the roles, invite the Rule bot to your server using the following steps:
1. Go to the Rule bot’s page on top.gg.
2. Then, click on Invite.

3. Choose your server from the list provided on the following page.

4. Then, click Continue to proceed with the invitation process.
5. Check the permissions displayed and click on Authorize to grant the bot access to your server.
6. Tick the I am human Captcha box and then close the window.
Step III: Set Up Rule Bot
Here are the instructions to set up the Rule bot:
1. Return to your server on Discord.
2. Make a new channel named verification on your Discord server.

3. To set up the bot on your server, execute the v!setup command.
4. After entering the v!setup command, you’ll be taken to the Rule bot’s setup hub.
5. Now, select the General setup option and confirm your selection by clicking on the green check mark.
Note: To set up the bot to assign roles to new members and send a welcome message, you need to specify the roles to assign using the @ symbol, such as unverified for new members and verified for members who accept the server rules. You also need to create a welcome message and specify a message and reaction to show once a member accepts the rules. Additionally, you’ll need to create and send a message containing the server rules, then tap Finish to complete the setup process.
Also Read: How to Use Chip Bot on Discord
What are the Benefits of Setting Up Rule Bot in Discord?
It can have several benefits, including:
- Improved moderation: A rule bot can help enforce the rules of a Discord server by automatically removing or warning users who break them. This can help reduce the workload of moderators and ensure that the server is a safe and welcoming space for all users.
- Increased efficiency: With a rule bot in place, moderators can spend less time monitoring the server and more time on other important tasks. The bot can automatically perform tasks such as muting or kicking users, freeing up moderators to work on other projects.
- Customization: Many rule bots allow for customization of the rules and commands, so server owners can tailor the bot to fit the needs of their particular community.
- 24/7 operation: A rule bot can operate 24/7, so even when moderators are not available, the server can still be kept safe and orderly.
- Transparency: By using a rule bot, all actions taken by the bot are logged and visible to all members, promoting transparency and accountability within the community.
Overall, setting up a rule bot can help create a better experience for users and moderators alike, while maintaining order and enforcing the rules of the server.
Recommended:
- How to Send Invisible Text on Snapchat
- Fix Disney Plus Error Code 42 on Windows
- How to Get Discord Age Verification
- 28 Best Discord Game Bots
We trust that the steps we have outlined in this guide on How to set up rules bot discord have proven useful in setting up Rule Bot in Discord. We would be delighted to hear any suggestions or queries you may have. Don’t hesitate to leave a comment in the section below.