
Are you looking for ways to insert a line in Word document? Do you need to add a line in Word? Don’t worry this article will help you to resolve your problem. MS word is developed by Microsoft and used to make documents, reports, letters, etc. Its advanced features enable us to edit the document in the best possible ways. Lines in a word are used for clarity while making a professional-level report or resume. There are two types of lines in words which are horizontal lines and vertical lines. Continue reading the article to know how to insert a line in Word.

How to Insert a Line in Word
You can insert horizontal as well as vertical lines in MS Word. Below we have shown both the methods to do so.
Method 1: For Horizontal Lines
Horizontal lines are used in a word when we want to separate the text section. Follow the methods below to insert horizontal lines:
Option I: Use Autoformat to Insert a Line
Autoformat is the easiest and the quickest way to insert a line in a word. Follow the steps below to insert a line using autoformat:
1. On Plain Single Line
Follow these steps to use autoformat to insert a plain single line.
1. Open the Word document.
2. Place the cursor where you want to insert the line.
3. Type three hyphens(—) and press Enter key.

2. On Plain Double Line
Here are the steps to use autoformat to insert a double line.
1. Go to the Word document and place the cursor where you want to insert the line.
2. Type three equal signs(===) and press Enter key.

3. On Broken or Dotted Line
Follow the given steps to use autoformat to insert broken or dotted line.
1. Go to your Word document.
2. To insert a broken line, type three asterisks(***) and hit Enter key.

4. On Bold Single Line
Below are the steps to use autoformat to insert bold single line.
1. Launch the Word file.
2. Type three underline symbols(___) and press Enter key to insert a bold single line.

5. On Wavy Line
Follow the below steps to use autoformat to insert wavy line in Word file.
1. Open the Word document.
2. To insert a wavy line, type three tildes(~~~) and press Enter key.

6. On Triple Line With a Thick Center
Here are the steps to use autoformat to insert a triple line with a thick center.
1. Launch your Word document.
2. Type three number signs(###) and hit the Enter key to insert a triple line with a thick center.

Also Read: How to Add Fonts to Word Mac
Option II: Use Shape Menu
The shape tab contains a variety of lines which includes straight lines, arrow lines, and a lot more. Follow the steps below to use the shape tab:
1. Open the Word document and place the cursor where you want to insert the line.
2. Click on the Insert tab from the ribbon.

3. Click on the Shapes drop-down.

4. Select the line that you want to insert from the Shapes list.

5. Hold that line and drag it where you want to place it.

Option III: Use Border from Ribbon
Using border will help us insert the horizontal line in a text. Follow the methods below to use border:
1. Go to the Word document and place the cursor where you want to insert the line.
2. By default the Home tab will be open.

3. Click on the bottom border drop-down.

4. Select the Horizontal line.
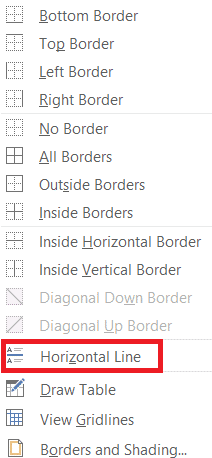
5. Double click on the Horizontal line to change the look of the line.

6. Change the height, width, color, and alignment from the Format Horizontal line dialog box.

Also Read: What are some of the best Cursive Fonts in Microsoft Word?
Method 2: Vertical Lines
Vertical lines are used in a word to separate the column of texts. Follow the methods below to insert vertical lines:
Option I: Use Page Layout
Using the Page Layout will help us separate the text into columns. Follow the methods below to use page Layout:
1. Open the Word document where you want to insert the vertical line.
2. Select the document.

3. Click on the Layout and select Columns.

4. The Columns menu will appear. Click on More Columns.

5. The Columns window will appear. Click on the number of columns that you want to add.

6. Check the box next to the line between and then click on OK.

7. This will split the page into two columns.

Option II: Use Shape Tab
Shape tab can be used to draw vertical lines as well. There are a variety of lines available in the shape tab. We can choose the lines as per our preference and draw them. Follow the methods below to insert shape tab:
1. Go to the Word document and place the cursor where you want to insert the vertical line.
2. Click on Insert and select Shapes.

3. Select the Shapes from the drop-down menu.

4. Select the line as per your preference.
5. Hold the line and drag it to the place where you want.

Also Read: How to Disable Microsoft Word Spell Checker
Option III: Use Border
Follow the methods below to use a border while trying to insert a vertical line:
1. By default when you open a new word document the Home tab will be opened.

2. Select the place where you want to insert the border.

3. Click on the bottom border drop-down menu.

4. The border list will appear on the screen.

5. Click on the left border.

5. Finally, the border will be added to your screen.

Recommended:
- Fix Google Meet Grid View Extension
- Fix Word File Permission Error in Windows 10
- 19 Best Free GIF Editor
- 27 Best Alternatives to Microsoft Word
We hope that this article was useful and you were able to learn how to insert a line in Word. Tell us which method worked best for you by typing in the comments section below.


