
Are you experiencing a problem with your PC, especially the performance issues and blue screen? Though it is a rare occurrence when RAM causes a problem you need to check, but it might be the culprit. So, you should test your Windows Computer’s RAM for bad memory as explained below.
How to Diagnose or Test your Computer’s RAM for Bad Memory
Random Access Memory (RAM) is one of the most essential components of your PC therefore whenever you experience some problems in your PC, you need to inspect it. For a non-technical user, it would be a difficult task to diagnose RAM errors. Therefore, we should start with finding the symptoms of RAM problems so that we can move forward and check RAM.
Symptoms of RAM Errors
1 – Your system freezes for a few minutes and it starts taking time to open particular programs. Sometimes it will stop a program from launching and your system will hang. Thus, we can say that the performance issues of the system are the first parameters to determine the RAM errors.
2 – How can anyone miss the infamous blue screen of death on Windows? If you have not installed any new software or hardware but getting a blue screen then there is a huge chance of RAM error.
3 – If your PC restarts randomly, it is sending signals of the RAM errors. However, there could be several other attributes of this problem but checking your RAM is one of the different ways to resolve the PC random restart problem.
4 – You start noticing that some files are getting corrupt. If you are not saving all those files properly, then you need to run a hard disk diagnostic program. If you find that everything is fine then you need to check RAM issues because it can corrupt files.
To start with diagnosing the RAM error
- First you can manually open the computer and take the RAM out.
- Put the new RAM in place to check whether the problem still persists or gone.
- Make sure that new RAM should be compatible with your PC.
Make sure to create a restore point just in case something goes wrong.
Method 1 – Windows Memory Diagnostic Tool
1.Launch the Windows Memory Diagnostic Tool. To start this, you need to type “Windows Memory Diagnostic” in the windows search bar

Note: You can also launch this tool by simply pressing “Windows Key + R” and enter “mdsched.exe” in the run dialogue and press enter.

2.You will get a pop-up box on your screen asking you to reboot your computer to start the program. You have to reboot your computer to start the diagnostic tool. While the program will be running, you would not be able to work on your computer.

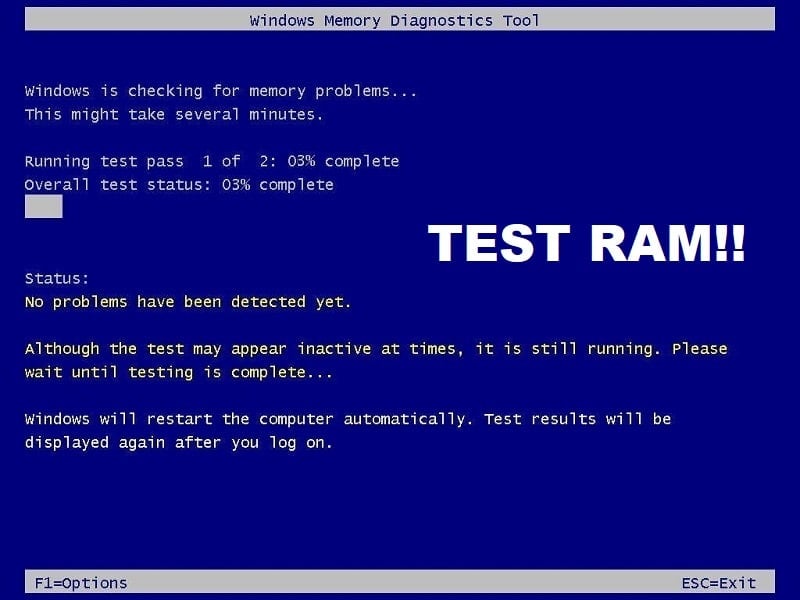
Now your system will restart and Windows Memory Diagnostic tool screen will be appearing on your screen with a status bar of the progress. Moreover, if the test detects any anomalies or problems with the RAM, it will show you a message. It will take several minutes to complete this test and populate the result.
Instead of waiting to see the result, you can leave your computer and come back to check the result finally. You can invest your precious time in some other work while Windows is testing RAM. Once the process will be done, your system will be automatically restarted. Once you will log in to your PC, you will be able to see the results.
I hope using Windows Memory Diagnostic tool you will be able to Test your Computer’s RAM for Bad Memory but if you’re not able to see the Memory Diagnostic test results then don’t worry just follow the below steps and you will be able to see the test results.
Also Read: Fix Your Computer Is Low On Memory Warning
What if you do not find the results?
If after login back to your system, you do not see the results, you can follow the below-mentioned method to see the Windows Diagnostic Tool result.
Step 1 – Open Event Viewer – To launch Event Viewer you need to right click on the start menu and then select Event Viewer.

Step 2 – Navigate to “Windows Logs” then “System”, here you will see a list of events. To find the specific one just click on the Find option.

Step 3 – Type “Memory Diagnostic Tool” and click on “Find Next” button, you will see the result.
Method 2 – Run MemTest86
If you want to test your Computer’s RAM for bad memory problems with the most powerful testing tool, you can download MemTest86 and use it. This testing tool gives you more options and power to diagnose the error that Windows test usually skips. It comes in two varieties –free version and pro-version. To get more features, you can go for the paid version.

While using the free version, you may not get the appropriate report for your diagnostic task. It has been reported that free version MemTest86 does not work properly. Both these version are bootable and you can create either bootable USB or CD with its ISO image file and start testing your system.
Once you have created the bootable file, you need to restart your system and boot it from either a USB drive or CD drive depending on where you have installed the bootable files. For step by step way to test your Computer’s RAM for Bad Memory using MemTest86 follow the below guide:
1.Connect a USB flash drive to your system.
2.Download and install Windows Memtest86 Auto-installer for USB Key.
3.Right-click on the image file which you just downloaded and select “Extract here” option.
4.Once extracted, open the folder and run the Memtest86+ USB Installer.
5.Choose your plugged in USB drive, in order to burn the MemTest86 software (this will format your USB drive).

6.Once the above process is finished, insert the USB to the PC in which you’re facing the RAM Bad Memory issue.
7.Restart your PC and make sure that boot from the USB flash drive is selected.
8.Memtest86 will begin testing for memory corruption in your system.

9.If you have passed all the test then you can be sure that your memory is working correctly.
10.If some of the steps were unsuccessful then Memtest86 will find memory corruption which means RAM has some bad sectors.
11.In order to fix the issue with your system, you will need to replace your RAM if bad memory sectors are found.
Recommended:How to Increase RAM on Windows 7 & 10
I hope the above steps were helpful and now you can easily Test your Computer’s RAM for Bad Memory, but if you still have any questions regarding this guide then feel free to ask them in the comment’s section.


