
Fix Unable to Activate Windows Defender Firewall: One of the most important inbuilt features of Windows 10 is the Windows defender, which stops malicious virus & programs to attack your computer. But what happens when the Windows Defender suddenly stop working or responding? Yes, this is the problem faced by many Windows 10 users and they are unable to activate Windows Defender Firewall. There are several issues which can cause Windows Defender Firewall to stop working.

One of the most common reasons for this issue is if you have installed any third-party Antimalware programs. Reason being, Windows Defender automatically shut itself down if any other Antivirus software is present on the same computer. Another reason could be the date and time zone mismatch. Don’t worry we will highlight several probable solutions which will help you to get your Windows Defender Firewall activated on your system in no time.
Fix Can’t turn on Windows Firewall in Windows 10
Make sure to create a restore point just in case something goes wrong.
Method 1: Disable 3rd party Antivirus Software
1.Right-click on the Antivirus Program icon from the system tray and select Disable.

2.Next, select the time frame for which the Antivirus will remain disabled.

3.Once done, again try to access Windows Defender and check if you’re able to Fix Unable to Activate Windows Defender Firewall issue.
4.If successful then make sure to uninstall your third-party Antivirus software completely.
Method 2: Restart Windows Defender Firewall Service
Let’s start with restarting the Windows Firewall service. It may be possible that something disrupted its functioning, hence restarting the Firewall service may solve the problem.
1.Press Windows key + R then type services.msc and hit Enter.

2.Locate Windows Defender Firewall under the service.msc window.

3.Right-click on Windows Defender Firewall and select the Restart option.
4.Again right-click on Windows Defender Firewall and choose Properties.

5.Make sure that the startup type is set to Automatic.

Method 3: Registry Tweak
Making changes to Register is dangerous, as any wrong entry can damage your registry files which in turn will damage your operating system. So before continuing make sure you understand the risk with tweaking registry. Also, create a restore point and backup your registry before continuing.
You need to tweak some registry files to activate the Windows Defender Firewall again.
1.Press Windows key + R then type regedit and hit Enter.
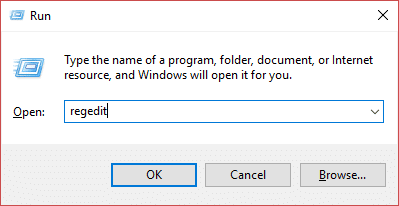
2.Navigate to the below-mentioned path.
HKEY_LOCAL_MACHINESYSTEM/CurrentControlSet/services/BFE
3.Right-click on BFE and choose Permissions option.

4.Follow this guide in order to take full control or ownership of the above registry key.

5.Once you have given permission then select Everyone under “Group or user names” and checkmark Full Control under Permissions for All.
6.Click Apply followed by OK.
7.Reboot your computer to save changes.
You will find this method to work for most of the users as this method is taken from the Microsoft official forum, so you can expect to Fix Unable to Activate Windows Defender Firewall issue with this method.
Method 4: Enable Windows Defender through Registry Editor
1.Press Windows Key + R then type regedit and hit Enter.

2.Navigate to the following registry key:
HKEY_LOCAL_MACHINE\SYSTEM\CurrentControlSet\Services\WinDefend
3.Now right-click on WinDefend and select Permissions.

4.Follow this guide in order to take full control or ownership of the above registry key.
5.After that make sure you have selected WinDefend then in the right window double-click on Start DWORD.
6.Change the value to 2 in the value data field and click OK.

7.Close Registry Editor and reboot your PC.
8.Again try to enable Windows Defender and you should be able to Fix Unable to Activate Windows Defender Firewall issue.
Method 5: Reset Windows Defender Firewall Settings
1.Type control panel in Windows Search bar then click on Control Panel from the search result.

2.Select System and Security option from the Control Panel window.

3.Now click on Windows Defender Firewall.

4.Next, from the left-hand window pane, click on the Restore Defaults link.

5.Now again click on the Restore Defaults button.

6.Click on Yes to confirm the changes.
Method 6: Forcibly Reset Windows Firewall using Command Prompt
1.Type cmd or command in Windows Search then right-click on Command Prompt and select Run as administrator.

2.Once the elevated command prompt opens, you need to type the following command & hit Enter:
netsh firewall set opmode mode=ENABLE exceptions=enable

3.Close the command prompt and Reboot your system to save changes.
Method 7: Install the latest Windows Updates
Sometimes Unable to Activate Windows Defender Firewall issue occurs if your system is not up to date i.e. there are pending updates available which you need to download & install. Therefore, you need to check whether any latest Windows updates are available to install or not:
1.Press Windows Key + I to open Settings then click on “Update & Security” icon.
![]()
2.Now from the left-hand window pane make sure to select Windows Update.
3.Next, click on “Check for updates” button and let Windows download & install any pending updates.

Method 8: Uninstall latest Windows Security Updates
If the issue started after you updated the Windows with the latest security patches, then you can uninstall the security update in order to Fix Unable to Activate Windows Defender Firewall.
1.Press Windows key + I to open Settings then click on Update & Security.
![]()
2.Click on View installed update history under the Windows Update section.

3.Uninstall all latest updates and reboot the device.

Method 9: Update Windows Defender
1.Press Windows Key + X then select Command Prompt (Admin).

2.Type the following command into cmd and hit Enter after each one:
“%PROGRAMFILES%\Windows Defender\MPCMDRUN.exe” -RemoveDefinitions -All
“%PROGRAMFILES%\Windows Defender\MPCMDRUN.exe” -SignatureUpdate

3.Once the command finishes processing, close cmd and reboot your PC.
Method 10: Set Correct Date & Time
1.Right-click on date and time on the taskbar and then select “Adjust date/time“.
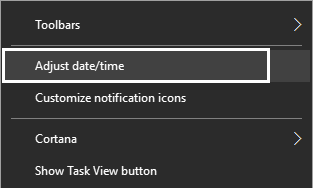
2.If on Windows 10, make sure to turn ON the toggle under “Set Time Automatically” and “Set time zone automatically“.

3.For others, click on “Internet Time” and tick mark on “Automatically synchronize with an Internet time server.”

4.Select Server “time.windows.com” then click Update followed by OK. You don’t need to complete the update, just click OK.
Recommended:
- 7-Zip vs WinZip vs WinRAR (Best File Compression Tool)
- Where is NOTEPAD in Windows 10? 6 Ways to open it!
- Fix Wireless Router Keeps Disconnecting Or Dropping
- Remove Android Viruses Without a Factory Reset
I hope this article was helpful and now you can easily Fix Unable to Activate Windows Defender Firewall, but if you still have any questions regarding this tutorial then feel free to ask them in the comment’s section.


