Steam offers a vast library of titles for gamers to connect, discover, and enjoy gaming adventures. However, it’s just not acceptable when you’re all set to conquer epic quests, you launch the app, and bam! The No Internet Connection message pops up on Steam. Well, no need to worry about it anymore as we will guide you on how to fix this error. Go as your uninterrupted gaming glory awaits!

How to Fix Steam No Internet Connection Error on Windows 10
We understand that connectivity issues can disrupt your gameplay. However, such hiccups with apps that function online are quite normal. Let’s break the wall standing midway obstructing your gaming session.
Tip: You can use the Steam web version instead.
Quick Answer
To resolve the problem, Restart the PC, and then Steam. If the error persists, update the network adapter drivers:
1. In the Device Manager, expand Network adapters.
2. Right-click on the appropriate adapter and select Update driver.
3. Select Search automatically for drivers and follow the instructions.
4. Restart PC once done.
Why Does Steam Show No Internet Connection Error
Several factors could contribute to this such as:
- Unstable or poor internet speed
- Outdated network drivers
- Server issues
- Device connected to VPN
- Interruptions caused by Windows Firewall
Let’s go through the solutions now.
Note: Check if Steam is in Offline Mode. Open the Steam client app and from the Steam menu at the top-left corner, select Go Online…
Method 1: Basic Troubleshooting Methods
Let’s begin with some basic methods first before we move to complex ones and try to fix this issue with ease in no time.
Method 1.1: Restart PC, then Steam
Occasionally, such errors are caused due to minor glitches which can be easily fixed by restarting the PC and then the Steam client.
Method 1.2: Wait for Server Uptime
There is a possibility that the Steam server for your region might be facing downtime issues due to heavy traffic or be in maintenance mode. You can check the server status on the Steamstat.us page or on the Steam Downdetector page. If there are any form of discrepancies, wait until they get resolved.

Method 1.3: Kill Active Background Tasks
Unused background processes can still consume system resources such as network connectivity, CPU, GPU, and memory. This might be why Steam isn’t receiving enough internet bandwidth to load files, hence causing the error. Follow the steps:
1. Open Task Manager and navigate to the Processes tab.
2. Right-click on any active running app consuming resources.
3. Select End task from the menu.

4. Now launch Steam again and see if the issue is resolved.
Method 1.4: Run Steam as an Administrator
Running Steam with administrative rights will allow the client all the necessary permissions, the absence of which could be causing the error. Follow the steps:
1. Right-click on Steam on the Desktop.
2. Select Run as administrator.

If this resolves the no internet connection error, you can set Steam to permanently run in administrator mode. Follow the steps:
1. Right-click on Steam and select Properties.
2. In the Compatibility tab, tick the check box next to Run this program as administrator.

3. Click on OK followed by Apply.
Method 2: Improve Internet Connectivity
In case the device is connected to a slow and unstable internet source, Steam could face issues while connecting to its server. For online apps and games, good network connectivity is important and for that, you can refer to our guide on Troubleshoot Internet Connection Problems in Windows 10.

Method 3: Update Network Drivers
Outdated network adapter drivers often cause issues with internet connectivity which is why Steam encounters such troubles while loading games. Therefore, it is required to keep the drivers updated. Follow the steps below:
1. Open Device Manager and expand Network adapters.
2. Right-click on the appropriate network driver (e.g. Intel(R) Dual Band Wireless-AC 3168).
3. Select Update driver from the context menu.

4. Click on Search automatically for drivers option to locate and install a driver automatically.
5. Once done, Restart the PC.
Also Read: God of War Valkyrie : Locations and Hidden Chambers
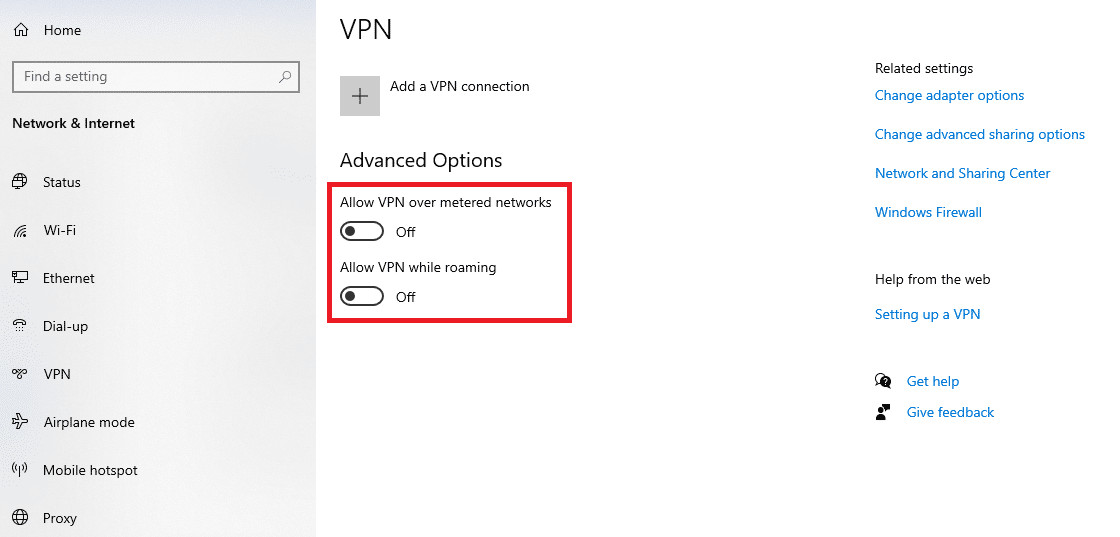
Method 4: Disable VPN and Proxy (If Applicable)
VPN can sometimes trigger network issues, either due to misconfigurations, issues with the VPN server, or geographical location. Regardless, the issue might be triggered as the device is connected to a VPN service. You can disable it. Follow our guide on How to Disable VPN and Proxy on Windows 10.
Method 5: Change Steam’s Protocol from UPD to TCP
Occasionally, the issue might lie with the protocol being used to access the Steam network. Hence, changing the protocol from UDP to TCP can work magic and eliminate errors. Follow the steps below:
1. In Desktop, right-click on the Steam icon and select Properties from the menu.
2. Move to the Shortcut tab.
3. In the Target field, at the end of the line, give a space and type -tcp.

4. Click on Apply and then OK to save.
Also Read: 18 Best Free Cloud Gaming Apps
Method 6: Flush DNS and Reboot Winstock
It is possible that the WinSock might have gotten damaged or corrupt making it unable to provide internet access to the Steam network. You can simply reset WinSock to fix the issue. Follow the steps:
1. Press the Windows key and type cmd to search for Command Prompt.
2. Now press and hold the Ctrl+ Shift keys together and then hit Enter.
3. Copy the the following command ipconfig/release, paste it into the terminal and press Enter.

4. Now execute this command: ipconfig/all.

5. Paste the ipconfig/flushdns command into the terminal and press Enter.

6. Run ipconfig/renew and press Enter.

7. Finally execute the netsh winstock reset command and hit Enter.

8. Once done, Restart the PC and check if Steam can now connect to the internet.
Method 7: Allow Steam through Windows Firewall (If Applicable)
If the incoming and outgoing traffic for Steam is restricted by Windows Firewall, it could result in the no connection error in the client. You do not have to disable the firewall completely but can add Steam as an excerpt. Follow the steps:
1. In the Search menu, type Windows Defender Firewall and open the app from the search results.
2. Click on the Allow an app or feature through Windows Defender Firewall option on the left.

3. Click on Change settings.
4. Tick both checkboxes under Private and Public for all Steam applications.

5. Click on OK to save.
6. Now launch Steam and check if the issue is resolved.
Also Read: How Much Does Steam Charge to Sell a Game?
Method 8: Update Steam, then Windows
An outdated Steam app is prone to bugs and such glitches which can be resolved by updating it. Follow the steps mentioned below:
1. Launch Steam and click on Steam at the top left corner.
2. Click on Check for Steam Client Updates…

3. Steam will check for updates. If there is one, click on Download to install it.
4. If the error still persists, then Update Windows on the PC.
Method 9: Reinstall Steam
If the error still persists, as a last resort, we suggest you reinstall the Steam client on the PC. Before you begin with the process, backup Steam games to avoid losing any game data. You can later restore the backup. Once done, follow the steps:
1. Launch the Control Panel and under Programs, select Uninstall a program.
2. Right-click on Steam and then click on Uninstall.

3. Select Yes in the UAC prompt followed by Uninstall to confirm.
4. Now, click on Start, type %localappdata%, and hit the Enter key.
5. Right-click on the Steam folder and select Delete.

6. Similarly search for %appdata%, open it and delete the Steam folder.
7. Restart the PC.
8. Visit Steam’s official website and click on INSTALL STEAM.

9. Now follow the on-screen instructions to install the executable file.
10. Once installed, LOGIN to your account, restore the backup, and check if the error is fixed now.
Recommended: Top 25 Most Played Games on Steam
That is it! We hope this guide helped you fix the Steam no internet connection issue. If you have any queries or, suggestions then feel free to drop them in the comments section below. Stay tuned to TechCult for solutions to such tech-related issues.