Spotify has made it easy to carry our customized playlists wherever we go right on our smartphone. You can also use it on your laptop, MacBook, or any PC. However, it is possible to run into errors while using it; a few common ones are error code 3, error code 4, error code 30, error code 53, and Spotify error code 17. If you are also dealing with any of these, this guide will help you fix all of them.

Fix Spotify Error Code 17 on Windows 10
With Spotify, you can take your music anywhere, anytime, with no interruptions and if you use premium, you will not have to worry about ads.
Error Code 17 is an error that happens when users try to use Spotify on their computers. It does not let you log in. Although the pop-up says: A firewall may be blocking Spotify, but it can also be caused by unsecured Proxy, corrupt Spotify Installer, or Registry.
Method 1: Change Location on Spotify
You could be facing the error code 17 because you recently moved. You mustn’t have changed your location on Spotify because you were automatically logged out of it on your PC. You can change it now as follows:
1. Open Google Chrome on your PC.
2. Search Spotify and log into your account.
3. After logging in, click on your profile in the top-right corner of the screen. Then select Account.

4. Your Account overview will open. Now, select Edit profile from the left side of the screen.

5. Change your location from the Country or region section.
6. After successfully changing the location, click on Save profile.

Method 2: Update Spotify App
You could be facing error code 17 because you are using an outdated version of Spotify. To fix error code 17 Windows 10, try updating your Spotify to the latest version.
1. Launch the Spotify app and click on the three-dotted icon as shown below.
![]()
2. Here, select Help > About Spotify to open the About Spotify window.

3. You will get the message stating: A new version of Spotify is available. If you do, click on Click here to download buttton to update it.
Note: If you do not get this message, then you are already using the latest version of Spotify.

4. Spotify will start Downloading a new version of Spotify… and install it automatically.

5. Restart Spotify once the update is completed.
Also Read: Fix Spotify Not Opening on Windows 10
Method 3: Clear Spotify App Cache
When you use Spotify to listen to songs, cache files keep getting stored on your device. Clearing these temporary cache files is a simple way to fix error code 17.
1. In the Windows Cortana box search Spotify and click on the Open option.

2. Now, click on the User icon.
![]()
3. Here, tap on the Settings icon.
![]()
4. Scroll down and under the storage option click on the Clear cache option.
Note: The picture illustrated below has no cache files in the Spotify app so the clear cache option is not enabled.

Following these steps will help you clear all the cache files. After successfully cleaning it, try to log in again.
Method 4: Update Windows
Microsoft constantly keeps updating Windows to remove bugs and add new features. If you want to fix Spotify error code 17 Windows 10, you can update your Windows. To find out How to Download and Install Windows 10 Latest Update, read our guide on How to Download and Install Windows 10 Latest Update.

Also Read: How to Remove Device from Spotify Connect
Method 5: Disable VPN and Proxy Server
Proxy servers behave like a gateway between you and the internet but they could also be interrupting your process of logging into your Spotify account. You can disable VPN and Proxy on Windows 10 to fix all error codes.

Method 6: Allow Spotify Through Windows Defender Firewall
Windows Defender Firewall protects your PC from malicious software. When you install an application Windows Defender Firewall automatically asks to Allow access to it or not. In case it doesn’t do so automatically when you install Spotify, then you have to Allow it manually in firewall to fix Spotify error code 17.

If you are facing Spotify error code 3, error code 4, error code 30, error code 53, or error code 17 after installation of app recently or login on a new device, the following methods will prove to be useful.
Method 7: Start Windows Installer Service
Windows Installer Services control and manage all the installation of applications on Windows. If the Installer Services are stopped, you will not be able to install Spotify properly. To Start Windows Installer Service follow the steps below.
1. Hit the Windows + R keys together to open the Run dialog box.
2. Type compmgmt.msc and click on OK button to launch Computer Management.

3. Now, select Services and Applications.

4. Then, select Services.

5. Scroll down till you reach Windows Installer.

6. Windows Installer Properties will now open up and show the General section. In that section, verify that the Service Status is set to Started.
7. If not, click on Start.

8. Finally, select OK.

Method 8: Run Program Install/Uninstall Troubleshooter
There are various built-in troubleshooters in Windows 10 computers that can be used to fix issues on your computer. While some are in-built, many others can be downloaded from the official Microsoft website. Program install and Uninstall troubleshooter is one such tool, that you will first have to download and install on your computer. This troubleshooter can fix various underlying issues with installation and uninstallation processes.
1. Download and install the Program Install and Uninstall Troubleshooter from the official Microsoft website.

2. Once the troubleshooter is successfully installed open it.

3. Now, select the process where the issue is happening i.e. Installing or Uninstalling.

4. Now, select the Program that is causing the issue and then click Next.
5. Finally, click on Yes, try uninstall to uninstall the program.
Also Read: How to Fix Spotify Search Not Working
Method 9: Reinstall Spotify App
If none of the methods mentioned above can solve your problem, you can try to uninstall and reinstall Spotify. Maybe while you were downloading Spotify for the first time, there could have been some problems with the file. It could be incomplete or broken regardless, try reinstalling Spotify.
1. Search for Add or remove programs and click on Open, as depicted below.

2. Here, search for Spotify and select it as shown.

3. Click on Uninstall button and confirm Uninstall in the pop up too, as illustrated below.

4. After uninstalling Spotify, press Windows + R keys together to open Run dialog box.
5. Type appdata and click on OK.

6. Double click on the AppData Local folder.

7. Select Spotify folder, and press Shift + Del keys together to delete it permanently.

8. Once again, repeat the same process in AppData Roaming folder.

9. Lastly, restart your PC.
10. Download and install Spotify from either their official website or from the Microsoft Store.

Also Read: How to Download Spotify Songs without Premium
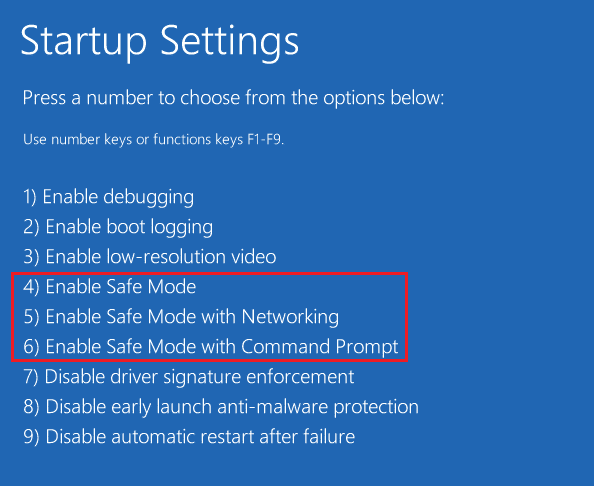
Method 10: Install Spotify in Safe Mode
If the conflict continues, you can try installing Spotify in Safe Mode. In Safe Mode your PC starts with the bare minimum of applications, this will stop antivirus and anti-spyware software from interfering with the installation. To Start Safe Mode Read our guide on How to Boot to Safe Mode in Windows 10 to do the same.
Recommended: Fix Spotify Wrapped Not Working
We hope that this guide was helpful, and you were able to fix Spotify error code 17 issue. Let us know which method worked for you the best. If you have any queries or suggestions, then feel free to drop them in the comments section below.