
Disable Automatic Updates on Windows 10: In the older versions of Window, a user has the option to install the Windows updates or not according to their preference. But, the same option is not available in Windows 10. Now, Window 10 downloads all the update and automatically install it. It gets painful if you are working on something because the window is forced to restart the computer to install the updates. If you want to configure the automatic update for Window, this article can be helpful. There are some ways which can be helpful to configure windows update which we will discuss in this article.

Should I Disable Windows 10 Updates?
Automatic Windows updates are important as it patches any security vulnerability which might harm your computer if your OS is not up to date. For most of the users Automatic Windows updates shouldn’t be a problem, instead, updates only make their life easier. But few users might have had a bad experience with Windows updates in past, a few updates caused more problem than they fixed.
You might also consider disabling Windows Automatic updates if you are on a metered broadband connection i.e. you don’t have a lot of bandwidth to waste on Windows updates. Another reason for disabling Automatic Updates on Windows 10 is sometimes the updates running in the background might consume all of your computer resources. So if you’re doing some resource intensive work then you might face the issue where your PC will freeze or hang unexpectedly.

As you see there isn’t a single reason because of which you should permanently disable Automatic Updates on Windows 10. And all the above issues can be fixed by temporarily disabling Windows 10 updates so that any issues which are caused by these updates are patched by Microsoft and then you can again enable the updates.
4 Ways to Disable Automatic Updates on Windows 10
Note: Make sure to create a restore point just in case something goes wrong.
There are many ways via which you can temporarily stop or disable Automatic updates on Windows 10. Also, Windows 10 has several version so some methods will work in several versions and some won’t, so please try to follow each method step by step and see if it works.
Method 1: Set up a Metered Connection
If you are using a Wi-Fi connection, then this method can be useful. This method is not useful for ethernet connection, as Microsoft has not given this facility for ethernet.
There is an option of metered connection in settings of Wi-Fi. Metered Connection allows you to control the bandwidth of the data usage, also it can restrict Windows updates. While all other security updates on Windows 10 will be allowed. You can enable this meter connection option in Windows 10 by following these steps:
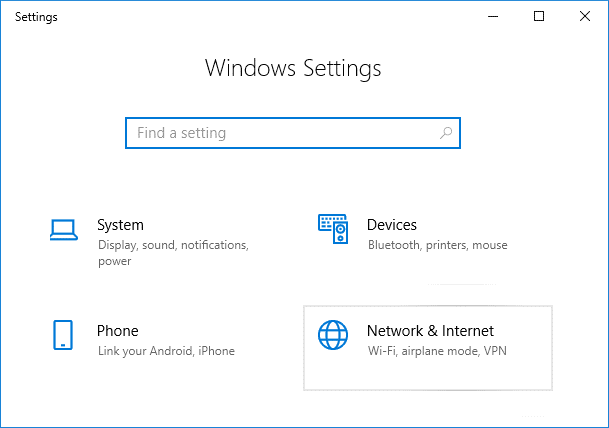
1.Open the Windows setting on the desktop. You can use the shortcut “Windows + I”. This will open the window screen.
2.Choose the “Network & Internet” option from the setting screen.
3.Now, select the “Wi-Fi” option from the left-hand menu. Then click on “Manage Known networks”.

4,After this, all the known networks will appear on the screen. Choose your network and click on “Properties”. It will open the screen where you can set different properties of the network

5.Under “Set as Metered Connection” enable (turn on) the toggle. Now, all the non-critical windows updates will be restricted for the system.

Method 2: Turn Off the Windows Update Service
We can also turn off the window update service. But, there is a drawback of this method, as it will disable all the updates either regular updates or Security updates. You can disable Automatic Updates on Windows 10 by following these steps:
1.Go to the Windows Search bar and search for “Services”.

2.Double-click on the “Services” and it will open a list of different services. Now scroll down the list to find the option “Windows Update”.

3.Right-click on “Windows Updates” and select Properties from the context menu that appears.

4.It will open the properties window, go to the “General” tab. In this tab, from “Startup type” drop-down choose “Disabled” option.

Now all the Windows updates are disabled for your system. But, you should continuously check that window update is disabled for your system especially when you restart the computer.
Method 3: Disable Automatic Update Using Registry Editor
In this method, we will do the changes in the registry. It is recommended to first take a full backup of your PC, if you can’t then at least backup Windows Registry Editor because if the changes don’t happen properly it may cause permanent damage to the system. So, better be careful and prepare for the worst. Now, follow the steps below:
Note: If you’re on Windows 10 Pro, Education, or Enterprise edition then skip this method and go to the next one.
1.First, use the shortcut key “Windows + R” to open the Run command. Now give “regedit” command to open the registry.

2.Navigate to the following location under Registry Editor:
HKEY_LOCAL_MACHINE\SOFTWARE\Policies\Microsoft\Windows

3.Right-click on Windows and select “New” then choose “Key” from the options.

4.Type “WindowUpdate” as the name of the key which you just created.

5.Now, right-click on “WindowUpdate” then select “New” and choose “Key” from the list of options.
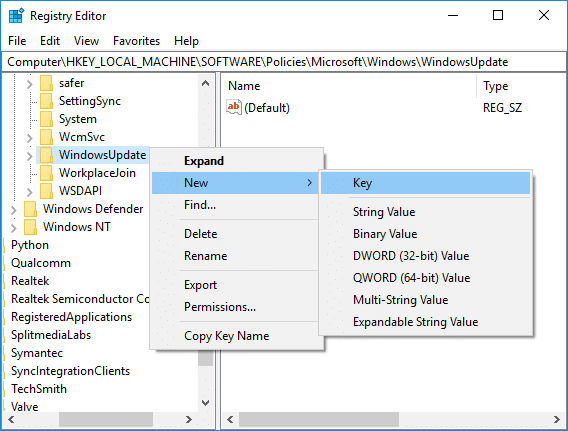
5.Name this new key as “AU” and hit Enter.

6.Now, right-click on this “AU” key and select “New” then choose “DWORD(32-bit) Value”.

7.Name this DWORD as NoAutoUpdate and press Enter.

7.You must double click on this “AU” key and a popup will open. Change the value data from ‘0’ to ‘1’. Then, press the OK button.

Finally, this method will completely disable Automatic Updates on Windows 10, but if you’re on Windows 10 Pro, Enterprise, or Education edition then you must skip this method, instead follow the next one.
Method 4: Disable Automatic Update using Group Policy Editor
You can stop automatic update using Group Policy Editor. You can also easily change this setting whenever a new update comes. It will ask for your permission to update. You can follow these steps to change the automatic update settings:
1.Use the shortcut key “Windows key + R”, it will open the run command. Now, type the command “gpedit.msc” in the run. This will open the group policy editor.

2.Navigate to the following location under Group Policy Editor:
Computer Configuration\Administrative Templates\Windows Components\Windows Update
3.Make sure to select Windows Update then in the right window pane double-click on “Configure Automatic Updates” policy.

4.Checkmark “Enabled” to activate the “Configure Automatic Updates” policy.

Note: If you want to completely stop all Windows updates then select Disabled under “Configure Automatic Updates” policy.

5.You can choose the diverse ways to configure automatic updates in the options category. Its recommended choosing the option 2 i.e. “Notify for download and auto install”. This option completely stops any automatic updates. Now click on apply and then press ok to complete the configuration.

6.Now you will receive a notification whenever any new update comes. You can manually update the Windows through Settings ->Update & Security->Windows Updates.
These are the methods which can be used to disable Automatic Window Update in the system.
Recommended:
- Easily Move Emails from one Gmail Account to another
- Airplane Mode not turning off in Windows 10 [SOLVED]
- Create Desktop Shortcut in Windows 10 (TUTORIAL)
- Manage Virtual Memory (Pagefile) In Windows 10
I hope the above steps were helpful and now you can easily Disable Automatic Updates on Windows 10, but if you still have any questions regarding this guide then feel free to ask them in the comment’s section.


