
Fix Windows Explorer has stopped working: The main reason why Windows Explorer has crashed is because of corrupted Windows files which can be due to a number of reasons, such as because of malware infection, corrupted Registry Files or incompatible drivers etc. But this error is very frustrating as many programs which are in accordance with Windows Explorer won’t work.
When working in Windows, you may receive the following error message:
Windows Explorer has stopped working. Windows is restarting
![Windows Explorer has stopped working [SOLVED]](https://techcult.com/wp-content/uploads/2017/06/Windows-Explorer-has-stopped-working-SOLVED.png)
Windows Explorer is a file management application which provides a GUI (Graphical User Interface) for accessing the files on your system (Hard Disk). With the help of Windows Explorer, you could easily navigate through your hard disk and check the contents of folders and subfolders. Windows Explorer is automatically launched when you log in to Windows. It is used to copy, move, delete, rename or search for files & folders. So it can be very annoying to work with Windows if Windows Explorer keeps on crashing.
Let’s see what are some common causes because of which Windows Explorer has stopped working:
- System Files may be corrupted or outdated
- Virus or Malware infection in the system
- Outdated Display drivers
- Incompatible drivers causing conflict with Windows
- Faulty RAM
Now that we have learned about the issue it’s time to see how to troubleshoot the error and possibly fix it. But as you can see there is no single cause due to which this error can occur that’s why we are going to list all the possible solutions to fix the error.
Fix Windows Explorer has stopped working
Make sure to create a restore point just in case something goes wrong.
Method 1: Run System File Checker (SFC) and Check Disk (CHKDSK)
1.Press Windows Key + X then click on Command Prompt(Admin).

2.Now type the following in the cmd and hit enter:
Sfc /scannow
sfc /scannow /offbootdir=c:\ /offwindir=c:\windows

3.Wait for the above process to finish and once done restart your PC.
4.Next, run CHKDSK from here Fix File System Errors with Check Disk Utility(CHKDSK).
5.Let the above process complete and again reboot your PC to save changes.
Method 2: Run CCleaner and Malwarebytes
Perform a Full antivirus scan to make sure your computer is secure. In addition to this run CCleaner and Malwarebytes Anti-malware.
1.Download and install CCleaner & Malwarebytes.
2.Run Malwarebytes and let it scan your system for harmful files.
3.If malware is found it will automatically remove them.
4.Now run CCleaner and in the “Cleaner” section, under the Windows tab, we suggest checking the following selections to be cleaned:
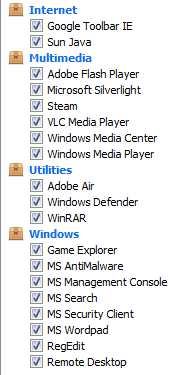
5.Once you’ve made certain the proper points are checked, simply click Run Cleaner, and let CCleaner run its course.
6.To clean your system further select the Registry tab and ensure the following are checked:
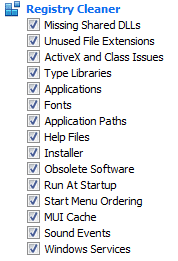
7.Select Scan for Issue and allow CCleaner to scan, then click Fix Selected Issues.
8.When CCleaner asks “Do you want backup changes to the registry?” select Yes.
9.Once your backup has completed, select Fix All Selected Issues.
10.Restart your PC and you may be able to Fix Windows Explorer has stopped working issue.
Method 3: Update Graphics Card Driver
Upgrade the drivers for your graphics card from the NVIDIA website (or from your manufacturer’s website). If you have trouble updating your drivers click here for the fix.

Sometimes updating graphic card driver’s seems to Fix Windows Explorer has stopped working error but if it doesn’t then continue to the next step.
Method 4: Perform a Clean Boot
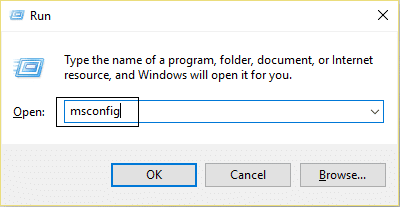
1.Press Windows Key + R then type msconfig and hit enter to System Configuration.
2.On General tab, choose Selective Startup and under it make sure the option “load startup items” is unchecked.

3.Navigate to the Services tab and checkmark the box that says “Hide all Microsoft services.“

4.Next, click Disable all which would disable all the other remaining services.
5.Restart your PC check if the problem persists or not.
6.If the issue is resolved then it’s definitely caused by a third-party software. In order to zero in on the particular software, you should enable a group of services (refer the previous steps) at a time then reboot your PC. Keep doing this until you figure out a group of services which are causing this error then check the services under this group one by one until you find which one is causing the problem.
6.After you had finish troubleshooting make sure to undo the above steps (select Normal startup in step 2) in order to start your PC normally.
Method 5: Run DISM (Deployment Image Servicing and Management)
1.Press Windows Key + X then select Command Prompt(Admin).

2.Enter the following command in cmd and hit enter:
DISM /Online /Cleanup-Image /RestoreHealth

2.Press enter to run the above command and wait for the process to complete, usually, it takes 15-20 minutes.
NOTE: If the above command doesn't work then try on the below:
Dism /Image:C:\offline /Cleanup-Image /RestoreHealth /Source:c:\test\mount\windows
Dism /Online /Cleanup-Image /RestoreHealth /Source:c:\test\mount\windows /LimitAccess
3.After the process is completed restart your PC.
Method 6: Disable Items in Right Click Context Menu
When you install a program or application in Windows, it adds an item in the right-click context menu. The items are called shell extensions, now if you add something which might conflict with the Windows this could certainly cause the Windows Explorer to crash. As Shell extension is part of Windows Explorer hence any corrupt program could easily cause Windows Explorer has stopped working error.
1.Now to check which of these programs are causing the crash you need to download a 3rd party software called
ShexExView.
2.Double click the application shexview.exe in the zip file to run it. Wait for few seconds as when it launches for the first time it takes some time to collect information about shell extensions.
3.Now click Options then click on Hide All Microsoft Extensions.

4.Now Press Ctrl + A to select them all and press the red button in the top-left corner.

5.If it asks for confirmation select Yes.

6.If the issue is resolved then there is a problem with one of the shell extensions but to find out which one you need to turn them ON one by one by selecting them and pressing the green button on the top right. If after enabling a particular shell extension Windows Explorer crashes then you need to disable that particular extension or better if you can remove it from your system.
Method 7: Disable Thumbnails
1.Press the Windows Key + E combination on the keyboard, This will launch File Explorer.
2.Now in the ribbon, click View tab and then click Options then Change folder and search options.

3.In Folder Options select View tab and enable this option “Always show icons, never thumbnails.”
![]()
4.Restart your system and hopefully, your problem would be solved by now.
Method 8: Run Windows Memory Diagnostic
1.Type memory in the Windows search bar and select “Windows Memory Diagnostic.“
2.In the set of options displayed select “Restart now and check for problems.“

3.After which Windows will restart to check for possible RAM errors and will hopefully display the possible reasons as to why you were facing Windows Explorer has stopped working error.
4.Reboot your PC and check if the problem is resolved or not.
5.If the issue is still not resolved then run Memtest86 which can be found in this post Fix kernel security check failure.
Method 9: Run Windows BSOD Troubleshoot Tool (Only available after Windows 10 Anniversary update)
1.Type “Troubleshoot” in Windows Search bar and select Troubleshooting.
2.Next, click Hardware and Sound & from there select Blue screen under Windows.

3.Now click on Advanced and make sure “Apply repairs automatically” is selected.

4.Click Next and let the process finish.
5.Reboot your PC which should able to troubleshoot Windows Explorer has stopped working error.
Method 10: Try to Restore you System to working condition
To Fix Windows Explorer has stopped working error you may need to Restore your computer to an earlier working time using System Restore.
Method 11: Repair Install Windows 10
This method is the last resort because if nothing works out then this method will surely repair all problems with your PC. Repair Install just using an in-place upgrade to repair issues with the system without deleting user data present on the system. So follow this article to see How to Repair Install Windows 10 Easily.
Recommended for you:
- Fix Unmountable Boot Volume Stop Error 0x000000ED
- Reboot and Select Proper Boot Device Issue
- 6 Ways To Fix Physical Memory Dump Error
- Fix KMODE Exception not handled Error
That’s it, you have successfully Fix Windows Explorer has stopped working error but if you still have any queries regarding this guide then feel free to ask them in the comment’s section.


