
In the context of Windows 10, hardware acceleration refers to the use of a computer’s hardware components, such as the graphics processing unit (GPU), to perform certain tasks faster or more efficiently than they would if they were performed by the CPU alone. Hardware acceleration can be useful for a wide range of applications, including graphics-intensive programs like video editing software, 3D modeling software, and games. As you continue reading the article you will know How to enable hardware acceleration in Windows 10.

How to Enable and Disable Hardware Acceleration in Windows 10
Let’s look at the steps to enable and disable hardware acceleration on Windows 10 PC.
Quick Answer
In Windows 10, open Settings > System > Display > Graphics settings and switch Hardware-accelerated GPU scheduling on or off. In Windows 11, go to Settings > System > Display > Graphics > Advanced graphics settings. Restart your PC afterwards. To turn off hardware acceleration in a browser, open Settings > System in Chrome or Settings > System and performance in Edge and switch off Use graphics acceleration when available.
What is Hardware Acceleration in Windows 10?
Hardware acceleration is the use of specialized hardware components, such as a graphics processing unit (GPU) to perform certain tasks more efficiently than they would be performed by the central processing unit (CPU) alone. By offloading certain tasks to dedicated hardware, the CPU is able to focus on other tasks, which can improve the overall performance of the system. However, it may not be necessary or desirable to use hardware acceleration windows 10 for all tasks, and it may not be compatible with all hardware or software.
There are two kinds of hardware acceleration settings you will run into:
- Windows-level: Hardware-accelerated GPU scheduling (often shortened to HAGS) lets the graphics card manage its own memory and task queue instead of relying on Windows. This can reduce input lag and improve frame rates in games.
- App-level (graphics acceleration): Browsers such as Chrome, Edge and Firefox, and apps like Discord, Microsoft Teams and Office, have their own switch that decides whether they use the GPU to draw pages, video and animations.
Also Read: How to Stop Windows 10 from asking Permission
What Does Hardware Acceleration Do?
Hardware acceleration can also be used to improve the performance of certain features in Windows 10, such as font rendering, video playback, and browsing the web. However, hardware acceleration in Windows 10, is rarely compatible with all. If you encounter any issues after enabling hardware acceleration, you may need to disable it or adjust the settings to resolve the problem.
How to Enable Hardware Acceleration in Windows 10
To enable hardware acceleration windows 10, follow these steps.
Method 1: Through Graphics Settings
1. Right-click on the desktop and select Display settings from the context menu.
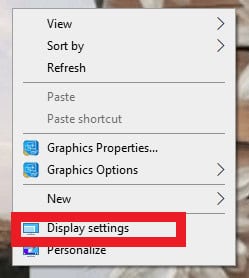
2. Scroll down and click on Graphics settings.

3. Turn the toggle on for Hardware-accelerated GPU scheduling.
4. Click Yes if User Account Control asks for permission. If those prompts annoy you, see how to stop Windows 10 from asking permission.
5. Restart the PC after making any changes in order for them to be fully effective.
However, even without the Hardware-accelerated GPU scheduling option, you can still adjust the general hardware acceleration settings. Follow the steps below for the same.
Method 2: Through Advanced Display Settings
1. Right-click on the desktop and select Display settings.
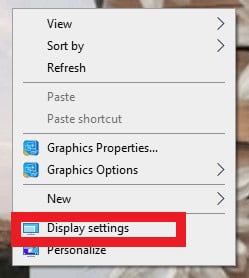
2. Then, scroll down and click on Advanced display settings.

3. Now, click on the display adapter properties for display1.

4. Click on Troubleshoot.
Note: If your device allows you to configure hardware acceleration, you’ll notice a troubleshooting tab. If you don’t see the tab, it means your system doesn’t allow you to manage the settings manually.
5. Then, click on Change settings.
6. Now, drag the slider for Hardware acceleration to full.
7. Click OK and restart your computer.
Further will see how to disable hardware acceleration.
Also Read: How to Activate Windows 10 without key
How to Turn On Hardware Acceleration in Windows 11
Microsoft redesigned the Graphics page in Windows 11, so the toggle now sits in a separate section.
- Press Windows + I to open Settings.
- Click System in the left pane, then Display.
- Scroll down and click Graphics.
- Click Advanced graphics settings. On older Windows 11 builds this link is called Change default graphics settings.
- Switch Hardware-accelerated GPU scheduling to On.
- Restart your PC.
On the same page you will also find Optimizations for windowed games, which reduces lag in DirectX 10 and 11 games running in windowed or borderless mode, and per-app GPU preferences under Custom settings for applications.
How to Disable Hardware Acceleration in Windows 10
To disable hardware acceleration windows 10, you will need to follow the same steps as mentioned above. The only thing that you need to change is drag the slider for hardware acceleration to none in order to disable it.
Method 1: Turn Off Hardware-Accelerated GPU Scheduling in Settings
- Open Settings > System > Display.
- Windows 10: click Graphics settings. Windows 11: click Graphics > Advanced graphics settings.
- Switch Hardware-accelerated GPU scheduling to Off.
- Restart your PC.
Method 2: Use the Display Adapter Slider (If Available)
- Go to Settings > System > Display > Advanced display settings.
- Click Display adapter properties for Display 1.
- Open the Troubleshoot tab and click Change settings.
- Drag the Hardware acceleration slider to None and click OK.
- Restart your PC.
Method 3: Use the Registry Editor
Use this method if the toggle is missing from Settings or you manage several PCs. Editing the registry incorrectly can cause problems, so create a restore point first.
- Press Windows + R, type regedit and press Enter. Click Yes at the prompt.
- Paste this path into the address bar and press Enter:
HKEY_LOCAL_MACHINE\SYSTEM\CurrentControlSet\Control\GraphicsDrivers - In the right pane, double-click HwSchMode. If it doesn’t exist, right-click an empty area, choose New > DWORD (32-bit) Value and name it HwSchMode.
- Set Value data to 1 to turn hardware-accelerated GPU scheduling off, or 2 to turn it on. Click OK.
- Close Registry Editor and restart your PC.
Should Hardware Acceleration Be On or Off?
For most people with a reasonably modern PC, leave it on. Hardware-accelerated GPU scheduling is on by default on many Windows 11 PCs, and NVIDIA’s DLSS Frame Generation requires it.
Turn it off if you notice any of these after an update or on an older PC:
- Black, white or flickering screens in a browser or app
- Stuttering or frame drops in games, especially on graphics cards with limited video memory
- Video playback freezing while audio continues
- An app crashing or showing graphics glitches that disappear in Safe Mode
- High GPU usage on a laptop that drains the battery quickly
Change one setting at a time and test for a day before changing the next, so you know which one fixed the problem.
Also Read: What to do if Windows 10 Keeps Locking Itself
Frequently Asked Questions (FAQs)
Q1. What happens if I turn off hardware acceleration?
Ans. If you turn off hardware acceleration, your computer will rely more on its CPU to perform tasks that would normally be handled by the specialized hardware. This can lead to a decrease in performance, as the CPU may not be as efficient at performing those tasks as the dedicated hardware.
Q2. Does hardware acceleration use more RAM?
Ans. Hardware acceleration does not necessarily use more RAM. However, certain tasks that are offloaded to specialized hardware, such as a GPU or DSP, may require additional memory in order to function properly.
Q3. What are the benefits of hardware acceleration?
Ans. There are many benefits of hardware acceleration, some of them are improved performance, reduced strain on the CPU, energy efficiency, enhanced visual experience, etc.
Q4. Does hardware acceleration affect Internet speed?
Ans. In general, hardware acceleration is not directly related to Internet speed. Internet speed is determined by the speed of your Internet connection, which is typically measured in megabits per second (Mbps). Hardware acceleration has no impact on the speed at which data is transferred over the Internet.
Q5. Do windows 10/11 have hardware acceleration?
Ans. Yes, Windows 10 and Windows 11 both support hardware acceleration, which allows a computer’s hardware to perform tasks more efficiently than is possible in software running on the central processing unit (CPU).
Recommended: Fix An Error Has Occurred in the Script On This Page
Hardware acceleration is worth keeping on for most PCs, but it’s one of the first settings to turn off when you see flickering, black screens or stutter. Start with the app where the problem appears, then try the Windows-level GPU scheduling toggle, and always restart afterwards.


Troubleshoot option does not exist