
Booting Windows 10 from a bootable USB drive is a good option, especially when your laptop does not support CD or DVD drives. It also comes in handy if Windows OS crashes and you need to reinstall Windows 10 on your PC. However, many users complained of Windows 10 won’t boot from USB.
Read on to know more about how to boot from USB Windows 10 and check out the methods you can use if you cannot boot from USB Windows 10.

How to Fix Windows 10 won’t Boot from USB issue
In this guide, we have explained how to boot Windows 10 from USB in five easy-to-follow methods for your convenience.
Method 1: Change USB File System to FAT32
One of the reasons your PC won’t boot from USB is the conflict between file formats. If your PC uses a UEFI system and the USB uses an NTFS file system, you are quite likely to face PC won’t boot from USB issue. To avoid such conflict, you will need to change the file system of the USB from NFTS to FAT32. Follow the steps below to do so:
1. Plug the USB into a Windows computer after it’s turned on.
2. Next, launch the File Explorer.
3. Then, right-click on the USB drive and then select Format as shown.

4. Now, select FAT32 from the list.

5. Check the box next to Quick Format.
5. Lastly, click on Start to begin the formatting process of the USB.
After the USB has been formatted to FAT32, you need to implement the next method to create an installation media on the formatted USB.
Method 2: Make sure USB is Bootable
Windows 10 won’t boot from USB if you created the USB flash drive incorrectly. Instead, you need to use the correct tools to create installation media on the USB to install Windows 10.
Note: The USB that you use should be blank with at least 8GB of free space.
Follow the steps below if you have not created an installation media yet:
1. Download the media creation tool from the official Microsoft website by clicking on the Download tool now, as shown below. 
2. Once the file is downloaded, click on the downloaded file.
3. Then, click on Run to run the Media Creation Tool. Remember to Agree to the license terms.
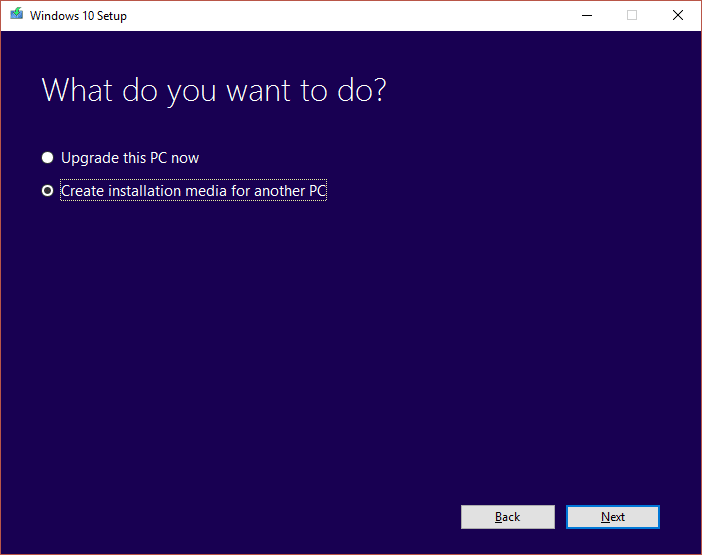
4. Next, choose to Create installation media for another PC. Then, click on Next.
5. Now, choose the version of Windows 10 you want to download.

6. Choose a USB flash drive as the media you want to download and click on Next.

7. You will need to manually select the USB drive you want to use on the ‘Select a USB flash drive’ screen.

8. The media creation tool will start downloading Windows 10 and depending on your internet speed; the tool may take up to an hour to finish downloading.

Once finished, your bootable USB Flash Drive will be ready. For more detailed steps, read this guide: How to Create Windows 10 Installation Media with Media Creation Tool
Method 3: Check if Boot from USB is Supported
Most modern computers offer the feature that supports booting from a USB drive. To check if your computer supports USB booting, you need to check the computer BIOS settings.
1.Turn on your computer.
2. While your PC is booting, press and hold the BIOS key until the PC enters the BIOS menu.
Note: The standard keys to enter BIOS are F2 and Delete, but they may vary depending on the brand manufacturer & device model. Make sure to check the manual that came with your PC or visit the manufacturer’s website. Here is a list of some PC brands and the BIOS keys for them:
- Asus – F2
- Dell – F2 or F12
- HP – F10
- Lenovo desktops – F1
- Lenovo laptops – F2/Fn + F2
- Samsung – F2
3. Go to Boot Options and press Enter.
4. Then, go to Boot Priority and press Enter.
5. Check if the boot from the USB option is listed here.

If not, then your computer does not support booting from a USB drive. You will need a CD/DVD to install Windows 10 on your computer.
Method 4: Change Boot Priority in Boot Settings
An alternative to fix can’t boot Windows 10 from USB is to change the boot priority to the USB drive in BIOS settings. Or else, read Top 14 Best Alternative for Windows OS.
1. Turn on the computer and then enter BIOS as explained in Method 3.
2. Go to Boot Options or a similar title and then press Enter.
3. Now, navigate to Boot Priority.
4. Select the USB drive as the First boot device.
5. Save the changes and restart your computer to boot from USB.
Also Read: SOLVED: No Boot Device Available Error in Windows 7/8/10
Method 5: Enable Legacy Boot and Disable Secure Boot
If you have a computer that uses EFI/UEFI, you will have to enable Legacy Boot and then try booting from USB again. Follow the steps below to enable Legacy Boot & disable Secure Boot:
1. Turn on your PC. Then, follow the steps in Method 3 to enter BIOS.
2. Depending on the model of your PC, BIOS will list different option titles for Legacy Boot settings.
Note: Some familiar names that indicate Legacy Boot settings are Legacy Support, Boot Device Control, Legacy CSM, Boot Mode, Boot Option, Boot Option Filter, and CSM.
3. Once you find the Legacy Boot settings option, enable it.

4. Now, look for an option titled Secure Boot under Boot Options.
5. Disable it by using the (plus) + or (minus) – keys.

6. Lastly, press F10 to save settings.
Remember, this key also may vary depending on the model & manufacturer of your laptop/desktop.
Recommended:
- How to enable legacy advanced boot option in Windows 10
- Fix No Audio Output Device Is Installed Error
- Fix Folder Keeps Reverting to Read Only on Windows 10
- How to Enable or Disable Administrator Account in Windows 10
We hope that this guide was helpful and you were able to fix Windows 10 won’t boot from the USB issue. Also, if you have any questions or suggestions regarding this article, feel free to drop them in the comments section.


