
The High-Definition Multimedia Interface or HDMI supports uncompressed media streaming so that you can view clearer pictures and hear sharper sounds. Furthermore, you can enjoy streaming video content with surround-sound audio support and 4K content on your display monitor or Television using just one cable. Moreover, you can simultaneously transmit digital video and audio from a TV or a computer to a projector or another computer/TV.
Some users complained that while the video content was being shared and viewed using HDMI, the audio was not accompanying the video. If you too are experiencing the same problem, you are at the right place. We bring a perfect guide that will help you fix HDMI No Sound in Windows 10 When Connected to the TV issue. So, continue reading to learn how.

Fix HDMI No Sound in Windows 10 When Connected to TV
Reasons behind ‘HDMI Cable No Sound on TV’ Issue
There is a wide range of reasons behind the ‘HDMI No Sound in Windows 10 When Connected to TV’ issue.
1. It starts with the HDMI cable you use to connect to the computer, TV, or monitor. Plug the HDMI cable into another PC/TV and check whether you can hear any sound. If yes, then there is a problem with the monitor or TV you are projecting to. You will need to configure it to receive HDMI.
2. If the audio issue still persists, it indicates a problem with the HDMI cable. Hence, try to connect with a new, functioning cable.
3. Audio problems with your PC can be caused by several reasons:
- Selection of the wrong audio driver or the incorrect playback device.
- Speaker Soundcard set as default instead of switching the audio output to HDMI.
- Not configured to quantify and receive HDMI audio data.
Before moving forward to solve the HDMI cable no sound on TV problem, here is a list of basic checks to be performed:
- Plug-in the HDMI cable properly. Make sure that the HDMI cable is not damaged or faulty.
- Ensure the Graphics Card (NVIDIA Control Panel) is configured correctly.
- NVIDIA cards (pre-GeForce 200 series) do not support HDMI audio.
- Realtek drivers also face compatibility issues.
- Reboot the devices as a simple restart usually fixes minor problems & software glitches, most of the time.
Explained below are various methods that will help you enable HDMI audio to send the audio to the TV. Read till the end to find the one that suits you.
Method 1: Set HDMI as Default Playback Device
Whenever a PC has two or more sound cards installed, a conflict usually arises. It’s quite likely that the HDMI audio output is not enabled automatically since the soundcard of speakers present internally in your computer is being read as the default device.
Here’s how to set HDMI as the default playback device on Windows 10 PCs:
1. Go to the Windows search box, type Control Panel and open it.
2. Now, click on the Sound section as depicted below.
Note: Make sure to select “View by” as Large icons.

3. Now, the Sound settings window appears on the screen with the Playback tab.
4. Plug in the HDMI cable. It will be displayed on the screen with the name of your device. Refer given pic.
Note: If the device name does not appear on the screen, then right-click on the empty space. Check whether Show Disabled Devices and Show Disconnected Devices options are enabled. Refer above picture.

5. Now, right-click on the audio device and check if it is enabled. If not, click on Enable, as shown.

6. Now, select your HDMI device and click on Set Default, as shown below.

7. Finally, click Apply followed by OK to save the changes and exit the window.
Method 2: Update Installed Drivers
The device drivers installed on your system, if incompatible, might trigger HDMI sound not working in Windows 10 when connected to the TV issue. Fix this problem quickly, by updating system drivers to their latest version
You can manually update your device drivers from the manufacturer’s website. Find and Download the drivers corresponding to the Windows version on your PC. Once downloaded, double click on the downloaded file and follow the given instructions to install it. Follow the same steps for all device drivers such as audio, video, network, etc.
You can also update device drivers through Device Manager:
1. Press Windows Key + R then type devmgmt.msc as shown and click OK.

2. Now, double-click to expand Sound, video and game controllers.

3. Now, right-click on the HDMI audio device and click on Update driver, as depicted.

4. Click on Search automatically for drivers under How do you want to search for drivers?
Note: Clicking on ‘Search automatically for drivers’ will allow Windows to search for the best available drivers and install them on your computer.

Method 3: Rollback the Graphics Drivers
If the HDMI had been working correctly and began to malfunction after an update, then rolling back the Graphics Drivers might help. The rollback of drivers will delete the current driver installed in the system and replace it with its previous version. This process should eliminate any bugs in the drivers and potentially, fix HDMI No Sound in Windows 10 When Connected to TV issue.
1. Type Device Manager in the Windows search bar and open it from the search results.

2. Double-click on the Display adapters from the panel on the left and expand it.

3. Right-click on your Graphics card name and click on Properties, as depicted.

4. Switch to the Driver tab and select Roll Back Driver, as shown.
Note: If the option to Roll Back Driver is greyed out in your system, it indicates that your system does not have the pre-installed driver files or the original driver files are missing. In this case, try alternative methods discussed in this article.

5. Click on OK to apply this change.
6. Finally, click on Yes in the confirmation prompt and restart your system to make the rollback effective.
Also Read: How to Convert Coaxial Cable to HDMI
Method 4: Enable Audio Controllers
If the Audio controllers of your system are disabled, then the ‘HDMI No Sound in Windows 10 When Connected to TV’ issue will occur because the normal function of audio output swapping will be collapsed. All the audio controllers on your device should be enabled, especially when you have more than one audio driver installed.
Thus, you need to ensure the audio controllers are not disabled by following these steps:
1. Open Device Manager as explained in the previous method.
2. Now, click View > Show hidden devices as depicted in the picture below. Move to the next step, if it is already checked.

3. Now, expand System Devices by double-clicking on it.

4. Here, search for the audio controller i.e High-Definition Audio Controller, and right-click on it. Then, click on Properties, as shown below.

5. Switch to the Driver tab and click on Enable Device.
Note: If the audio controller drivers are already enabled, an option to Disable Device will appear on the screen.
6. Finally, restart the system to save changes.
Method 5: Reinstall Audio Drivers
If updating the drivers or rolling back the drivers doesn’t help fix HDMI sound not working on Windows 10 issue, its best to reinstall the audio drivers and get rid of all such issues in one-go. Here’s how to do so:
1. As instructed earlier, launch the Device Manager.
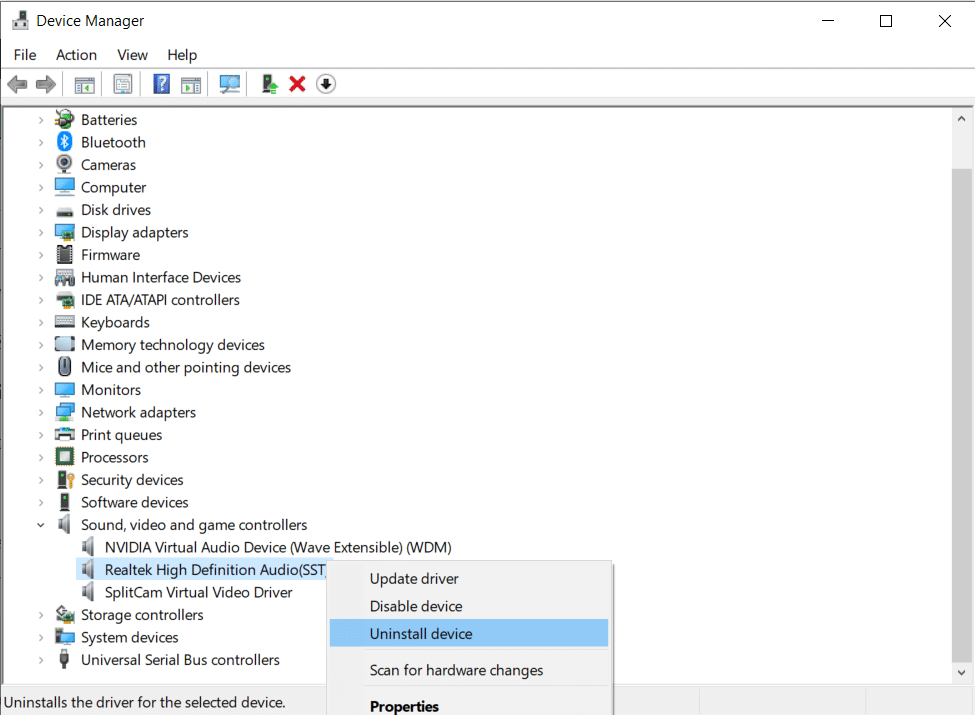
2. Scroll down, search & then, expand Sound, video and game controllers by double-clicking on it.
3. Now, right-click on the High Definition Audio Device.
4. Click on Uninstall device as depicted below.
5. A warning prompt will appear on the screen. Click on Uninstall to proceed.

6. Next, expand System Devices by double clicking on it.
7. Now, repeat steps 3-4 to uninstall High Definition Audio Controller.

8. If you have more than one audio controller in your Windows system, uninstall all of them using the same steps.
9. Restart your system. Windows will automatically install the latest drivers from its repository.
If this doesn’t help fix HDMI No Sound in Windows 10 When Connected to TV issue, try the next solution.
Method 6: Use Windows Troubleshooter
Windows Troubleshooter is an extremely useful in-built tool that helps sort out several common issues with Windows computer systems. In this scenario, the functionality of hardware components (audio, video, etc) will be tested. The issues responsible for such discrepancies will be found and resolved.
Note: Make sure you log in as an administrator before proceeding.
1. Hit the Windows key on the keyboard and type troubleshoot, as depicted.

2. Click on Open from the right pane to launch the Troubleshoot settings window.
3. Here, click the link for Additional troubleshooters.
4. Next, click on Playing Audio under the Get up and running section. Refer given pic.

5. Now, click on Run the troubleshooter as depicted below.

6. On-screen instructions will be displayed. Follow them to run the troubleshooter and apply the recommended fixes.
7. Restart your system, if and when prompted.
Also Read: Fix Black Screen Issue on Samsung Smart TV
Method 7: Check the TV/Monitor Sound Properties
Always check and correct the TV/Monitor sound properties to make sure that the obvious requirements are being met. This includes ensuring proper seating of HDMI cable on its port, cable in working condition, TV not on mute and set to optimum volume, etc. Follow the below-mentioned steps to check the TV/Monitor sound properties:
1. Navigate to the Menu of Monitor or Television.
2. Now, select Settings followed by Audio.
3. Ensure the audio is Enabled and audio coding is set to Automatic/ HDMI.
4. Toggle OFF Dolby Volume Mode as it’s a tried & tested solution.

5. Now, set the Audio Range as any of these:
- Between WIDE and NARROW
- Stereo
- Mono
- Standard etc.
Note: Often, HDMI graphics card does not support HDMI audio rather than HDMI video. In this case, the connection can be established by connecting the audio cable between the computer and the system.
Confirm if the HDMI sound not working on TV issue is fixed.
Method 8: Restart Android TV
The restart process of Android TV will depend on the TV manufacturer and device model. Here are the steps to restart your Android TV:
On the remote,
1. Press ![]() Quick Settings.
Quick Settings.
2. Now, select Restart.

Alternatively,
1. Press HOME on the remote.
2. Now, navigate to Settings > Device Preferences > About > Restart > Restart.
Method 9: Use the Correct HDMI Cable & Port
Certain devices have more than one HDMI port. In such cases, always ensure that you connect the correct pair of ports to the HDMI cable. You can opt to purchase adapters, if there is a mismatch between the HDMI cable and computer cable.
Recommended:
- HDMI Port Not Working in Windows 10 [SOLVED]
- Fix HDMI Sound Not Working in Windows 10
- Fix Media Disconnected Error on Windows 10
- Fix Caps Lock Stuck In Windows 10
We hope that this guide was helpful, and you were able to fix HDMI No Sound in Windows 10 When Connected to TV. Let us know which method worked for you best. Also, if you have any queries/comments regarding this article, then feel free to drop them in the comments section.


