
Adjust PC’s Screen Brightness on Windows 10: Most of the computer users spent hours after hours working in front of a computer screen, either in the office or at home. So, if you have proper screen brightness, it can help you in avoiding eye strain. When you are in the daylight, you need your screen brightness to be more; again when you are in a dark room, you need to decrease down your screen brightness so that it comforts your eyes. Also, as you decrease down your screen brightness, it helps in saving your power and increase the battery life. In this article, you will learn about the different methods through which you can adjust your screen brightness in Windows 10.

6 Ways to Change Screen Brightness in Windows 10
Make sure to create a restore point just in case something goes wrong.
Method 1: Adjust screen brightness using Hotkeys
Thankfully, Windows 10 provides users with a number of easy ways to adjust your screen brightness. This method is one of the easiest among the methods discussed here. You might have noticed that most of the laptops or notebooks come with a dedicated set of shortcut keys for controlling various functions of PC such as increasing or decreasing volume or brightness, enabling or disabling WiFi, etc.
From these dedicated keys we have two sets of keys that are used for increasing or decreasing the screen brightness in Windows 10 PC. You can take a look at your keyboard and find out keys with symbols that you can see in the image below. To actually use this key you may need to press the Function key first.

In case these hotkeys are not functional, then you have to take a look at whether the keyboards, as well as the display drivers, are successfully installed or not.
Method 2: Change screen brightness using the Action Center
Another simple way to deal with screen brightness is by using the Windows 10 Action Center. To do this follow the below steps:
1.Click the Action Center icon which you can find in the extreme right corner of the taskbar.
![]()
2.Open the Action Center pane by clicking on Expand.
3.Click on the Brightness tile for reducing or increasing the brightness of your display.
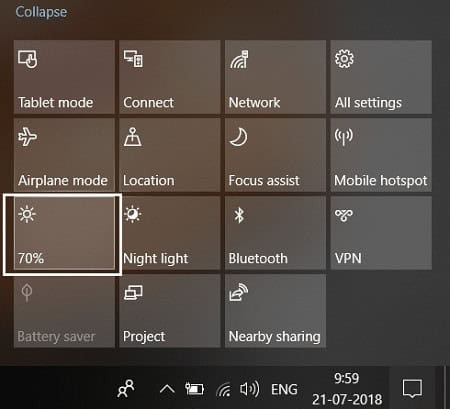
4.In case you cannot see the Brightness tile, you have to click the Expand option.
5.Click the Brightness tile and you can easily adjust your screen brightness on Windows 10.
Method 3: Change screen brightness using Windows 10 Settings
1.Press Windows Key + I to open Settings then click on System.

2.Now from the left-hand side window pane select Display.
3.To change the screen brightness, drap the slider to either left or right to decrease or increase the brightness respectively.

4.Click your mouse and drag the slider in order to increase or decrease the brightness.
Method 4: Change brightness using Control Panel
Another traditional way for manually adjusting the screen brightness on Windows 10 PC is by using the Control Panel. To do this, the steps you need to follow are:
1.Type control in Windows Search then click on Control Panel from the search result.

2.Under Control Panel navigate to Hardware and Sound > Power Options.

3.Now under Power options click on Change plan settings next to your currently active power plan.

4.Now use the Screen brightness slider to adjust your screen brightness levels. Drag it left or right in order to reduce or increase the brightness respectively.

5.Once done, click Save changes.
Method 5: Adjust screen brightness using Windows Mobility Center
You can also change the screen brightness from Windows Mobility Center, to do so follow the below steps:
1.Right-click on the Start button then select “Mobility Center”. Or type “Mobility Center” or “Windows Mobility Center” in Windows Search.

2.You can drag the slider under Display brightness to adjust your screen brightness on Windows 10.
Method 6: Automatically Adjust Brightness
Windows 10 can automatically manage your screen brightness according to the battery life. It provides users with a battery saver option which can automatically lower your screen brightness to save battery life.
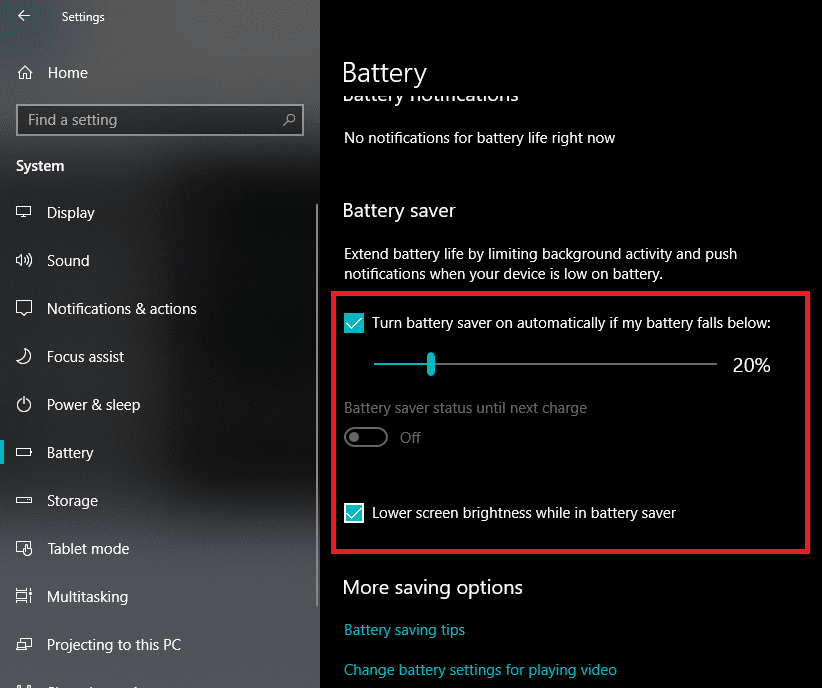
1.Press Windows Key + I to open Settings then click on System.
2.Now under System click on Battery from the left-hand window pane.
3.Next, checkmark the box that says “Turn battery saver on automatically if my battery falls below” under Battery saver. And drag the slider to adjust the battery level percentage.

4.Again, checkmark the box that says “Lower screen brightness while in battery saver” option.
Recommended:
- Fix Error 651: The modem (or other connecting devices) has reported an error
- How to Delete SoftwareDistribution Folder on Windows 10
- How to Fix Bluetooth problems in Windows 10
- Enable Flash for Specific Websites in Chrome
I hope the above steps were helpful and now you can easily Change Screen Brightness in Windows 10, but if you still have any questions regarding this tutorial then feel free to ask them in the comment section.


