
If you have recently purchased a desktop, you may have noticed that the OneDrive cloud storage service comes built into Windows 11. It automatically syncs your files, photos, and documents across all your devices. Although some may need it, not many users access this storage platform. Therefore, you may wonder how to turn off OneDrive on Windows 11 and get rid of unnecessary space. Let’s get started!
How to Turn Off OneDrive on Windows 11
Whether you wish to get rid of pop-up notifications or speed up your computer, here are all the ways you can disable OneDrive.
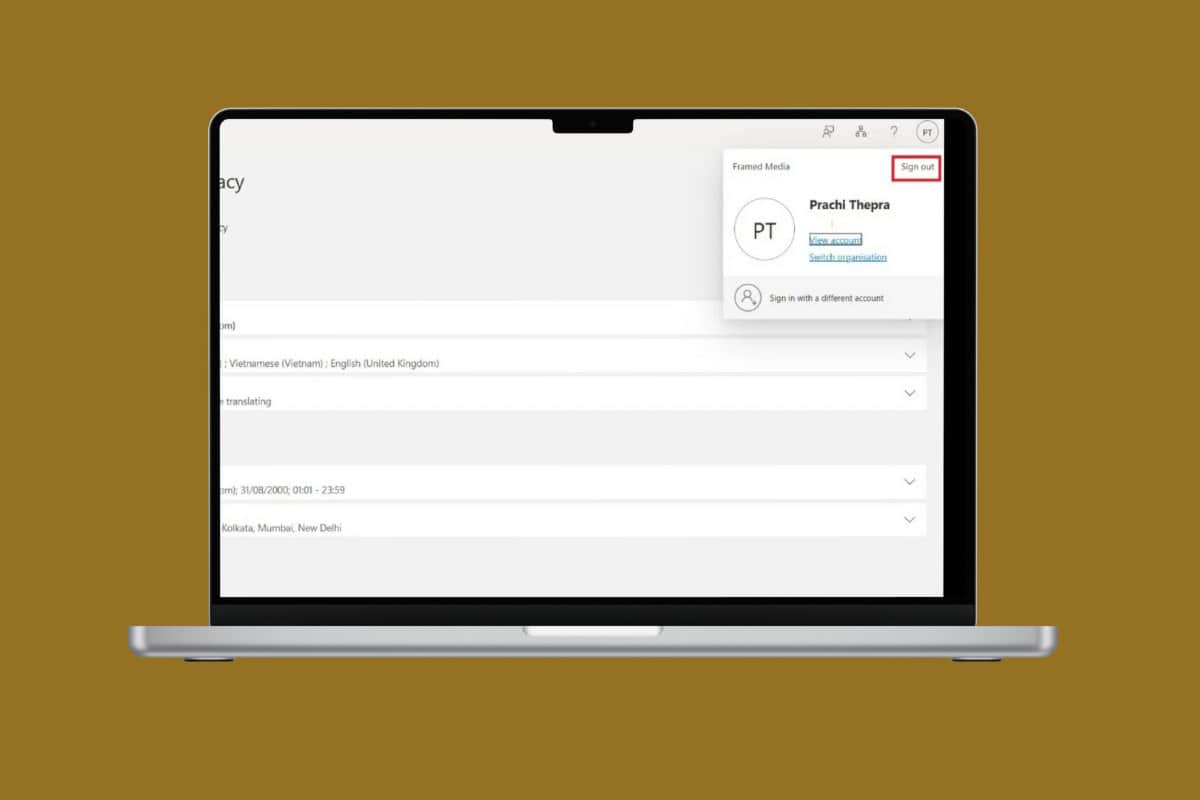
Method 1: Unlink Your Account
You can quickly unlink your account from OneDrive to avoid notifications:
- Open OneDrive and click on your profile at the top right corner.
- Now, click on Sign Out.
Once you’re logged out, OneDrive will become inactive.
Method 2: Via Startup in Task Manager
You can also turn off the Task Manager.
- Open Task Manager and click on Startup apps from the left menu.
- Now, right-click on OneDrive and select Disable.
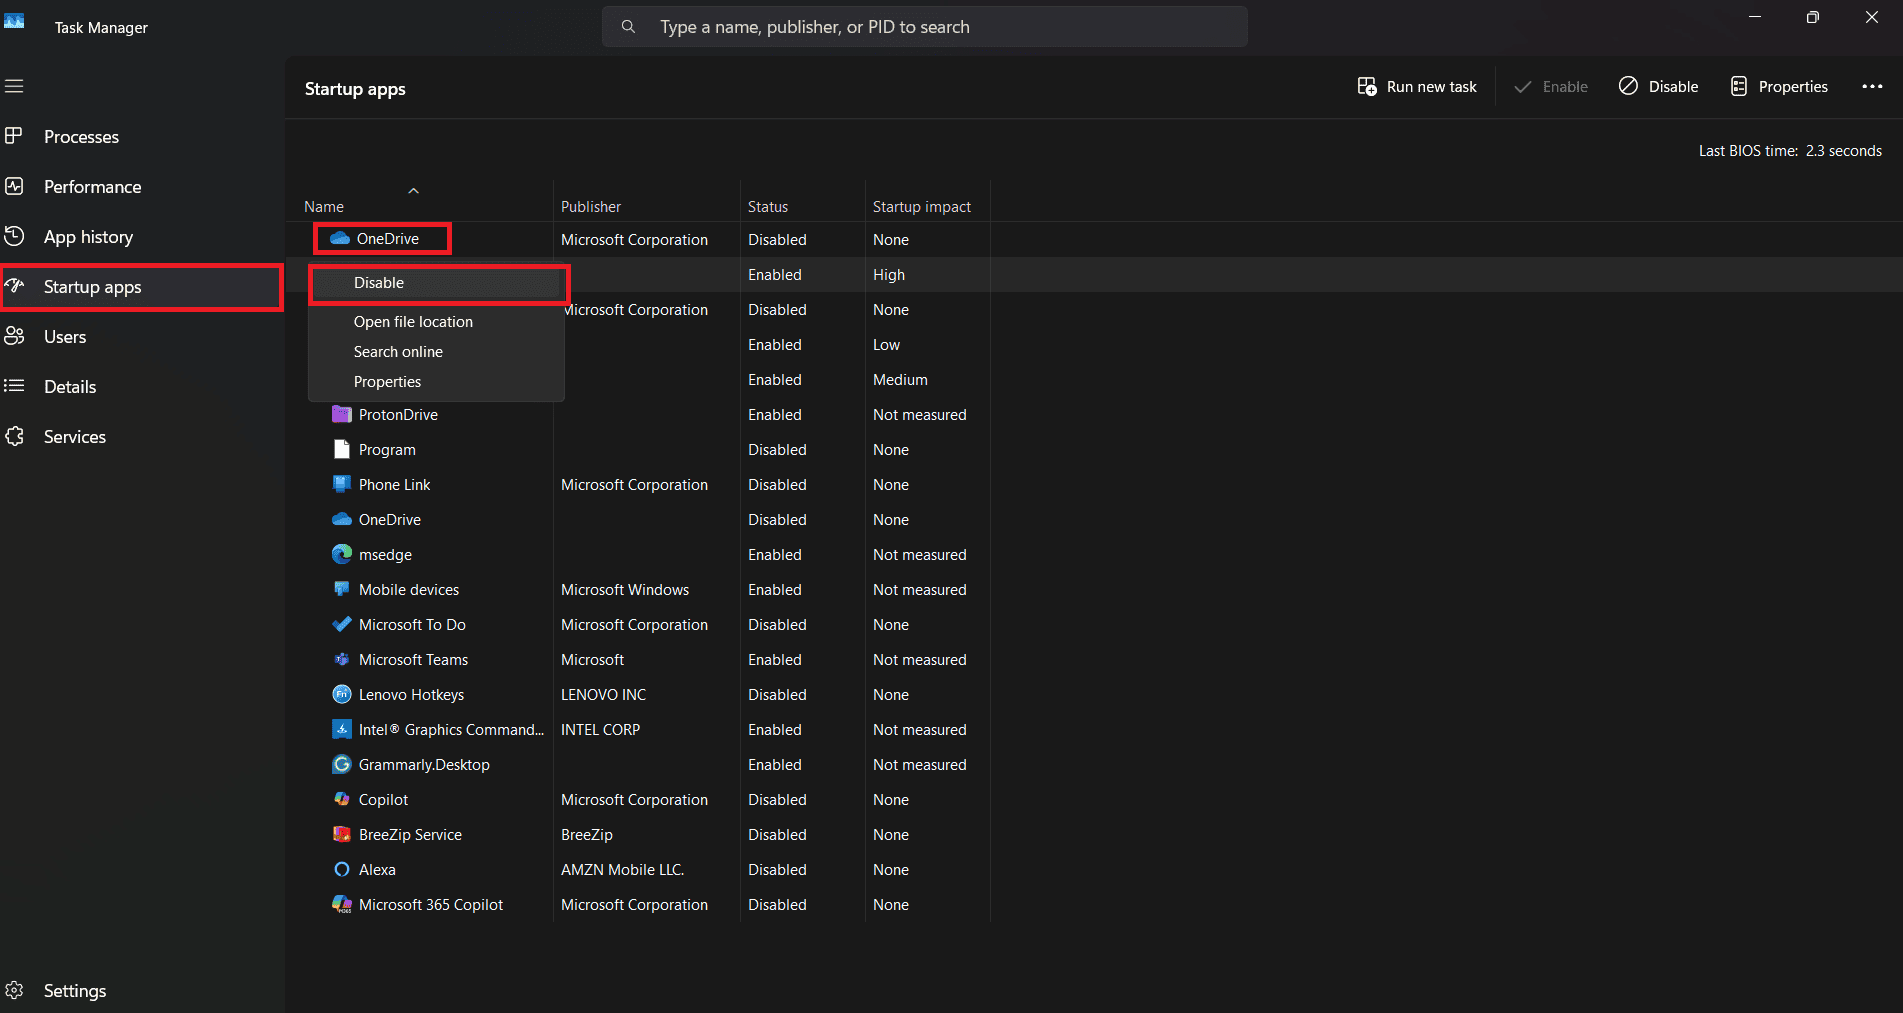
OneDrive will be disabled.
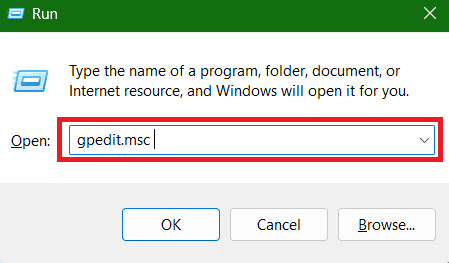
Method 3: Group Policy Editor
Follow the steps to do the same from the Group Policy Editor:
- Press the Windows and R keys to open the Run dialog.
- Type in gpedit.msc and hit Enter.
- Select Computer Configuration > Administrative Templates > Windows Components.
- Click on OneDrive.
- Double-click it to open its properties.
- Select Enabled.
- Click on Apply followed by OK.
- Restart the desktop.
This will successfully disable the platform.
Method 4: Registry Editor
You can do so from the Registry Editor:
- Press the Windows and R keys to open the Run dialog.
- Type in regedit and hit Enter.
- Select Yes.
- Click on the down arrow under HKEY_LOCAL_MACHINE.
- Click on the down arrow under SOFTWARE
- Click on the down arrow under Microsoft.
- Right-click on OneDrive and select New.
- Select DWORD (32-bit) Value.
- Name the file DisableFileSync.
- Then, double-click DisableFileSync.
- Type in 1 under its data.
- Click on OK.
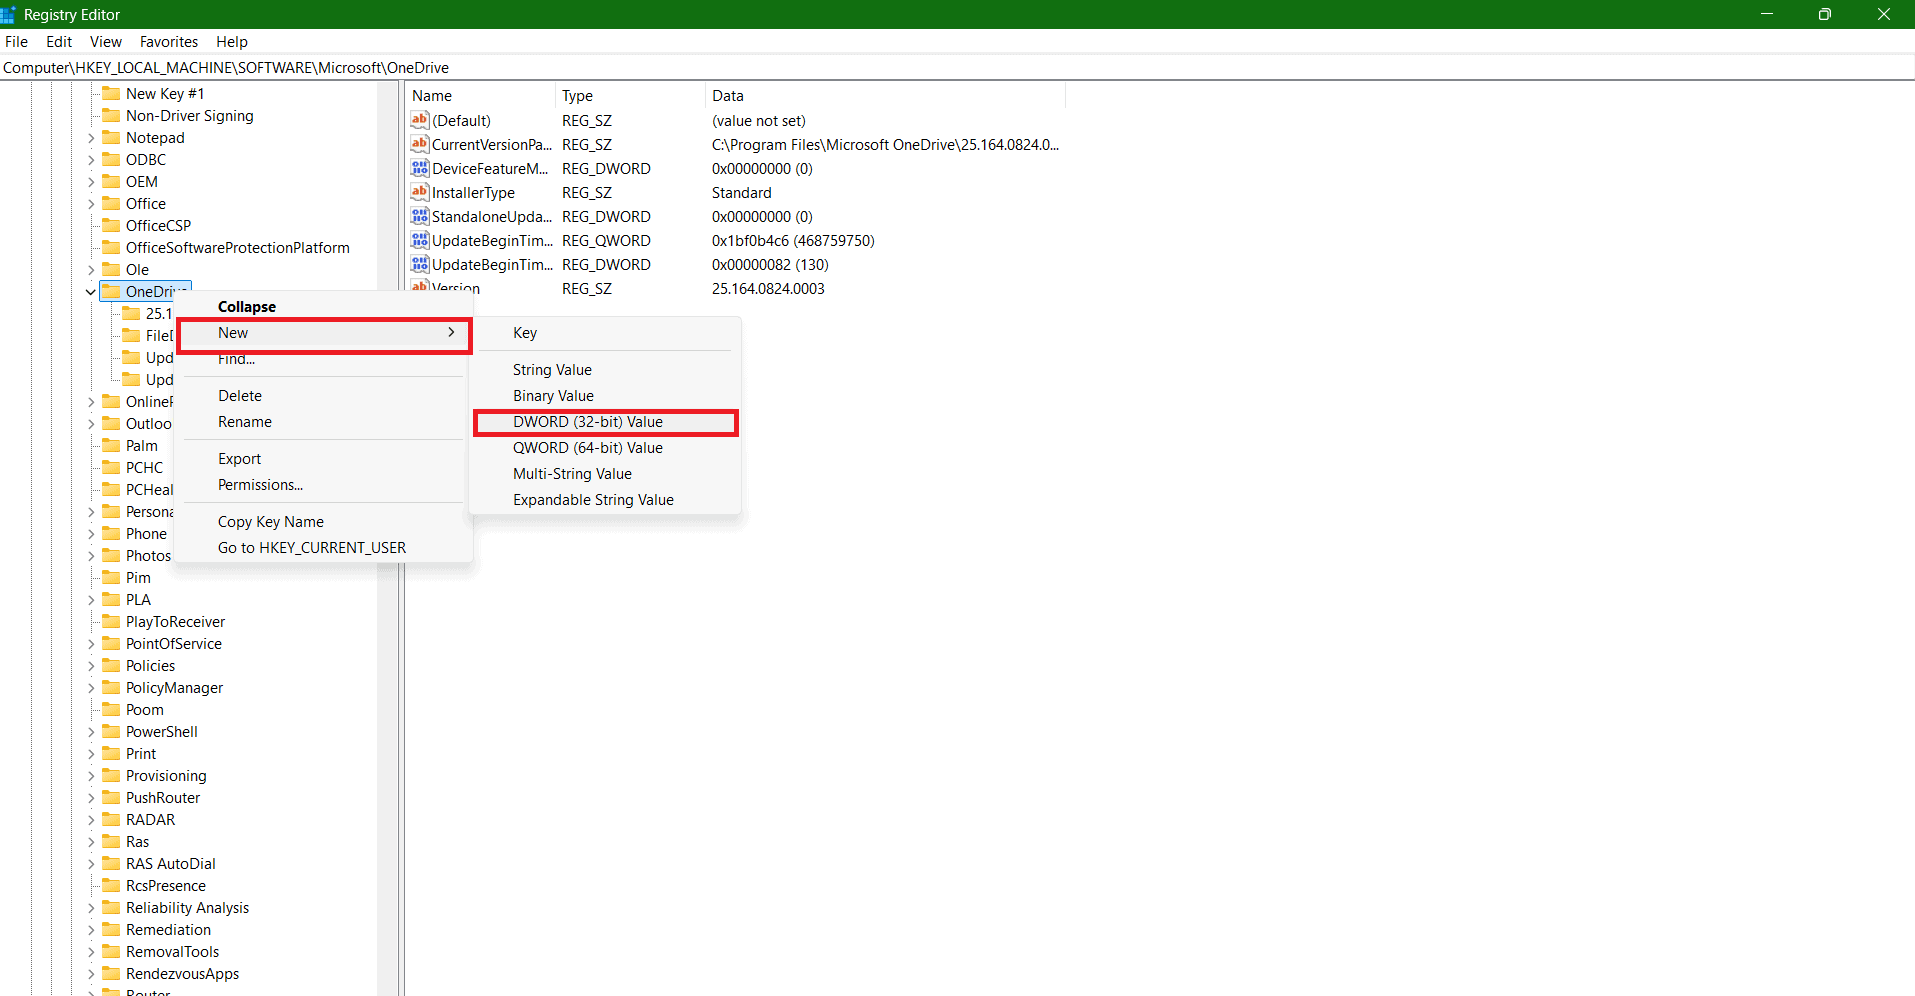
OneDrive will be uninstalled.
Method 5: Uninstall OneDrive Settings
Access your settings to do the same:
- Open Settings and click on Apps from the left menu.
- Click on Installed apps.
- Type in OneDrive in the search bar.
- Select the three dots beside the app.
- Now, select Uninstall.
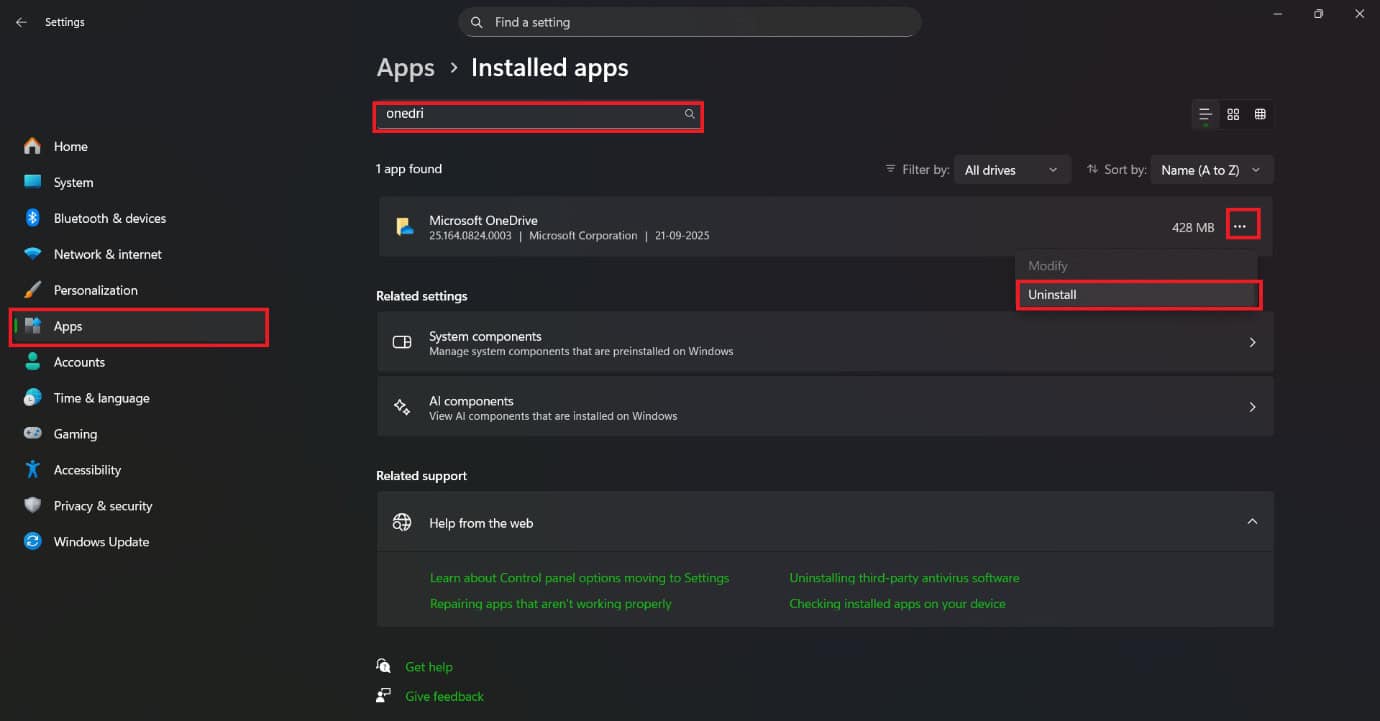
The app will be uninstalled.
Method 6: Uninstall OneDrive Command Prompt
You can also use different commands to delete the app.
- Right-click on the Start button and select Windows Terminal Admin.
- Select Yes.
- Type in the command %SystemRoot%System32OneDriveSetup.exe /uninstall.
- Hit Enter.
- Type in the command %SystemRoot%SysWOW64OneDriveSetup.exe /uninstall for 32-bit system.
- Hit Enter.
- Restart your desktop.
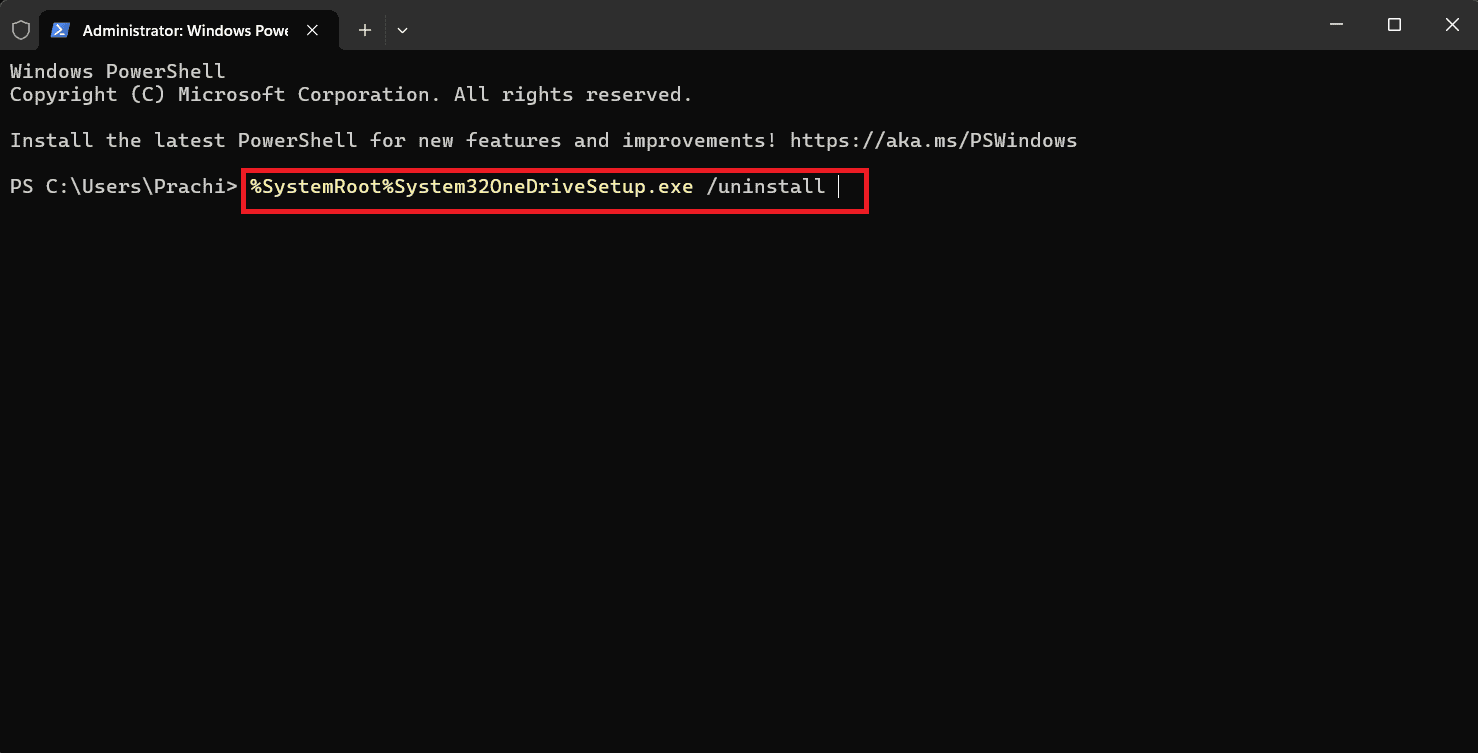
OneDrive will no longer be in your system.
Method 7: File Explorer
Another way to delete the platform is from the File Explorer.
- Open File Explorer and click on This PC.
- Click on ProgramData.
- Select the Microsoft OneDrive folder and hit the Delete button.
- Click on Yes.
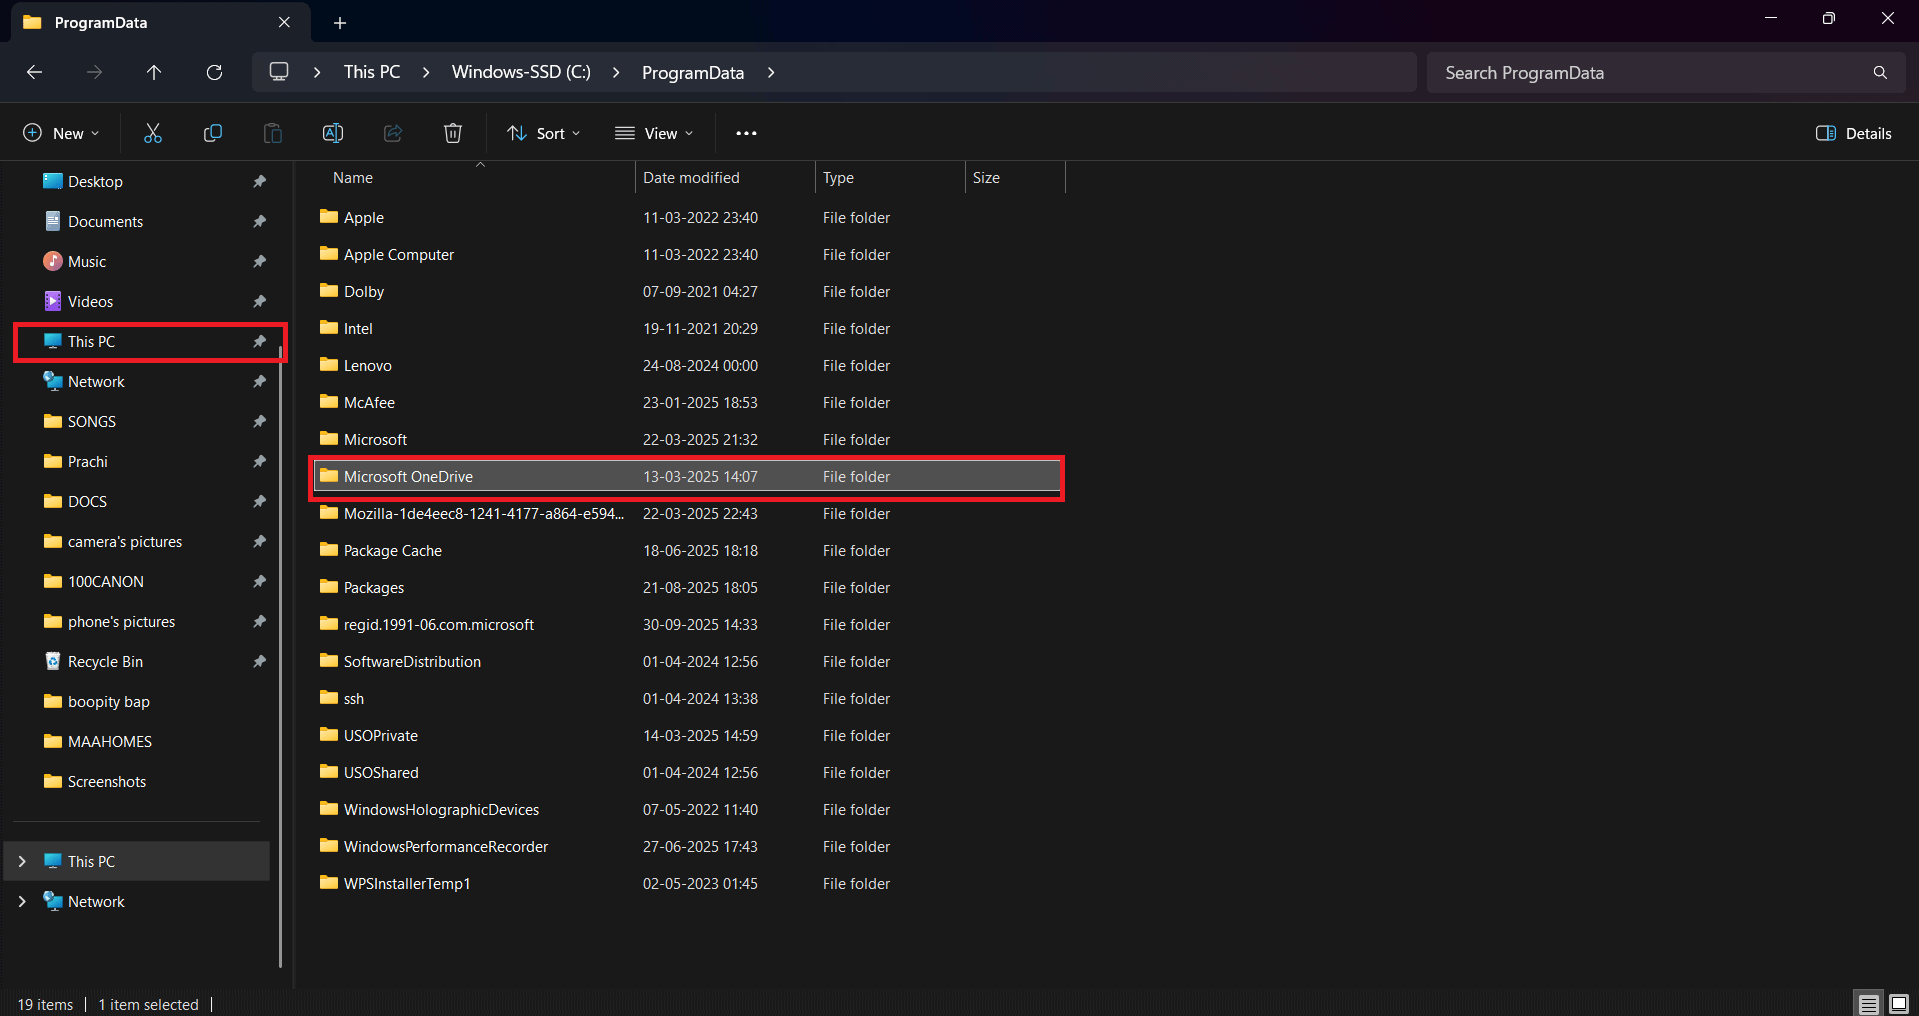
The files will be successfully deleted.
Method 8: Via Control Panel
You can also find the program in the Control Panel and delete it:
- Open the Control Panel and click on Programs.
- Select Uninstall a program.
- Then, right-click on Microsoft OneDrive and select Uninstall.
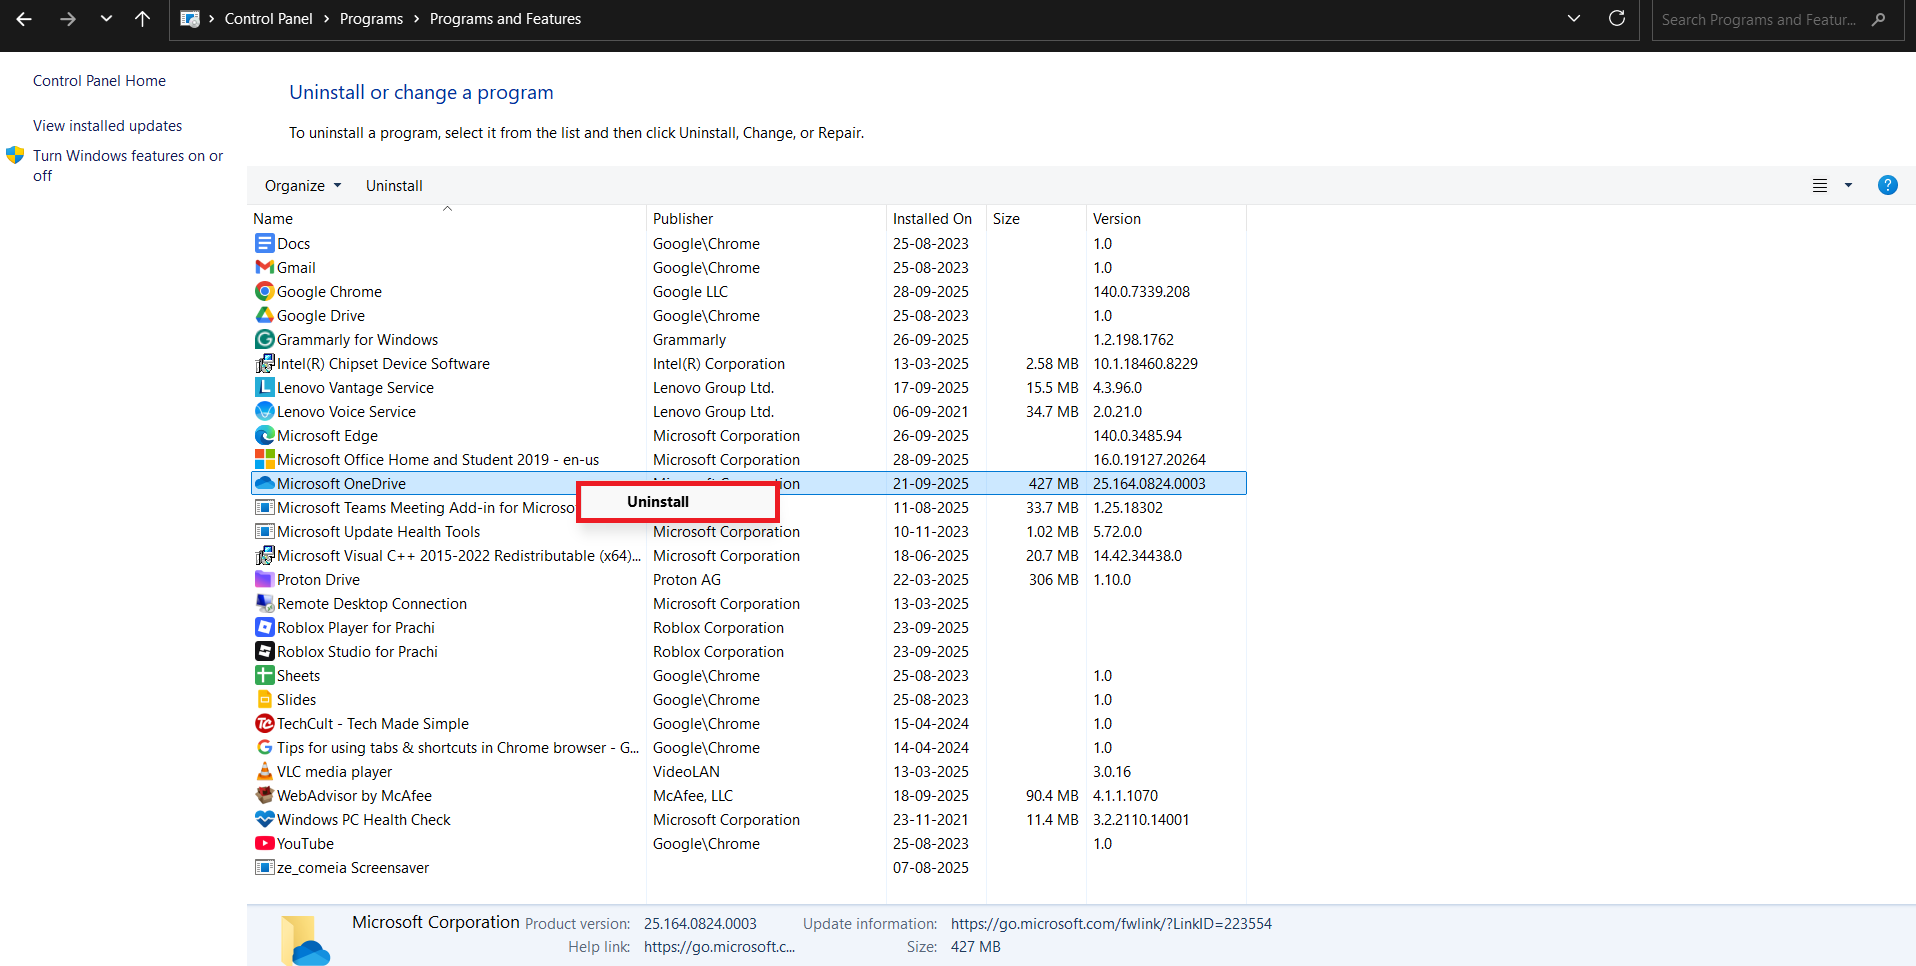
That’s it, the program will be removed.
Method 9: Task Scheduler
Lastly, follow the steps to do the same:
- Press the Windows and R keys to open the Run dialog.
- Type in taskschd.msc and hit Enter.
- Click on Task Scheduler Library from the left menu.
- Click on OneDrive folders.
- Now, select Disable from the right menu for each program.
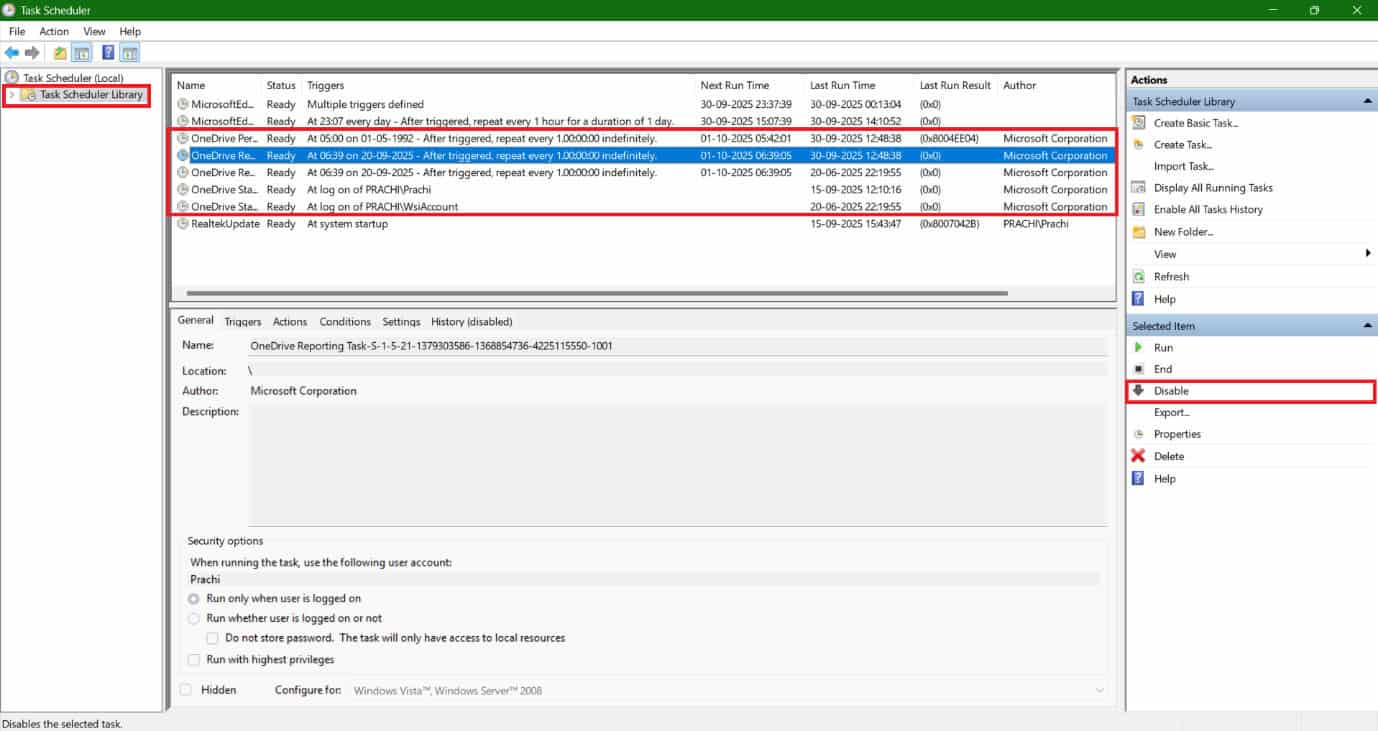
Now the programs will no longer be active.
Also Read: How to Delete Files on OneDrive
Now you will no longer have a difficult time figuring out how to turn off OneDrive on Windows 11 after following this guide. For more helpful tips and tricks, stay tuned, and feel free to share your suggestions in the comments below.


OneDrive is viral! Even after you’ve uninstalled it and thoroughly cleaned up post-uninstall, it can sometimes come right back. And it’ll almost certainly re-insert itself if a new user is logged into Windows.
In Windows 10 Pro anyway, I’ve yet to find a way to purge it from the system once and for all.