
Navigation is one of the several important aspects for which we are heavily reliant on our smartphones. Most people, especially millennials, would most likely get lost without apps like Google Maps. Although these navigation apps are mostly accurate, there are times when they malfunction. This is a risk that you would not want to take, especially while travelling in a new city.
All these apps determine your location using the GPS signal transmitted and received by your device. Another important component that aids in navigation is the built-in compass on your Android device. In most cases, an un-calibrated compass is responsible for making the navigation apps go berserk. Therefore, if you ever find the good old Google Maps misleading you, make sure to check whether or not your compass is calibrated. For those of you who have never done that before, this article will be your handbook. In this article, we are going to discuss the various ways in which you can calibrate the compass on your Android Phone.

How to Calibrate the Compass on your Android Phone?
1. Calibrate your Compass using Google Maps
Google Maps is the pre-installed navigation on all Android devices. It is pretty much the only navigation app that you will ever need. As mentioned earlier, the accuracy of Google Maps depends on two factors, the quality of the GPS signal and the sensitivity of the compass on your Android phone. While the strength of the GPS signal isn’t something that you can control, you can most certainly ensure that the compass is working properly.
Now, before we proceed with the details of how to calibrate your compass, let’s first check whether or not the compass is showing the right direction. The compass accuracy can be easily estimated by using Google Maps. All that you need to do is launch the app and look for a blue circular dot. This dot indicates your current location. If you are unable to find the blue dot, then tap on the Location icon (looks like a bullseye) on the lower right side of the screen. Notice the blue beam that is emanating from the circle. The beam looks like a flashlight originating from the circular dot. If the beam extends out too far, then it means that the compass isn’t very accurate. In this case, Google Maps will automatically prompt you to calibrate your compass. If not then, follow the steps given below to manually calibrate your compass on your Android phone:
1. Firstly, tap on the blue circular dot.

2. This will open the Location menu that provides detailed information about your location and surroundings like parking spots, nearby places, etc.
3. At the bottom of the screen, you will find the Calibrate Compass option. Tap on it.

4. This will take you to the Compass Calibration section. Here, you need to follow the on-screen instructions to calibrate your compass.
5. You will have to move your phone in a specific way to make figure 8. You can refer to the animation for a better understanding.
6. The accuracy of your compass will be displayed on your screen as low, medium, or high.
7. Once the calibration is complete, you will automatically be taken to the home page of Google Maps.

8. Alternatively, you can also tap on the Done button once the desired accuracy has been achieved.
Also Read: Find GPS Coordinate for any Location
2. Enable High-Accuracy Mode
In addition to calibrating your compass, you can also enable the high accuracy mode for Location services to improve the performance of navigation apps like Google maps. Although it consumes a little more battery, it is definitely worth it, especially while exploring a new city or town. Once you enable the high-accuracy mode, Google maps will be able to determine your location more precisely. Follow the steps given below to see how:
1. Firstly, open Settings on your mobile.
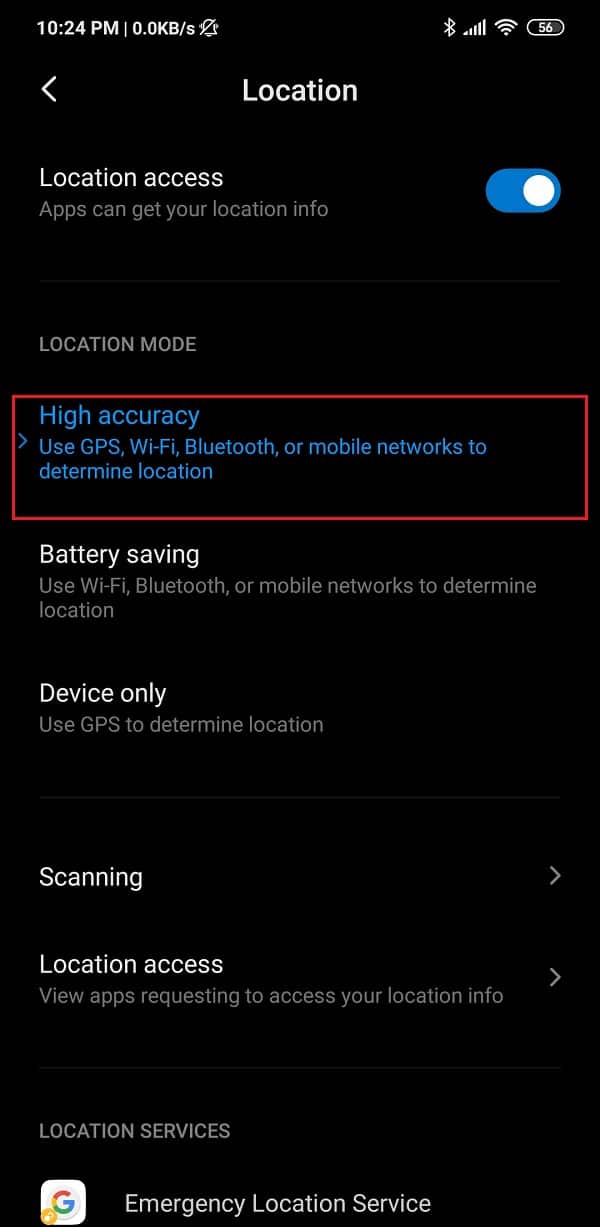
2. Now tap on the Location option. Depending on the OEM and its custom UI, it might also be labelled as Security and Location.

3. Here, under the Location tab, you will find the Google Location Accuracy option. Tap on it.
4. After that, simply select the High accuracy option.
5. That’s it, you are done. From now on, apps like Google maps will provide more accurate navigation results.
3. Calibrate your Compass using the Secret Service Menu
Some Android devices allow you to access their secret service menu to test various sensors. You can enter a secret code in the dial pad, and it will open the secret menu for you. If you are lucky, it might work for you directly. Otherwise, you will have to root your device to access this menu. The exact process might vary from one device to another but you can try the following steps and see if it works for you:
1. The first thing that you need to do is open the Dialer pad on your phone.
2. Now type in “*#0*#” and hit the Call button.
3. This should open the Secret menu on your device.
4. Now from the list of options that are displayed as tiles, select the Sensor option.

5. You will be able to see the list of all the sensors along with the data that they are collecting in real-time.
6. The compass will be termed as the Magnetic sensor, and you will also find a small circle with a dial indicator pointing towards the north.

7. Observe closely and see if the line passing through the circle is blue in colour or not and whether there is number three written beside it.
8. If yes, then it means that the compass is calibrated. A green line with the number two, however, indicates that the compass is not calibrated properly.
9. In this case, you will have to move your phone in the figure of eight motion (as discussed earlier) multiple times.
10. Once the calibration is complete, you will see that the line is now blue with the number three written beside it.
Recommended:
- How to Improve GPS Accuracy on Android
- Fix Google Maps not showing directions in Android
- 8 Ways to Fix Android GPS Issues
- How to Remove Xbox Game Speech Window?
We hope that you find this information helpful and you were able to calibrate the Compass on your Android phone. People often get baffled when their navigation apps malfunction. As mentioned earlier, most of the time the reason behind this is an out of sync compass. Therefore, always make sure to calibrate your compass once in a while. In addition to using Google Maps, there are other third-party apps that you can use for this purpose. Apps like GPS Essentials allow you to calibrate not only your compass but also test the strength of your GPS signal. You will also find plenty of free compass apps on the Play Store that will help you to calibrate the compass on your Android Phone.


The secret code is not working, *#0*#
Smartphone compass apps are known to be inaccurate. Go to “tru-path.org” to see accuracy test results for several compass apps and proof that compass errors can be corrected.