If you were trying to fix corrupted files found in your system using System File Checker (SFC), then you may have face the error “Windows Resource Protection found corrupt files but was unable to fix some of them.” This error means System File Checker completed the scan and found corrupted system files but could not fix them. The Windows Resource Protection protects registry keys and folders as well as critical system files and if they are corrupted SFC try to replace those files to fix them but when SFC fails you will face the following error:
Windows Resource Protection found corrupt files but was unable to fix some of them.
Details are included in the CBS.Log windir\Logs\CBS\CBS.log. For example C:\Windows\Logs\CBS\CBS.log.
Note that logging is currently not supported in offline servicing scenarios.
![Windows Resource Protection found corrupt files but was unable to fix some of them [SOLVED]](https://techcult.com/wp-content/uploads/2017/06/Windows-Resource-Protection-found-corrupt-files-but-was-unable-to-fix-some-of-them-SOLVED.png)
The corrupted system files should be fixed to maintain the system’s integrity, but as SFC failed to do it job, you are not left with many other options. But this is where you’re wrong, don’t worry if SFC fails as we have other better alternative to fix corrupted files then System File Checker. So without wasting any time, let’s see how to actually fix this issue with the help of below-listed troubleshooting steps.
Windows Resource Protection found corrupt files but was unable to fix some of them [SOLVED]
Make sure to create a restore point just in case something goes wrong.
Method 1: Boot into Safe Mode then try SFC
1. Press Windows Key + R then type msconfig and hit Enter to open System Configuration.

2. Switch to boot tab and checkmark Safe Boot option.

3. Click Apply, followed by OK.
4. Restart your PC and system will boot into Safe Mode automatically.
5. Press Windows Key + X then select Command Prompt (Admin).
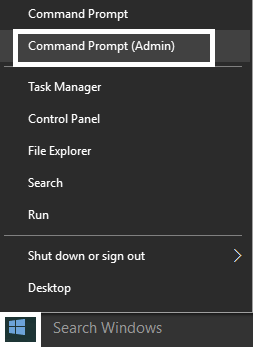
6. Type the following command and hit Enter: sfc/scannow

Note: Make sure the PendingDeletes and PendingRenames folders exist under C:\WINDOWS\WinSxS\Temp.
To go to this directory open Run and type %WinDir%\WinSxS\Temp.

Method 2: Use the DISM Tool
1. Press Windows Key + X and click on Command Prompt(Admin).

2. Type the following and press enter:
DISM /Online /Cleanup-Image /RestoreHealth

3. Let the DISM command run and wait for it to finish.
4. If the above command doesn’t work, then try on the below:
Dism /Image:C:\offline /Cleanup-Image /RestoreHealth /Source:c:\test\mount\windows
Dism /Online /Cleanup-Image /RestoreHealth /Source:c:\test\mount\windows /LimitAccess
Note: Replace the C:\RepairSource\Windows with your repair source (Windows Installation or Recovery Disc).
5. Reboot your PC to save changes.
The DISM Tool seems to Fix Windows Resource Protection found corrupt files but was unable to fix some of the issues in most cases, but if you are still stuck, try the next method.
Method 3: Try running SFCFix Tool
SFCFix will scan your PC for corrupted system files and restore/repair these files which System File Checker failed to do so.
1. Download SFCFix Tool from here.
2. Press Windows Key + X then select Command Prompt (Admin).

3. Type the following command into cmd and hit enter: SFC /SCANNOW
4. As soon as the SFC scan has begun, launch the SFCFix.exe.

Once SFCFix has run its course, it will open a notepad file with information about all the corrupt/missing system files that SFCFix found and whether it was successfully repaired.
Method 4: Check cbs.log manually
1. Press Windows Key + R then type C:\windows\logs\CBS and hit Enter.
2. Double click on the CBS.log file, and if you get access denied error, then continue to the next step.
3. Right-click on the CBS.log file and select properties.

4. Switch to Security tab and click Advanced.

5. Click on Change under Owner.
6. Type Everyone then clicks on Check Names and click OK.

7. Now click Apply followed by OK to save changes.
8. Again right-click CBS.log file and select properties.
9. Switch to Security tab then select Everyone under Group or user names and then click Edit.
10. Make sure to checkmark Full Control then click Apply followed by OK.

11. Again try to access the file, and this time you will be successful.
12. Press Ctrl + F then type Corrupt, and it will find everything that says corrupt.

13. Keep pressing F3 to find everything that says corrupt.
14. Now you will find what actually is corrupted which can’t be fixed by SFC.
15. Type the query in Google to find out how to fix the corrupted thing, sometimes it is as simple as re-registering a .dll file.
16. Reboot your PC to save changes.
Method 5: Run Automatic Repair
1. Insert the Windows 10 bootable installation DVD and restart your PC.
2. When prompted to Press any key to boot from CD or DVD, press any key to continue.

3. Select your language preferences, and click Next. Click Repair your computer in the bottom-left.

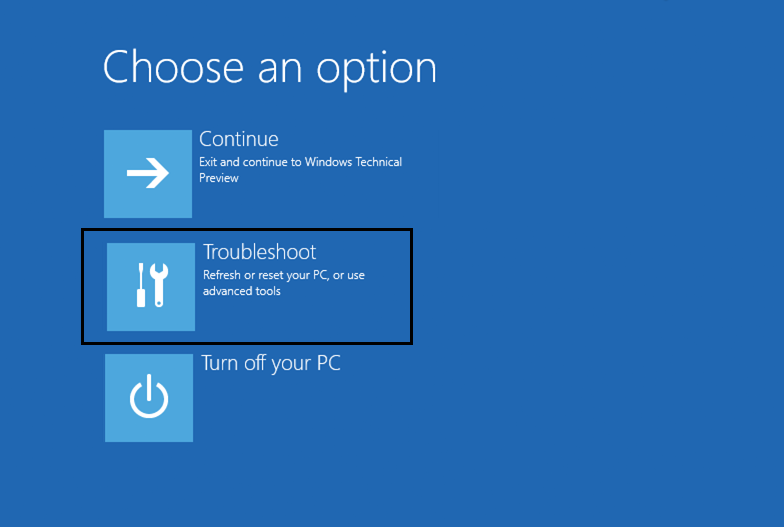
4. On choose an option screen, click Troubleshoot.
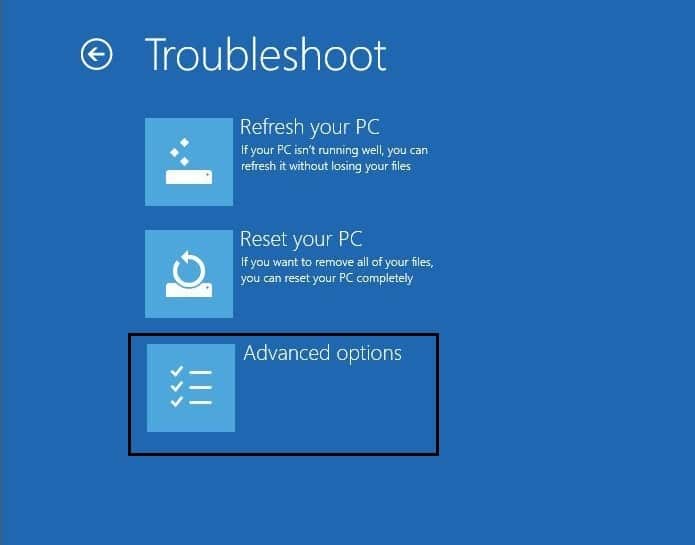
5. On Troubleshoot screen, click the Advanced option.
6. On the Advanced options screen, click Automatic Repair or Startup Repair.
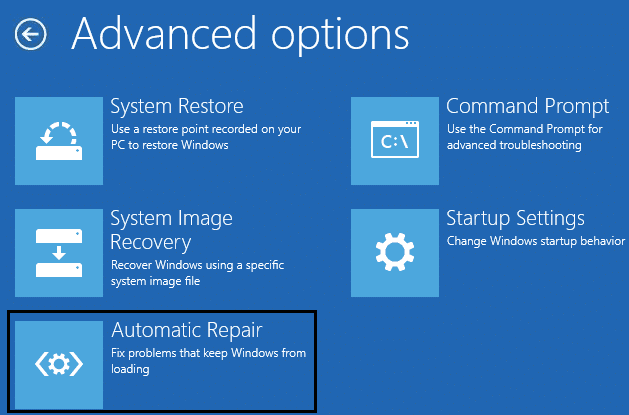
7. Wait till the Windows Automatic/Startup Repairs complete.
8. Restart your PC, and the error may be resolved by now.
Also Read: How to fix Automatic Repair couldn’t repair your PC.
Method 6: Run Windows 10 Repair Install
This method is the last resort because if nothing works out, then, this method will surely repair all problems with your PC. Repair Install using an in-place upgrade to repair issues with the system without deleting user data present on the system. So follow this article to see How to Repair Install Windows 10 Easily.
Recommended:
- Fix VIDEO_TDR_FAILURE (ATIKMPAG.SYS)
- How to Fix Windows Store Error Code 0x80240437
- Fix Windows Media Won’t Play Music Files Windows 10
- Fix Windows Store Error 0x80073cf0
That’s it you have successfully Fix Windows Resource Protection found corrupt files but was unable to fix some of the issues if you still have any queries regarding this post feel free to ask them in the comment’s section.





When I ran THIS:
DISM /Online /Cleanup-Image /RestoreHealth
I got back that DISM doesn’t recognize the word “Online”