
Now as all of you might be aware that Microsoft Windows is a very huge operating system and there are a lot of things that need to be taken care of. But since there are a large number of tasks such as software updates, error checking, running various commands, executing scripts, etc which cannot be performed by the user manually. So to complete these tasks which can be easily done when your computer is sitting idle, Windows OS schedules these tasks so that the tasks can start and complete themselves at the scheduled time. These tasks are scheduled & managed by Task Scheduler.

Task Scheduler: Task Scheduler is a feature of Microsoft Windows that provides the ability to schedule the launch of apps or programs at a specific time or after a particular event. Generally, the System & Apps use the Task Scheduler to automate the maintenance tasks but anyone can use it to create or manage their own schedule tasks. Task scheduler works by keeping track of time and events on your computer and executes the task as soon as it met the required condition.
Why Task Scheduler is not running in Windows 10?
Now there can be many reasons behind the Task Scheduler not working properly such as corrupted registry entries, corrupted Task Scheduler tree cache, Task Scheduler services might be disabled, permission issue, etc. As each user system have a different configuration, so you need to try all the listed methods one by one until your problem is resolved.
If you are facing any problems with the Task Scheduler such as Task Scheduler is not available, Task Scheduler is not running, etc then don’t worry as today we will discuss various methods to fix this issue. So without wasting any time let’s see How to fix Task Scheduler not running in Windows 10 with the help of the below-listed troubleshooting guide.
Fix Task Scheduler Not Running In Windows 10
Make sure to create a restore point just in case something goes wrong.
Method 1: Start Task Scheduler Service Manually
The best and the first method to start with if you are facing Task Scheduler not working issue is to manually start the Task Scheduler service.
To start the Task Scheduler service manually follow the below steps:
1.Open Run dialog box by searching for it using the search bar.

2.Type services.msc in the run dialog box and hit Enter.

3.This will open the Services window where you need to find the Task Scheduler service.

3.Find Task Scheduler Service in the list then right-click and select Properties.

4.Make sure the Startup type is set to Automatic and the service is running, if not then click on Start.

5.Click Apply followed by OK.
6.Reboot your PC to save changes and see if you’re able to Fix Task Scheduler Not Running In Windows 10.
Method 2: Registry Fix
Now the Task Scheduler might not be working properly because of incorrect or corrupt registry configuration. So in order to fix this issue, you need to alter some registry settings, but before you continue, make sure you backup your registry just in case something goes wrong.
1.Open Run dialog box by searching for it using the search bar.
2.Now type regedit in the Run dialog box and hit Enter to open Registry Editor.

3.Navigate to the following registry key:
HKEY_LOCAL_MACHINE\SYSTEM\CurrentControlSet\Services\Schedule

4.Make sure to select Schedule in the left window and then in the right window pane look for “Start” registry DWORD.

5.If you can’t find the corresponding key then right-click in an empty area in the right window and select New > DWORD (32-bit) value.

6.Name this key as Start and double-click on it to change its value.
7.In the Value data field type 2 and click OK.

8.Close Registry Editor and reboot your PC to save changes.
After your computer restarts, you may be able to Fix Task Scheduler Not Running in Windows 10, if not then continue with the next methods.
Method 3: Change the Task Conditions
The Task Scheduler not working problem may arise due to incorrect Task conditions. You need to ensure that the Task conditions are correct in order for the proper functioning of Task Scheduler.
1.Open Control Panel by searching for it using the search bar.

2.This will open the Control Panel window then click on System and Security.

3.Under System and Security, click on Administrative Tools.

4.The Administrative Tools window will open up.

5.Now from the list of the tools available under Administrative tools, click on Task Scheduler.

6.This will open the Task Scheduler window.

7.Now from the left side of Task Scheduler, click on Task Scheduler Library to look for all the tasks.

8.Right-click on the Task and select Properties from the context menu.
9.In the Properties window, switch to the Conditions tab.

10.Check the box next to “Start only if the following network connection is available“.

11.Once you have checked the above box, from the drop-down select Any connection.

12.Click OK to save changes and reboot your PC.
After your computer restarts, you may be able to Fix Task Scheduler Not Running in Windows 10 issue.
Method 4: Delete Corrupted Task Scheduler Tree Cache
It is possible that Task Scheduler is not working because of the corrupted Task Scheduler tree cache. So, by deleting the corrupted task scheduler tree cache you may resolve this issue.
1.Press Windows Key + R then type regedit and hit Enter to open Registry Editor.
2.Navigate to the following registry key:
HKEY_LOCAL_MACHINE\SOFTWARE\Microsoft\Windows NT\CurrentVersion\Schedule\TaskCache\Tree

3.Right-click on Tree Key and rename it to Tree.old and again open Task Scheduler to see if the error message still appears or not.

4.If the error doesn’t appear this means an entry under Tree key is corrupted and we are going to find out which one.
To find out which task is corrupted follow the below steps:
1.First, rename the Tree.old back to Tree which you have renamed in previous steps.
2.Under Tree registry key, rename each key to .old and each time you rename a particular key open the Task Scheduler and see if you’re able to fix the error message, keep doing this until the error message no longer appears.

3.Once the error message appears then that particular Task which you renamed is the culprit.
4.You need to delete the particular Task, right-click on it and select Delete.

5.Reboot your PC to save changes.
After your computer restarts, see if you’re able to Fix Task Scheduler Not Running in Windows 10 issue.
Method 5: Start Task scheduler using Command Prompt
Your Task Scheduler may work properly if you start it using Command Prompt.
1.Type cmd in Windows Search bar then right-click on Command Prompt and select “Run as administrator“.
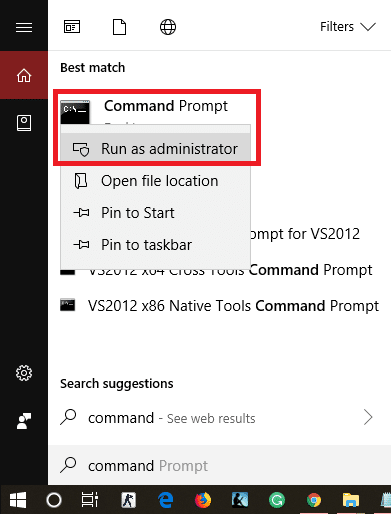
2.When asked for confirmation click on the Yes button. Your Administrator command prompt will open up.
3.Type the below command in command prompt and hit Enter:
net start task scheduler

After completing the above steps, your task scheduler may start working properly.
Method 6: Change Service Configuration
To change the Service configuration follow the below steps:
1.Type cmd in Windows Search bar then right-click on Command Prompt and select “Run as administrator“.
2.Type the below command in command prompt and hit Enter:
SC Comfit schedule start= auto

3.After running the command if you get the reply [SC] Change Service Config SUCCESS, then the service will be changed to automatic once you will reboot or restart your computer.
4.Close the command prompt and restart your computer.
Recommended:
- 3 Ways to Combine Multiple PowerPoint Presentation Files
- Fix VCRUNTIME140.dll is Missing from Windows 10
- 7 Ways to Fix PUBG Crashes on Computer
- Reset or Recover Your Gmail Password
Hopefully, using one of the above methods, you will be able to Fix Task Scheduler Not Running In Windows 10, but if you still have any questions regarding this tutorial then feel free to ask them in the comment section.


Every single option failed for me, very frustrating!!!
What worked for me is, I’ve changed the value of “start” DWORD (32-bit) from 4 to 3 in regedit.exe at “Computer\HKEY_LOCAL_MACHINE\SYSTEM\CurrentControlSet\Services\TimeBrokerSvc”
Hope it helps!