
Steam is a popular video game digital distribution service by Valve. It is the preferred choice for gamers when it comes to exploring and downloading online games. However, many Steam users have reported that Steam keeps crashing on Startup or while playing a game. These crashes can be pretty frustrating. If you are also dealing with the same problem, then you are at the right place. We bring to you a perfect guide that will help you fix Steam keeps crashing issue on Windows PC.
Before proceeding with the troubleshooting methods, you should do the following:
- Firstly, make sure that no unrequired external devices are connected to your PC.
- Exit all other apps that are running on your desktop/laptop to free up more CPU, memory & network resources for Steam and your game.

How to Fix Steam Keeps Crashing on Windows 10
Here’s why Steam client keeps crashing on your desktop/laptop:
- Background Tasks: When plenty of applications run in the background, it increases the CPU and memory usage, thereby affecting the performance of the system.
- Third-Party Software Interference: Third-party software programs and modules often interfere with the manifest files.
- Issues with Local Files: Verification of the integrity of games and game cache is essential to ensure there are no corrupt files in the system.
- Windows Firewall issues: It too, may block connection with the server and cause problems.
- Malicious Software: Several malicious software cause frequent crashing of the operating system and installed programs.
- Inadequate Memory Space: Sometimes, this issue occurs when you do not have enough memory space on your computer.
- Outdated Drivers: If the new or existing drivers in your system are incompatible with the game, then you will face such errors.
Method 1: Run Steam as Administrator
Sometimes, Steam needs elevated permissions to run certain processes. If Steam is not granted the required privileges, it will run into errors and keep crashing. Here’s how to grant admin privileges to Steam:
1. Navigate to File Explorer by pressing Windows + E keys together.
2. Click on Local Disk (C:) in the left sidebar, as shown.

3. Next, double-click on Program Files (x86) > Steam folder.

4. Here, right-click on steam.exe and select Properties, as depicted below.

5. In the Properties Window, switch to the Compatibility tab.
6. Check the box next to Run this program as an administrator. Then, click on Apply and OK to save these changes, as highlighted below.

7. Next, in Steam folder, locate the file titled GameOverlayUI.exe

8. Follow Steps 4-6 to give GameOverlayUI.exe administrative privileges as well.
9. Restart your PC and then. relaunch Steam.
Also Read: Fix Steam Application Load Error 3:0000065432
Method 2: Verify Integrity of Game Files
If the issue Steam keeps crashing occurs when you are playing a particular game, you need to check the integrity of files and cache for that particular game. There’s an inbuilt feature in Steam to search for corrupt/missing game files and repair or replace these, as needed. Read our easy-to-follow tutorial on How to Verify Integrity of Game Files on Steam.
Method 3: Run Compatibility Troubleshooter
The issue Steam keeps crashing may be caused by the incompatibility of Steam with the current version of the Windows operating system. To check this, you will need to run the Program Compatibility Troubleshooter, as follows:
1. Navigate to File Explorer > Local Disk (C:) > Program Files (x86) > Steam folder as before.
2. Right-click on the steam.exe file and select Properties from the given menu.

3. Under Compatibility tab, click on Run compatibility troubleshooter button, as illustrated below.

4. Here, select Try recommended settings option and try launching the Steam client.

5. If the issue still persists, then repeat steps 1-3. Then, click on the Troubleshoot program option instead.

Program Compatibility Troubleshooter will scan and try to fix issues with the Steam client. Thereafter, launch Steam to check if the problem is fixed or not.
If you encounter Steam keeps crashing when downloading issue even now, then follow Steps 6-8 listed below.
6. Once again, go to Steam Properties > Compatibility tab.
7. Here, check the box marked Run this program in compatibility mode for: and choose an earlier Windows version e.g. Windows 8.
8. Additionally, check the box titled Disable fullscreen optimizations option and click on Apply > OK to save these changes. Refer given pic to understand better.

Also Read: How to Open Steam Games in Windowed Mode
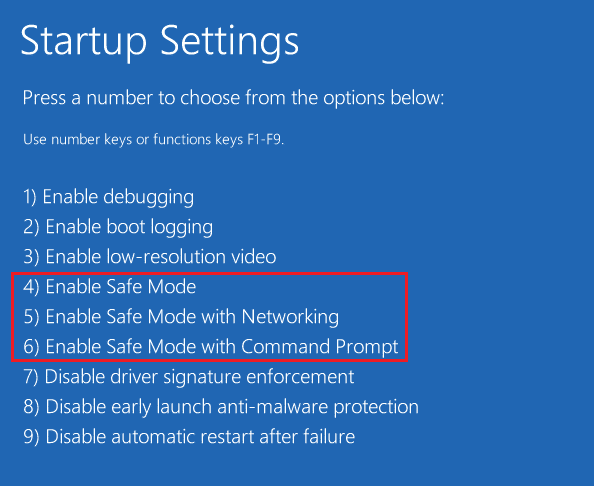
Method 4: Launch Steam in Safe Mode with Networking
If Steam does not crash in Safe Mode, it would imply that a third-party application or antivirus software is causing conflicts with the app. To determine if this is the cause behind Steam keeps crashing on startup, we need to launch Steam in Safe Mode with Networking, as explained below:
1. Read 5 Ways to Start your PC in Safe Mode here. Then, press F5 key to Enable Safe Mode with Networking.
2. Launch Steam client.
Note: If Steam crashes even in Safe Mode, then you can try to launch Steam as an administrator, as explained in Method 1.
If it works properly in Safe Mode, then it is clear that third-party antivirus or Windows Firewall is blocking its connectivity with the server and causing Steam keeps crashing issue on Windows 10. In this case, implement Method 5 to fix it.
Method 5: Add Steam Exclusion in Firewall
If Windows Firewall is not causing conflict with Steam, it is likely that the antivirus software on your system is blocking the Steam client or vice-versa. You can add an exclusion for Steam to fix Steam keeps crashing on startup.
Method 5A: Add Exclusion in Windows Defender Firewall
1. Press Windows key, type virus and threat protection, and click Open, as shown.

2. Click on Manage settings.
3. Then, scroll down and click Add or remove exclusions as depicted below.

4. In the Exclusions tab, click on Add an exclusion and select Folder as shown.

5. Now, navigate to Drive (C:) > Program Files (x86) > Steam and click Select folder.
Note: The above step path is according to the default storage location for Steam. If you have installed Steam elsewhere on your system, go to that file location.

Method 5B: Add Exclusion in Antivirus Settings
Note: Here, We have used Avast Free Antivirus as an example.
1. Launch Avast Antivirus. Click on the Menu option from the top right corner, as shown.

2. Here, click on Settings from the drop-down list.

3. Select General > Blocked & Allowed apps. Click on ALLOW APP under List of allowed apps section, as highlighted below.

4. Now, click on ADD > corresponding to Steam to add it to the whitelist. Alternately, you may also browse for Steam app by selecting the SELECT APP PATH option.
Note: We have shown App Installer being added as an exclusion below.

5. Finally, click on ADD in the prompt to add the Steam app in Avast whitelist.
Method 6: Delete AppCache Folder
The AppCache is a folder that contains Steam cache files. Deleting it will not affect the application in any way but, might help fix Steam keeps crashing issue. Follow the steps below to delete Steam AppCache folder.
1. Go to File Explorer > Local Disk (C:) > Program Files (x86) > Steam folder as shown in Method 1.
2. Right-click on AppCache folder and select Delete, as shown below.

Also Read: 5 Ways to Repair Steam Client
Method 7: Update Windows
If Windows has not been updated, then the old system files will conflict with Steam. Hence, you should update Windows OS as follows:
1. Launch Windows Settings > Update and Security, as shown.

2. Click on Check for updates button.

3A. If your system has Updates available, click on Install now.

3B. If your system does not have any pending updates, You’re up to date message will appear as shown below.

4. Restart your system after updating to the new version and confirm that Steam keeps crashing issue has been resolved.
Method 8: Update System Drivers
Similarly, update your system drivers to fix Steam keeps crashing problem by resolving incompatibility issues between Steam client & game files and game drivers.
1. Press Windows + X keys and click on Device Manager, as depicted.

2. Here, double-click on Display adapters to expand it.
3. Next, right-click on display driver (e.g. AMD Radeon Pro 5300M) and select Update Driver, as illustrated below.

4. Click on Search automatically for drivers.

5. Windows will automatically search and update the driver.
Also Read: How To Fix No Sound On Steam Games
Method 9: Reset Network Protocol
Network adapters are components inside your computer that create a line of communication between the operating system and the internet servers. If it becomes corrupt, your computer will not be able to work with the drivers or Windows OS. You need to reset the network adapter to fix Steam keeps crashing on startup issue.
1. Type & search cmd. Then, click on Run as administrator to launch Command Prompt, as shown below.

2. Here, type netsh winsock reset and press Enter key.

3. Now, restart your PC and launch Steam as it should not crash anymore.
Method 10: Leave Beta Participation
In case, you opted for Steam Beta program, the application may face instability issues and therefore, cause Steam keeps crashing issue. Thus, it is recommended to opt-out of it, as explained below:
1. Launch Steam app.
2. Click on Steam in the top-left corner and click on Settings, as illustrated here.

3. Select the Account tab from the left pane.
4. Under Beta participation, click on Change… as shown highlighted.

5. Select NONE – Opt out of all beta programs to leave Beta participation, as depicted.

6. Lastly, click on OK to save these changes.
Also Read: How to View Hidden Games on Steam
Method 11: Reinstall Steam
If you have tried all the methods mentioned above and are still experiencing this issue, you will need to reinstall Steam. Follow the given steps carefully so that you do not lose any important Steam game data while reinstalling it.
1. Go to File Explorer > Local Disk (C:) > Program Files (x86) > Steam folder as directed in Method 1.
2. Locate and copy steamapps folder to your Desktop or anywhere outside the Steam directory. In this way, you will not lose any game data even when you reinstall the Steam client on your Windows 10 PC.

3. Now, delete steamapps folder from the Steam folder.
4. Next, search and launch Apps & features, as shown.

5. Search for Steam in the search this list bar. Then, click on Steam and select Uninstall.

6. Visit the official Steam website and click on INSTALL STEAM.

7. Double-click on the Downloaded file, run steam.exe installer and follow the on-screen instructions to install Steam.
Once Steam has been reinstalled, launch it and check for errors. Hopefully, Steam keeps crashing on startup issue is resolved.
Recommended:
- How to Enter BIOS on Windows 10
- 5 Ways to Repair Steam Client
- How to Update Discord
- Fix League of Legends Black Screen in Windows 10
We hope that you were able to fix Steam keeps crashing on Windows 10 and can enjoy glitch-free gameplay with your friends. Leave your questions or suggestions in the comments section below.


