Critical process died error in Windows 10 means that a critical component of Windows system process fails and it can’t run properly, which led to your system crash.

Critical process died error is generally accompanied by a blue screen of death, which will sometimes lead you to the infinite loop of this error. The issue can be a corrupted driver, bad memory sector, etc. Without wasting any time, let’s get straight to how to fix CRITICAL_PROCESS_DIED in Windows 10.
Fix CRITICAL_PROCESS_DIED in Windows 10
Use System Restore to restore your computer to a good point.
Method 1: Run System File Checker
1. Press Windows Key + X then select Command Prompt (Admin).
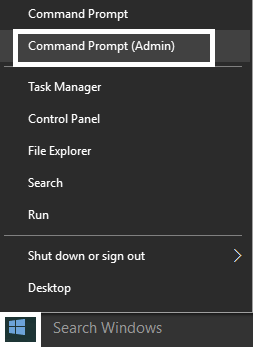
2. Enter the following in cmd and hit enter:
sfc /scannow

3. Let the process run, and when it’s finished, restart your PC.
Method 2: Run CCleaner and Antimalware
1. Download and install CCleaner & Malwarebytes.
2. Run Malwarebytes and let it scan your system for harmful files.
3. If malware is found, it will automatically remove them.
4. Now run CCleaner, and in the “Cleaner” section, under the Windows tab, we suggest checking the following selections to be cleaned:

5. Once you’ve made certain the proper points are checked, click Run Cleaner and let CCleaner run its course.
6. To clean your system further, select the Registry tab and ensure the following are checked:
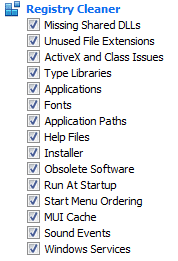
7. Select Scan for Issue and allow CCleaner to scan, then click Fix Selected Issues.
8. When CCleaner asks, “Do you want backup changes to the registry?” select Yes.
9. Once your backup has completed, select Fix All Selected Issues.
10. Restart your PC.
Method 3: Update Drivers
1. Press Windows key + R and type “devmgmt.msc” in Run dialogue box to open the device manager.

2. Expand Network adapters, then right-click on your Wi-Fi controller(for example Broadcom or Intel) and select Update Drivers.

3. In the Update Driver Software Windows, select “Browse my computer for driver software.”

4. Now select “Let me pick from a list of device drivers on my computer.”

5. Try to update drivers from the listed versions.
6. If the above didn’t work then go to the manufacturer’s website to update drivers: https://downloadcenter.intel.com/
7. Reboot to apply changes.
Method 4: Run DISM
1. Open your PC into Safe mode and then type cmd in the search and right-click on it, then select Run as administrator.
2. Type the following command into cmd and hit enter:
Dism /Online /Cleanup-Image /RestoreHealth

3. After the process is finished, restart your PC normally.
Method 5: Disable Sleep and Hibernate
1. Open Control Panel, then type Power options in the search.
2. In Power Options, click Change what the power button does.

3. Next, click Change settings that are currently unavailable.

4. Uncheck Sleep and Hibernate.

5. Click save changes and restart your PC,
That’s it; you have successfully Fix CRITICAL_PROCESS_DIED in Windows 10 error, but if you still have any queries regarding this post, feel free to ask them in the comments section.


