Windows 10 PC allows you to sign-in using fingerprint, face recognition, or IRI scan using Windows Hello. It is a biometrics-based technology that enables users to authenticate their identity to access their devices, apps, networks, etc using any one of the above. Although face detection in Windows 10 works well, but it can’t differentiate between a photo of your face and the actual user’s face. The potential threat is quite obvious. To overcome this , the anti-spoofing technology comes into action. Let us learn how to enable the anti-spoofing for Windows Hello Face Authentication so that your photo cannot be used to login into your PC.

How to Enable or Disable Enhanced Anti-Spoofing for Windows Hello Face Authentication
Once the enhanced anti-spoofing is enabled, Windows will require all users on the device to use anti-spoofing for facial features. This policy is not enabled by default and users have to manually enable anti-spoofing feature.
Note: Make sure to create a restore point just in case something goes wrong.
Method 1: Through Group Policy Editor
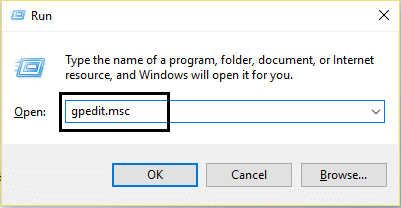
1.Press Windows Key + R then type gpedit.msc and hit Enter to open Group Policy Editor.
2.Navigate to the following location:
Computer Configuration\Administrative Templates\Windows Components\Biometrics\Facial Features
3.Select Facial Features then in right window pane double-click on the “Configure enhanced anti-spoofing” policy.

4.Now change the settings of the Configure enhanced anti-spoofing policy according to:
To Enable Enhanced Anti-Spoofing for Windows Hello Face Authentication: Select Not Configured or Disabled
To Disable Enhanced Anti-Spoofing for Windows Hello Face Authentication: Select Enabled

5.Click Apply followed by OK then close Group Policy Editor.
6.Reboot your PC to save changes.
Method 2: Via Registry Editor
1.Press Windows Key + R then type regedit and hit Enter to open Registry Editor.

2.Navigate to the following registry key:
HKEY_LOCAL_MACHINE\SOFTWARE\Policies\Microsoft\Biometrics\FacialFeatures
3.Right-click on FacialFeatures then select New > DWORD (32-bit) Value.

4.Name this newly created DWORD as EnhancedAntiSpoofing and hit Enter.

5.Double-click on EnhancedAntiSpoofing DWORD and change it’s value to:
Enable Enhanced Anti-Spoofing: 1
Disable Enhanced Anti-Spoofing: 0

6.Once you have typed the correct value simply click OK.
7.Close registry editor and reboot your PC to save changes.
Recommended: Turn Off Recent Items and Frequent Places in Windows 10
That’s it you have successfully learned How to Enable Enhanced Anti-Spoofing for Windows Hello Face Authentication in Windows 10 but if you still have any queries regarding this post then feel free to ask them in the comment’s section.