
2 Ways to Create a Guest Account in Windows 10: Do your friends and guests often ask you to use your device to check their emails or browse some websites? In that situation, you would not let them peep into your personal files stored on your device. Therefore, Windows used to have a Guest account feature which lets the guest users have access to the device with some limited features. Guests with the guest account can use your device temporarily with some limited access such as they can’t install any software or make changes on your system. Moreover, they would not be able to access important files of yours. Unfortunately, Windows 10 has disabled this facility. Now what? We still can add a guest account in Windows 10. In this guide, we will explain 2 methods through which you can create a guest account in Windows 10.

2 Ways to Create a Guest Account in Windows 10
Make sure to create a restore point just in case something goes wrong.
Method 1 – Create Guest Account in Windows 10 using the command prompt
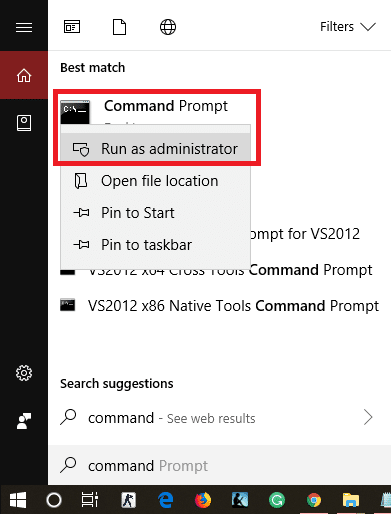
1.Open the command prompt with admin access on your computer. Type CMD in windows search and then right-click on Command Prompt from the search result and select Run as Administrator.
Note: Instead of command prompt if you see Windows PowerShell, you can open PowerShell also. You can do all things in Windows PowerShell that you can do in Windows Command Prompt. Moreover, you can switch between Windows PowerShell to Command Prompt with admin access.
2.In the elevated command prompt you need to type the below-given command and hit enter:
net user Name /add
Note: Here instead of using Name, you can put the name of the person that you want to create an account for.

3.Once the account is created, you can set a password for this. To create a password for this account you simply need to type the command: net user Name *

4.When it asks for the password, type your password that you want to set for that account.
5.Finally, users are created in the user group and they have standard permissions regarding the usage of your device. However, we want to give them some limited access to our device. Therefore, we should put the account in the guest’s group. To start with this, first, you need to delete the Visitor from the users’ group.
6.Delete the created Visitors account from the users. To do this you need to type the command:
net localgroup users Name /delete

7.Now you need to add the Visitor in guest group. To do this you simply need to type the below-given command:
net localgroup guests Visitor /add

Finally, you are done with the Guests account creation on your device. You can close the command prompt by simply typing Exit or click on the X on the tab. Now you will notice a list of the users in the lower-left pane on your login screen. Guests who want to use your device temporarily can simply choose the Visitor account from the login screen and start using your device with some limited functions.
As you know multiple users can log in at once in Windows, it means you do not need to sign out, again and again, to let the visitor use your system.

Method 2 – Create a Guest Account in Windows 10 using Local Users and Groups
This is another method to add a guest account on your device and give them access to your device with some limited features.
1.Press Windows + R and type lusrmgr.msc and hit Enter.

2.On the left pane, you click on the Users folder and open it. Now you will see More Actions option, click on it and navigate to add New User option.

3.Type the user account name such as Visitor/Friends and other required details. Now click on the Create button & close that tab.

4.Double-click on the newly added user account in Local Users and Groups.

5.Now switch to the Member Of tab, here you can select Users and tap on Remove option to remove this account from the users’ group.

6.Tap on the Add option in the lower pane of Windows box.
7.Type Guests in the “Enter the object names to select” box and click OK.

8.Finally click on OK to add this account as the member of Guests group.
9.Finally, when you are done with the creation of users and groups.
Recommended:
- How to Check Your PC’s Specification on Windows 10
- Fix Startup Repair Infinite Loop on Windows 10/8/7
- What is a CSV file & How to open a .csv file?
- How to Sign Out or Log Out Of Gmail?
I hope this article was helpful and you can now easily Create a Guest Account in Windows 10, but if you still have any questions regarding this tutorial then feel free to ask them in the comment’s section.


