Gmail is one of the most popular email services available because of its amazing interface and extremely useful. No matter what you decide to do with your emails, Gmail has it all covered. One of these features that can be your savior is combining all your email accounts into one inbox. So if you have multiple email accounts and you can’t get rid of any of them, this article is for you. This unified inbox feature of Gmail will let you access and respond to all your emails from all your accounts from a single inbox, hence saving you from a lot of hassle and time. Moreover, you will not miss any of your emails as you have to check only one inbox and even better, you can filter your different mailboxes and keep them organized too. So let’s see how to configure this. Basically, there are four things that you want to do when you combine your accounts, which we will talk about one by one:
- Forward emails from all secondary email accounts to the primary account.
- Enable the primary account to send emails as other secondary accounts.
- Make a label for all incoming emails.
- Organize your inbox by creating a filter.

Combine All Your Email Accounts Into One Gmail Inbox
#1. Forward Emails to Primary Account
This is the first step to combining your accounts into a single inbox. To receive the emails from all your accounts into the primary account inbox, you will need to forward them from the secondary email accounts to your primary email account using Gmail itself. To do this,
1. Log in to one of your secondary Gmail accounts from which you want the emails to be forwarded.
2. Click on the gear icon on the top right corner of the window and select ‘Settings’ from the list.
![]()
3. Switch to the ‘Forwarding and POP/IMAP’ tab.
4. At the top, you will find the ‘Forwarding:’ section. Click on the ‘Add a forwarding address’ button.

5. In the popup, Enter your primary email address at which you want to receive all the forwarded emails. Then click on Next.

7. In the confirmation window, click on ‘Proceed’ then Click on OK when prompt.

9. A verification email will be sent to your primary email address.
10. Now login to your primary email address in the incognito tab to save yourself from having to log in to secondary email again.
11. You will find an email containing the verification code and link.
12. You can click on the link to verify or manually type the given code in your secondary account at where you had left it. Click on ‘Confirm’.

14. Your secondary email account will now forward the emails to the primary account.
15. Do this for all your secondary accounts.
Note: If your secondary email account is not a Gmail account and does not support email forwarding, you can still forward your emails, if it supports the POP3 protocol. To do this, follow the given steps:
1. Log in to one of your secondary Gmail accounts from which you want the emails to be forwarded.
2. Click on the gear icon on the top right corner of the window and select ‘Settings’ from the list.
![]()
3. Switch to the ‘Accounts and imports’ tab. Then click on ‘Add a mail account’.

5. Enter your secondary email address and click on ‘Next’.

6. Enter the POP settings. Then click on ‘Add account’.

8. Note that you might not get emails immediately but you can enable the ‘Refresh POP accounts’ feature in the Labs section of settings.
Also Read: Hide Email Address on Windows 10 Login Screen
#2. Send Email As Secondary Account
Now once you are receiving the emails from all other accounts, the second thing you want is to be able to respond to each of the emails as the account to which it was sent. To enable your primary Gmail account to be able to send emails as another account,
1. Login to your primary email account.
2. Click on the gear icon at the top right corner of the screen and select ‘Settings’ from the list.
![]()
3. Switch to the ‘Accounts and imports’ tab. Then under the ‘Send mail as’ section, click on ‘Add another email address you own’.

5. Enter your secondary email address in the new window. You can also edit the name if you need to. Then click on ‘Next Step’.
7. Click on ‘Send verification’ to send the verification email to your secondary email address.
8. Now switch to your secondary email account inbox and click on the confirmation link provided. You can also manually type the sent verification code in the previous window. Then click on ‘Verify’.

10. If your secondary account is not a Gmail account, you will have to enter the SMTP details also.

11. You will now be able to send emails as another account from your primary account itself.
To send emails as your secondary account from your primary account,
A) While sending any email, you will see a drop-down menu against the ‘From:’ field.
B) Select the required secondary address that you want to send the email as.
Note: Sometimes, you might observe that you send emails as one of your secondary accounts more frequently than your primary account. In such a case, you can set that secondary address as your default ‘Send mail as’ address so that you don’t have to select it every time. To set it as default,
1. Login to your primary email account.
2. Click on the gear icon at the top right corner of the screen and select ‘Settings’ from the list.
![]()
3. Switch to the ‘Accounts and Import’ tab. Under the ‘Send mail as’ section, click on ‘make default’ against the address of your choice.

5. Now, whenever you compose an email, this address will be selected as the default ‘From:’ address.
Also Read: How to Automatically Delete Spam Emails In Gmail
3. Create Labels
Any email you receive or send can be tagged or labeled automatically in order to keep your Gmail inbox structured. Labels are similar to creating folders on your computer but with an exception that multiple labels can be applied to a single email. You can even create nested labels in Gmail. These labels appear in the left panel to be accessed directly.
Now once you have all the emails from different accounts in your primary inbox, it might get very confusing figuring out which address you have received the email from. To sort this for you, Gmail has ‘Labels’, using which, you can instantly identify which email has been received from which secondary account. To create labels,
1. Login to your primary Gmail account.
2. In the left pane, expand the ‘More’ section.
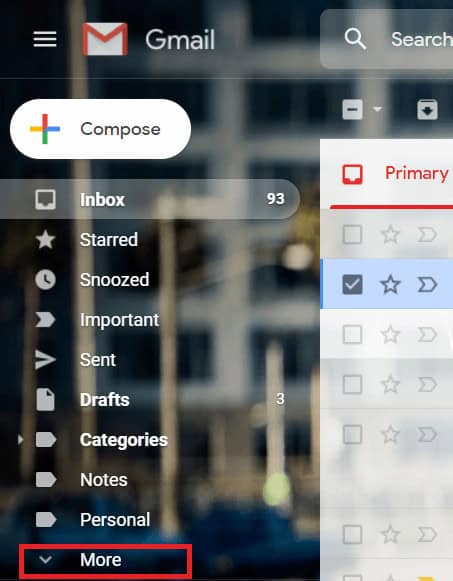
3. Click on ‘Create new label’ from the list. Type the preferred label name and click on ‘Create’.
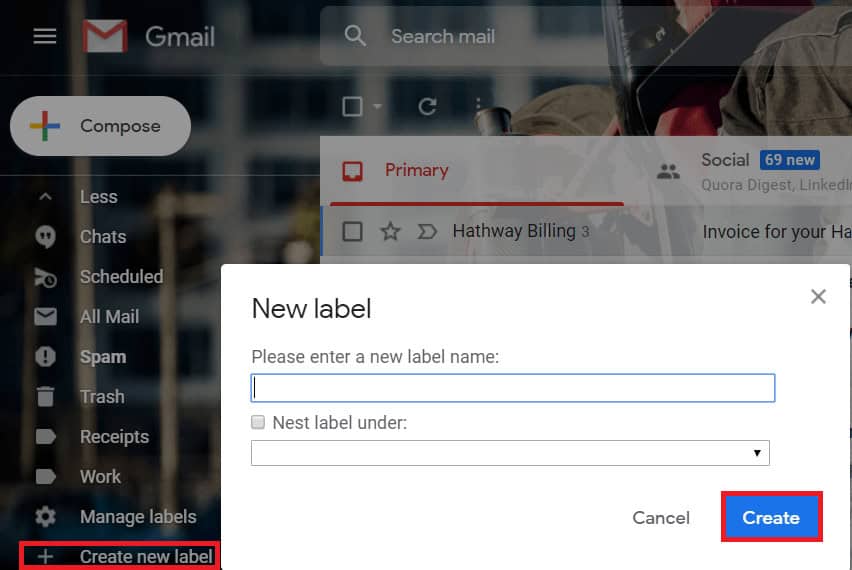
5. Add as many labels as you want, say, one for each secondary email address.
Also Read: Fix We Can’t Sign Into Your Account Error on Windows 10
4. Add Filters
Now, to prevent all the emails from cluttering your primary ‘Inbox’, you can add filters. Filtering the emails from your secondary address and applying a label to them will make sure that all the emails from your secondary address are received under the specified label. Adding filters will help you in:
- Avoiding confusion and organizing your inbox.
- Preventing from missing out the important emails.
- Increase the speed of response to the desired contacts.
To add filters,
1. Login to your primary Gmail account.
2. Click on the gear icon at the top right corner of the screen and select ‘Settings’ from the list.
![]()
3. Switch to ‘Filters and Blocked addresses’ tab. then click on ‘Create a new filter’.

5. In the ‘To’ field, type the secondary email address that you want to filter the emails from and click on ‘Create filter’.

6. On the next screen, you will see a list of options to choose from, depending upon what you want to do with the emails that match this filter conditions. Check the ‘Apply the label’ checkbox then click on ‘Choose label’ and select the label that you had created in previous steps.
Note: You can also create a new label at this step if you want.

9. If you want to filter out the matching emails that you already have in your inbox, check the ‘Also apply filter to X matching conversations’ checkbox. You can leave it unchecked if you prefer then click on ‘Create filter’.
Note: Here X is the number of matching conversations in your inbox.

11. All emails from your secondary email account will available under the set label in the left pane.
There is another way to create filters:
1. Open your primary inbox.
2. Select the checkbox against any email from your secondary account. Click on the three-dot icon on the top and select ‘Filter messages like these’ form the list.
![]()
4. Edit the fields if you require them. Click on ‘Create filter’.

6. From the list of options, select what you want to do with the emails that match the conditions. Click on ‘Create filter’ again.
Gmail’s Multiple Inbox Feature
This is another feature of Gmail which allows you to view different account inboxes at a single Gmail account in the form of different panes. However, to use this feature, you will have to disable Gmail’s default tabbed inbox features that use tabs like Social, Promotions, Updates, etc. For this,
1. Login to your primary email account.
2. Click on the gear icon at the top right corner of the screen and select ‘Configure inbox’ from the list.
![]()
3. Uncheck Social, Promotions, Updates, and Forums checkboxes and click on ‘Save’.

Now, to enable multiple inbox,
1. Click on the gear icon at the top right corner of the screen and select ‘Settings’ from the list.
![]()
2. Click on the ‘Inbox’ tab then choose the “Multiple Inboxes” option in the ‘Inbox type’ section. Enter the Gmail Id’s or your search related query and section name in Multiple Inbox Section then Click on “Save changes”.

3. Now you will need to configure each inbox by creating a search query for it. Under Search query, define your inbox with a filter. For example:
- To create an inbox from an existing label, enter label:name of the label.
- To create an inbox based on a sender, enter from:person’s email address. Add multiple senders by typing from:person’s address OR another address.
- To create an inbox for email sent to 1 of your other accounts, enter to:you@youremail.com.
Note: Before you can create inboxes to show mail for different accounts, you need to set up Gmail to send mail from a different address or alias.
Source: Google
4. Under Panel title, enter a name for each inbox.
5. Your multiple inboxes will be set up.
Also Read: Reset or Recover Your Gmail Password
Using the above methods, you can easily combine email accounts into one Gmail Inbox. But if you still have any queries regarding this tutorial then feel free to ask them in the comment section.