
Welcome to our guide on ‘Cleaning Up Your Android Phone’! In today’s fast-paced digital world, our smartphones have become our lifelines, storing everything from personal memories to crucial information. However, over time, even the best Android phones can get cluttered and slow down. This guide is designed to help you declutter, optimize, and rejuvenate your Android device. We’ll walk you through simple yet effective steps to free up space, enhance performance, and ensure your phone runs as smoothly as the day you got it.

6 Ways To Clean Up Your Android Phone
Take out the Trash on Your Own
As mentioned earlier, the Android system is quite smart and can take care of itself. There are multiple ways to clear the junk files which does not need aid or intervention from a third-party app. You can start with clearing the cache files, backing up your media files, removing unused apps, etc. In this section, we will discuss each of these in detail and provide a step-wise guide for the same.
1. Clear the Cache Files
All apps store some data in the form of cache files. Some essential data is saved so that when opened, the app can display something quickly. It is meant to reduce the startup time of any app. However, these cache files keep growing with time. An app that was only 100 MB while installation ends up occupying almost 1 GB after some months. It is always a good practice to clear cache and data for apps. Some apps like social media and chatting apps occupy more space than others. Start from these apps and then work your way to other apps. Follow the steps given to clear cache and data for an app.
1. Go to the Settings on your phone.
2. Click on the Apps option to view the list of installed apps on your device.
3. Now select the app whose cache files you would like to delete and tap on it.

4. Click on the Storage option.

5. Here, you will find the option to Clear Cache and Clear Data. Click on the respective buttons and the cache files for that app will get deleted.

In earlier Android versions, it was possible to delete cache files for apps at once however this option was removed from Android 8.0 (Oreo) and all the subsequent versions. The only way to delete all cache files at once is by using the Wipe Cache Partition option from the Recovery mode. Follow the steps given below to see how:
1. The first thing that you need to do is to switch off your mobile phone.
2. In order to enter the bootloader, you need to press a combination of keys. For some devices, it is the power button along with the volume down key while for others it is the power button along with both the volume keys.
3. Take note that the touchscreen does not work in the bootloader mode so when it starts using the volume keys to scroll through the list of options.
4. Traverse to the Recovery option and press the Power button to select it.
5. Now traverse to the Wipe Cache Partition option and press the Power button to select it.
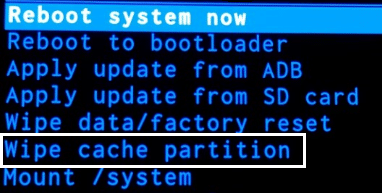
6. Once the cache files get deleted, reboot your device.
2. Get Rid of Unused Apps
We all have a couple of apps on our phones that we can very well continue without. People often don’t care too much about unused apps unless they start facing performance issues. The easiest way to reduce the burden on your memory is to delete these old and obsolete apps.
Over the course of time we end up installing multiple apps and usually, these apps remain on our phone even after we no longer need them. The best way to identify unnecessary apps is to ask the question “when was the last time I used it?” If the answer is more than a month, feel free to go ahead and uninstall the app because you clearly don’t need it anymore. You can also take help from the Play Store to identify these unused apps. Follow the steps given below to see how.
1. Firstly, open the Play Store on your device.
2. Now tap on the Hamburger menu on the left corner of your screen then tap on the My Apps and Games option.
3. Here, go to the Installed apps tab.

4. Now you will find an option to sort the list of files. It is set to Alphabetical by default.
5. Tap on it and select the Last Used option. This will sort the list of apps on the basis of when was the last time that a particular app was opened.

6. The ones at the bottom of this list are the clear targets that need to be uninstalled from your device.
7. You can directly tap uninstall to uninstall them from Play Store itself or choose to manually uninstall them later from the app drawer.
3. Backup your Media Files on a Computer or Cloud Storage
Media files like photos, videos, and music take up a lot of space on your mobile’s internal storage. If you are planning to clean up your Android phone, then it is always a good idea to transfer your media files to a computer or cloud storage like Google Drive, One Drive, etc.
Having a backup for your photos and videos has a lot of added benefits as well. Your data will remain safe even if your mobile gets lost, stolen, or damaged. Opting for a cloud storage service also provides protection against data theft, malware, and ransomware. Apart from that, the files will always be available for viewing and download. All that you need to do is log in to your account and access your cloud drive. For Android users, the best cloud option for photos and videos is Google photos. Other viable options are Google Drive, One Drive, Dropbox, MEGA, etc.

You can also choose to transfer your data to a computer. It won’t be accessible at all times but it offers much more storage space. In comparison to cloud storage that offers limited free space (you need to pay for extra space), a computer offers almost unlimited space and can accommodate all your media files irrespective of how much it is.
Also Read: Restore Apps and Settings to a new Android phone from Google Backup
4. Manage your Downloads
Another major contributor to all the clutter on your phone is the Downloads folder of your device. Over the course of time, you must have downloaded a thousand different things like movies, videos, music, documents, etc. All these files form a massive pile on your device. Almost no one makes the effort to sort and organize the contents of the folder. As a result, junk files like old and unnecessary podcasts, year-old recordings of your once-favourite TV shows, screenshots of receipts, message forwards, etc. conveniently lay hiding on your phone.
Now we know it is going to be a cumbersome task, but you need to clear your Downloads folder every once in a while. In fact, doing so more frequently will make the job easier. You need to sift through the contents of the Downloads folder and get rid of all the junk files. You can either use the File manager app or use different apps like the Gallery, Music Player, etc. to take out different kinds of trash separately.
5. Transfer Apps to an SD card
If your device is running an older Android operating system, then you can choose to transfer apps to the SD card. However, only some apps are compatible to be installed on an SD card instead of the internal memory. You can transfer a system app to the SD card. Of course, your Android device should also support an external memory card in the first place to make the shift. Follow the steps given below to learn how to transfer apps to the SD card.
1. Firstly, open Settings on your device then tap on the Apps option.
2. If possible, sort the apps according to their size so that you can send the big apps to the SD card first and free up a substantial amount of space.
3. Open any app from the list of apps and see if the option “Move to SD card” is available or not.

4. If yes, then simply tap on the respective button and this app and its data will be transferred to the SD card.
Please take note that this will only be possible if you are running Android Lollipop or earlier on your device. After that, Android stopped allowing users to install apps on the SD card. Now, apps can only be installed on the internal memory. So, you need to keep a watch on how many apps you install on your device as the storage space is limited.
Also Read: Transfer Files From Android Internal Storage To SD Card
6. Use third-party apps to clean up your Android phone
Honestly, the above-mentioned methods do sound like a lot of work and thankfully there is an easier alternative. If you don’t want to identify and remove the junk items from your phone, then have someone else do it for you. You will find a number of mobile cleaning apps on the Play Store at your disposal waiting for you to say the word.
Third-party apps will scan your device for junk files and allow you to get rid of them with a few simple taps. After a certain period of time, it is important to keep at least one such app on your phone to regularly clean its memory. In this section, we are going to discuss some of the best apps that you can try to clean up your Android phone.
a) Files by Google
Let’s start the list with Android’s most recommended file manager brought to us by none other than Google itself. Files by Google is in essence a file manager for your phone. The main utility of the app is that of a one-stop solution for your browsing needs. All your data can be accessed from this app itself. It carefully sorts out different kinds of data into respective categories which makes it easier for you to find things.
The reason why it has featured in this list is that it comes with several powerful tools that will help you to clean up your Android phone. When you open the app you will find a Clean button at the bottom of the screen. Tap on it and you will be taken to the respective tab. Here, all your junk files will be identified and arranged in properly defined categories such as unused apps, junk files, Duplicates, Backed up photos, etc. All that you need to do open each category or option and select the files that you want to get rid of. After that, simply tap on the Confirm button and the app will take care of the rest.
b) CCleaner
Now, this app has been around for a long time and is still arguably one of the best apps out there. Unlike most other Cleaner apps that are nothing but an eyewash, this one actually works. CCleaner was first released for computers and having managed to turn few heads there, they extended their services for Android as well.
CCleaner is an effective phone cleaning app that is capable of getting rid of cache files, removing duplicates, deleting empty folders, identify unused apps, clearing temp files, etc. The best part of CCleaner is that it has a number of utility tools that keep the system free of junk files. You can use the app to perform quick scans and diagnosis to figure out which apps or programs are consuming excess space or memory. Its built-in app manager allows you to directly deploy changes.
Additionally, the app also has a monitoring system that provides information about the consumption of the phone’s resources like the CPU, RAM, etc. To make things even better the app is free and will get the job done without any kind of root access.
c) Droid Optimizer
With over one million downloads under its belt, Droid Optimizer is one of the most popular mobile cleaning apps. It has a fun and interesting ranking system which incentivizes users to keep their phone clean. The app’s simple interface and detailed animated intro-guide make it easier for everyone to use.
When you launch the app for the first time, you will be taken through a short tutorial explaining the various tools and features of the app. On the home screen itself, you will find the device report that indicates what percentage of the RAM and internal memory is free. It also shows your current rank and shows where you stand in comparison to other app users. When you perform any cleaning action, then you are awarded points and these points determine your rank. This is a great way to motivate people to clean junk files every now and then.
Getting rid of junk files is as simple as tapping a button, specifically the Cleanup button on the main screen. The app will take care of the rest and delete all the cache files, unused files, junk items, etc. You can even automate these functions. Simply tap on the Automatic button and set up a regular cleaning process. Droid Optimizer will automatically initiate the process at the preferred time and take care of the trash on its own without your intervention.
d) Norton Clean
You know that an app is good when it is associated with one of the best security solutions brand. Since we all know how popular Norton Antivirus software is, it would be fair to expect a similar level of performance when it comes to their own Android cleaning app.
Norton Clean offers pretty standard features like removing unused old files, clearing the cache and temp files, removing unused apps, etc. It essentially helps you in clearing the clutter. Its Manage Apps section allows you to quickly identify the useless apps on your phone by arranging them on the date of last use, date of installation, memory occupied, etc.
The key highlight of the app is its neat and clean interface which makes it user friendly. You can easily get the job done in a matter of few taps. Although it does not have a lot of add on features like the other apps that we have discussed earlier, Norton Clean can definitely get the job done. If your main concern is to clean your phone and reclaim some space on your internal storage then this app perfect for you.
e) All-In-One Toolbox
As the name suggests, the All-In-One Toolbox app is a complete collection of useful tools that helps you to keep your device in shape. In addition to cleaning junk files from your phone, it will also remove annoying ads, monitor your resources (CPU, RAM, etc.), and manage your battery.
The app has a simple one-tap button to clean your phone. Once you tap on it, the app will scan for junk items like cache files, empty folders, old and unused media files, etc. You can now select which item you would want to keep and then delete the rest with another tap on the Confirm button.
Other additional features include a Boost button that frees up the RAM by closing apps running in the background. You can also set this process to automatic if you purchase the premium version of the app.
There is also a battery saver tool that eliminates background tasks and makes the battery last longer. Not only that, but there is also a mass app delete, Wi-Fi analyzer, deep file cleaning tools in the All-In-One Toolbox app. This app is perfect if you want to take care of multiple things at the same time.
Recommended: How to Hide Files, Photos, and Videos on Android
With that, we come to the end of this article. We hope this article was helpful and you were able to clean up your Android phone. Cleaning your phone from time to time is a good practice. It helps your device maintain the same level of performance for longer time periods. As a result apps like Droid Optimizer and All-In-One Toolbox have a ranking system to motivate people to perform cleaning actions on your device.


