
Change Default OS in Dual-Boot Setup: The boot menu comes whenever you start your computer. If you have multiple operating systems on your computer then you need to choose an operating system when the computer starts. Anyways if you do not choose an OS, the system will start with the default operating system. But, you can easily change the default OS in dual-boot setup for your system.

Basically, you need to change the default OS when you have installed or update your Windows. Because whenever you update the OS, that operating system will become the default operating system. In this article, we will learn how to change the boot order of the operating system through different methods.
How to Change Default OS in Dual-Boot Setup
Note: Make sure to create a restore point just in case something goes wrong.
Method 1: Change Default OS in System Configuration
The most basic way to change the Boot order through the system configuration. There are very few steps you need to follow to do the changes.
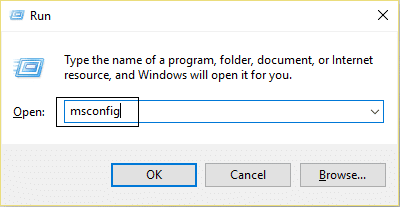
1.First, open the run window through the shortcut key “Windows + R”. Now, type the command “msconfig” & hit Enter to open the system configuration window.
2.This will open the System configuration window from where you need to switch to the Boot tab.

3.Now select the Operating System which you want to set as default then click on the “Set as default” button.

This way you can change the Operating System which will boot when your system restarts. You can also change the default time out setting in the system configuration. You can change it to your desired waiting time to choose an Operating System.
Method 2: Change Default OS in Dual-Boot Setup using Advanced Options
You can set a boot order when the system starts. Follow the steps below to change the default OS in dual-boot setup:
1.First, restart your system.
2.When the screen appears for choosing an operating system, select the “Change defaults or choose other options” from the bottom of the screen instead of the operating system.

3.Now from the Options window select “Choose a default operating system”.

4.Choose the preferred default operating system.

Note: Here the operating system which is at the top is currently the Default Operating System.
5.In the above image Windows 10 is the currently the default operating system. If you choose Windows 7 then it will become your default operating system. Just keep in mind that you will not get any confirmation message.
6.From the Options window, you could also change the default waiting period after which Windows automatically start with the default operating system.

7.Click on “Change the timer” under Options window and then change it to 5, 10 or 15 secs according to your choice.

Press the “Back” button to see the Options screen. Now, you will see the operating system you have chosen as the “Default Operating System”.
Method 3: Change Default OS in Dual-Boot Setup using Settings
There is another way to change boot order which is using Windows 10 Settings. Using the below method will again lead to the same screen as above but it is helpful to learn another method.
1.Press Windows Key + I to open Settings then click on “Update & security” icon.
![]()
2.From the left-hand side menu make sure to select “Recovery” option.

4.Now from the Recovery screen, click on “Restart now” button under Advanced Startup section.

5.Now your system will restart and you will get “Choose an option” screen. Select the “Use another operating system” option from this screen.

6.On the next screen, you will get a list of operating system. The first one will be the current default operating system. To change it, click on “Change defaults or choose other options“.
7.After this click on the option “Choose a default operating system” from the Options screen.
8.Now you can select the default operating system as you have done in the last method.
That’s it, you have successfully change Default OS in Dual-Boot setup for your system. Now, this chosen operating system will be your default operating system. Every time when the system starts this operating system will be automatically chosen to boot from if you do not choose any OS initially.
Method 4: EasyBCD Software
EasyBCD software is the software which can be very useful to change the BOOT order of the operating system. EasyBCD is compatible with Windows, Linux, and macOS. EasyBCD has a very user-friendly interface and you can use EasyBCD software through these steps.
1.First, download EasyBCD software and install it on your desktop.

2.Now run the software EasyBCD and click “Edit Boot Menu” from the left side of the screen.

3.You can now see the list of the Operating System. Use up and down arrow to change the sequence of the operating system on the computer.

4.After this just save the changes by clicking the “Save Settings” button.
These are the methods which can be used for changing the Boot order if you are using multiple operating systems.
Recommended:
- Compress Video Files Without Losing Quality [2019]
- Reveal Hidden Passwords behind asterisk without any software
- How to Start Private Browsing in your Favorite Browser
- 4 Ways to Disable Startup Programs in Windows 10
I hope the above steps were helpful and now you can easily Change Default OS in Dual-Boot Setup, but if you still have any questions regarding this tutorial then feel free to ask them in the comment’s section.


I installed easybcd on Windows 10, selected ubuntu as the main one and put automatic choice, now I can only boot on Ubuntu.