All the electrical devices like PCs, Desktop, Laptops, etc., which we use in our daily lives for many purposes, for businesses, for running the Internet, for entertainment, etc., contains many components like processor, operating system, RAM and more. What operating system, our Laptop or PC or desktop contains is very important. As we are provided with many operating systems like Windows, Linux, UNIX, etc., which we want to use is a very important decision to make. All operating systems have their own advantages and disadvantages. But we generally choose that operating system which is handy and easy to use. And the Windows operating system is the best choice as it is very user-friendly and easy to operate.

Windows operating system comes with many windows version like Windows XP, Windows 7, Windows 8.1, Windows 10 and more. The latest version of windows that is available in the market is Windows 10. As we live in a world of technology, so day-to-day new updates arrive in the market. Similarly, with Windows 10, new updates arrive daily. Windows 10 user can see a notification that a new update is available for their system.
No matter how much you avoid updating your Windows, at some point of time it becomes necessary to update it as many problems may start arising like your PC may slow down or some applications may stop supporting and running, etc. Updating Windows can provide you with new features such as security fixes, improvements, etc., and it is also not a very difficult task to keep your PC up-to-date.
How to check if Update Available for Windows 10?
Make sure to create a restore point just in case something goes wrong.
To check if an update is available for windows10 and to update it follow below steps:
1. Press Windows Key + I to open Settings then click on Update and Security.
![]()
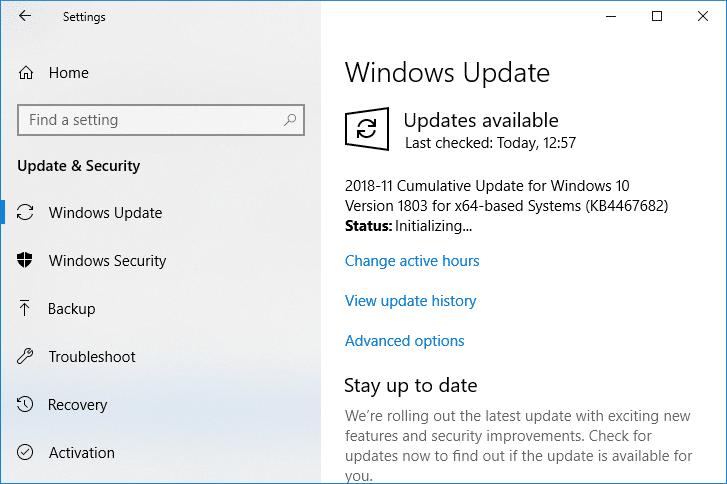
2. Under Windows Update below window will open.
3. Click on “Check for updates” to check which updates are available.

4. Then you will see if any new updates are available.
5. Click on Download button to download updates, for newer builds the update will start downloading itself.
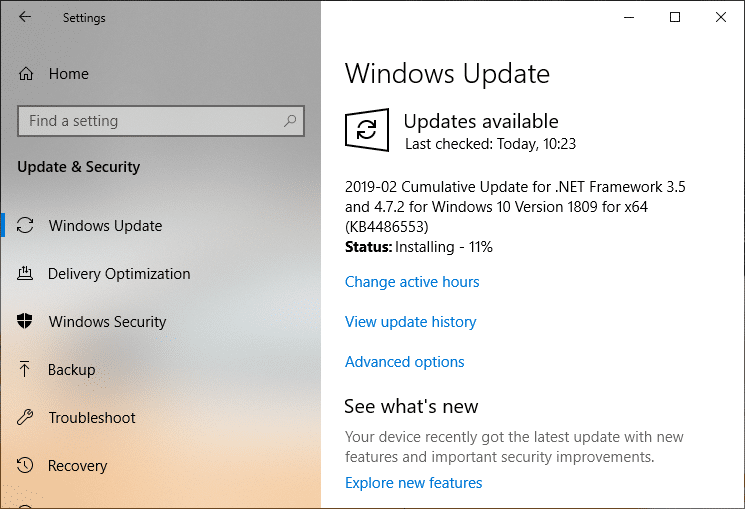
6. After that below box will appear, which will show updates progress.
7. After reaching 100%, your updates download is completed and click on Install Now to install the updates. For newer builds, the updates will start automatically.
8. After Windows finish installing updates, it will ask for a System Restart. If you don’t want to restart, then you can schedule restart or manually restart later.

Why are Windows 10 Updates Extremely Slow?
Sometimes, the above steps do not take place as smoothly as we think. Unfortunately, the Windows10 update process is very slow, and it takes a lot of time to update it. There are many reasons why Windows 10 Updates are extremely slow. These are:
- Windows 10 is a very big, complicated operating system. There are some updates which are very small and are not even noticed when they are updated. Simultaneously, others are very large and massive and take a huge amount of time to update.
- If you are using a slow internet connection, downloading even one gigabyte can take hours.
- If multiple people try to update the window simultaneously, this also affects the speed of updating.
- Windows may be extremely unoptimized. You might be using it for a very long time, and there is just too much old application data.
- You may have changed the wrong settings. If that is the case, then even well-tuned updates can take forever.
- Some updates need to cover many things, and slow or old hard disk drive with lots of unneeded files everywhere can create a lot of problems.
- Windows Update is itself a programme, so maybe its component or part of the programme can break and throw the entire process off.
- While updating window, third-party applications, services, and drivers may cause software conflicts.
- One of the reasons is that windows have to rewrite its registry every time it installs an update.
- How fragmented your hard drive is because if it is not properly fragmented then hard drive needs to do more searching for free space into which the computer can write updated files, and it will consume a lot of time.
Do not worry if any of the above problems occur. As we know, every problem comes with a solution, so below are some solutions which we can use to fix Windows 10 extremely slow updates:
Method 1: Check your Internet Connection
There can be numerous causes for this error, such as DNS issue, Proxy issue, etc. But before that make sure your Internet Connection is working (use another device to check or use another browser) and you have disabled VPNs (Virtual Private Network) running on your system. Also, make sure that you have a good high-speed internet connection.
Method 2: Perform Clean Boot in Windows 10
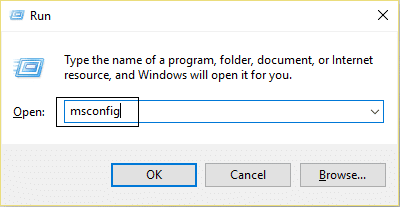
1. Press the Windows Key + R button, then type msconfig and click OK.
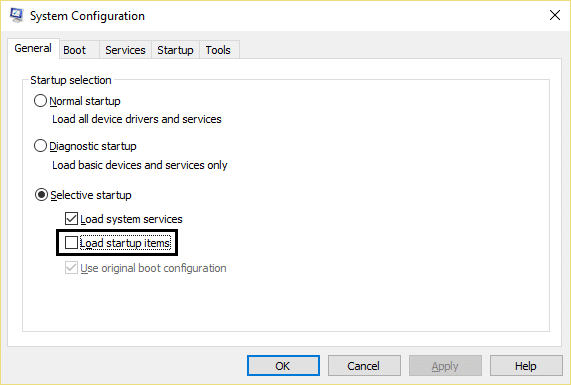
2. Under the General tab under, make sure Selective startup is checked.
3. Uncheck Load startup items under selective startup.
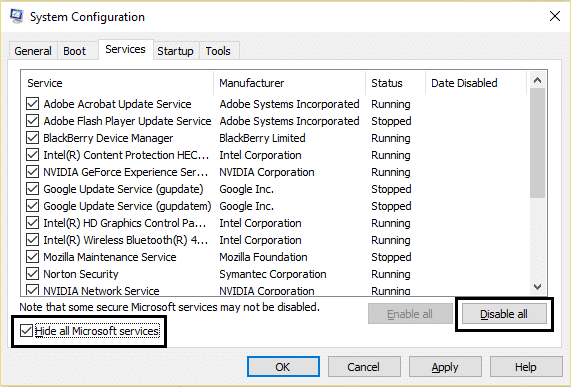
4. Switch to the Service tab and checkmark Hide all Microsoft services.
5. Now click Disable all button to disable all the unnecessary services which might cause conflict.
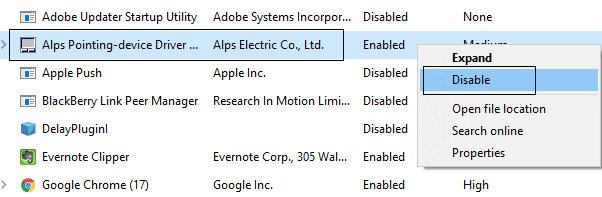
6. On the Startup tab, click Open Task Manager.
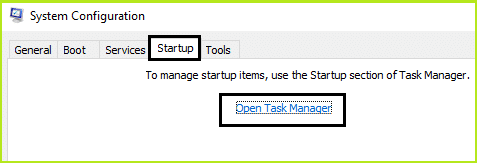
7. Now, in the Startup tab (Inside Task Manager) disable all the startup items which are enabled.
8. Click OK and then Restart. Now again try to Update Windows and this time you will be able to update your Windows successfully.
9. Again press the Windows key + R button and type msconfig and hit Enter.
10. On the General tab, select the Normal Startup option and then click OK.
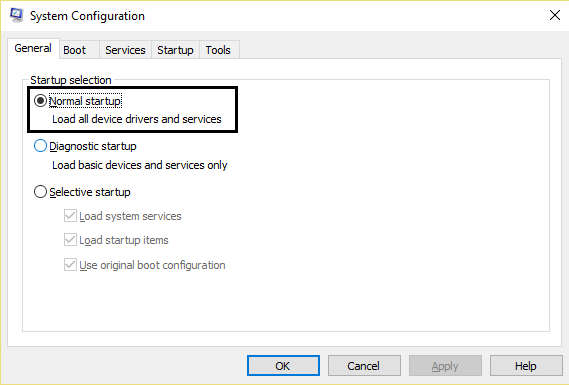
11. When you are prompted to restart the computer, click Restart. This would definitely help you Fix Windows 10 Updates extremely slow issue.
Once, your PC or Desktop or Laptop restarts, again try to update your window. Once Windows Updates start working, make sure to enable the Startup programs back from the System Configuration window.
If you’re still experiencing Windows 10 Updates Extremely Slow issue, you need to perform clean boot using a different approach discussed in this guide. To Fix Windows Update Stuck, you need to perform a clean boot in your PC and diagnose the issue step by step.
Method 3: Scheduled Windows Updates using Active Hours
Active Hours let you specify the hours in which you are most active on your device to prevent Windows from updating your PC in the specified period of time automatically. No updates will be installed during those hours, but you still can’t manually install these updates. When a restart is necessary to finish installing an update, Windows won’t automatically restart your PC during the active hours. Anyway, let’s see How To Change Active Hours for Windows 10 Update with this tutorial.

Method 4: Run Windows Update Troubleshooter
You can also solve the Windows 10 Updates extremely slow issue by running “Windows Update troubleshooter”. This will take a few minutes and will automatically detect & fix your problem.
1.Press Windows Key + I to open Settings then click on Update & Security.
![]()
2. From the left-hand menu, make sure to select Troubleshoot.
3. Now under Get up and running section, click on Windows Update.
4. Once you click on it, click on “Run the troubleshooter” under Windows Update.

5. Follow on-screen instructions to run the troubleshooter and see if you’re able to Fix Windows Update Stuck issue.

If none of the above steps was helpful in troubleshooting extremely slow Windows 10 Update issue then as a last resort, you could try to run Microsoft Fixit which seems helpful in fixing the issue.
1. Go here and then scroll down till you find “Fix Windows Update errors.”
2. Click on it to download the Microsoft Fixit or else you can directly download from here.
3. Once download, double-click the file to run the Troubleshooter.
4. Make sure to click Advanced and then click “Run as administrator” option.

5. Once the Troubleshooter will have administrator privileges, and it will again open, then click on advanced and select “Apply repairs automatically.”

6. Follow the on-screen instruction to complete the process, and it will automatically troubleshoot all the issues with Windows Updates & fix them.
Method 5: Rename SoftwareDistribution Folder
1. Open Command Prompt. The user can perform this step by searching for ‘cmd’ and then press Enter.

2. Now type the following commands to stop Windows Update Services and then hit Enter after each one:
net stop wuauserv
net stop cryptSvc
net stop bits
net stop msiserver

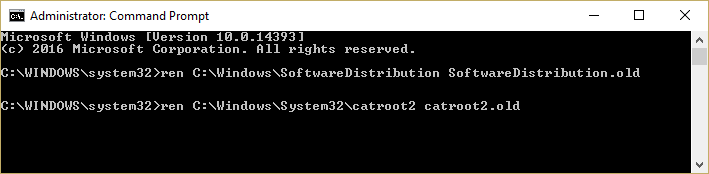
3. Next, type the following command to rename SoftwareDistribution Folder and then hit Enter:
ren C:\Windows\SoftwareDistribution SoftwareDistribution.old
ren C:\Windows\System32\catroot2 catroot2.old
4. Finally, type the following command to start Windows Update Services and hit Enter after each one:
net start wuauserv
net start cryptSvc
net start bits
net start msiserver

5. Reboot your PC to save changes and check if you can Fix Windows 10 Updates extremely slow issue.
If you are still not able to download the updates, then you need to delete SoftwareDistribution folder.
1. Press Windows Key + R then type services.msc and hit Enter.

2. Right-click on Windows Update service and select Stop.

3. Open File Explorer then navigate to the following location:
C:\Windows\SoftwareDistribution
4. Delete all the files and folders under SoftwareDistribution.

5. Again right-click on Windows Update service then select Start.

6. Now to try to download the updates which were stuck earlier.
Method 6: Optimize and Defragment Drives in Windows 10
Now Disk defragmentation re-arranges all the pieces of data that are spread across your hard drive and stored them together again. When the files are written to disk, it is broken into several pieces as there is not enough contiguous space to store the complete file. Hence the files become fragmented. Naturally, reading all these pieces of data from different places will take some time, in short, it will make your PC slow, long boot times, random crashes and freeze-ups, etc.
Defragmentation reduces file fragmentation, thus improving the speed by which data is read and written to disk, which ultimately increases your PC’s performance. Disk defragmentation also cleans the disk, thus increasing the overall storage capacity. So without wasting any time let’s see How to Optimize and Defragment Drives in Windows 10.

Method 7: Run .BAT File to Re-register DLL files
1. Open Notepad file then copy & paste the following code as it is:
net stop cryptsvc
net stop wuauserv
ren %windir%\system32\catroot2 catroot2.old
ren %windir%\SoftwareDistribution SoftwareDistribution.old
regsvr32 comcat.dll /s
Regsvr32 Msxml.dll /s
Regsvr32 Msxml2.dll /s
proxycfg -u
Regsvr32 Msxml3.dll /s
regsvr32 shdoc401.dll /s
regsvr32 cdm.dll /s
regsvr32 softpub.dll /s
regsvr32 wintrust.dll /s
regsvr32 initpki.dll /s
regsvr32 dssenh.dll /s
regsvr32 rsaenh.dll /s
regsvr32 gpkcsp.dll /s
regsvr32 sccbase.dll /s
regsvr32 slbcsp.dll /s
regsvr32 mssip32.dll /s
regsvr32 cryptdlg.dll /s
regsvr32 wucltui.dll /s
regsvr32 shdoc401.dll /i /s
regsvr32 dssenh.dll /s
regsvr32 rsaenh.dll /s
regsvr32 gpkcsp.dll /s
regsvr32 sccbase.dll /s
regsvr32 slbcsp.dll /s
regsvr32 asctrls.ocx /s
regsvr32 wintrust.dll /s
regsvr32 initpki.dll /s
regsvr32 softpub.dll /s
regsvr32 oleaut32.dll /s
regsvr32 shdocvw.dll /I /s
regsvr32 shdocvw.dll /s
regsvr32 browseui.dll /s
regsvr32 browseui.dll /I /s
regsvr32 msrating.dll /s
regsvr32 mlang.dll /s
regsvr32 hlink.dll /s
regsvr32 mshtmled.dll /s
regsvr32 urlmon.dll /s
regsvr32 plugin.ocx /s
regsvr32 sendmail.dll /s
regsvr32 scrobj.dll /s
regsvr32 mmefxe.ocx /s
regsvr32 corpol.dll /s
regsvr32 jscript.dll /s
regsvr32 msxml.dll /s
regsvr32 imgutil.dll /s
regsvr32 thumbvw.dll /s
regsvr32 cryptext.dll /s
regsvr32 rsabase.dll /s
regsvr32 inseng.dll /s
regsvr32 iesetup.dll /i /s
regsvr32 cryptdlg.dll /s
regsvr32 actxprxy.dll /s
regsvr32 dispex.dll /s
regsvr32 occache.dll /s
regsvr32 occache.dll /i /s
regsvr32 iepeers.dll /s
regsvr32 urlmon.dll /i /s
regsvr32 cdfview.dll /s
regsvr32 webcheck.dll /s
regsvr32 mobsync.dll /s
regsvr32 pngfilt.dll /s
regsvr32 licmgr10.dll /s
regsvr32 icmfilter.dll /s
regsvr32 hhctrl.ocx /s
regsvr32 inetcfg.dll /s
regsvr32 tdc.ocx /s
regsvr32 MSR2C.DLL /s
regsvr32 msident.dll /s
regsvr32 msieftp.dll /s
regsvr32 xmsconf.ocx /s
regsvr32 ils.dll /s
regsvr32 msoeacct.dll /s
regsvr32 inetcomm.dll /s
regsvr32 msdxm.ocx /s
regsvr32 dxmasf.dll /s
regsvr32 l3codecx.ax /s
regsvr32 acelpdec.ax /s
regsvr32 mpg4ds32.ax /s
regsvr32 voxmsdec.ax /s
regsvr32 danim.dll /s
regsvr32 Daxctle.ocx /s
regsvr32 lmrt.dll /s
regsvr32 datime.dll /s
regsvr32 dxtrans.dll /s
regsvr32 dxtmsft.dll /s
regsvr32 WEBPOST.DLL /s
regsvr32 WPWIZDLL.DLL /s
regsvr32 POSTWPP.DLL /s
regsvr32 CRSWPP.DLL /s
regsvr32 FTPWPP.DLL /s
regsvr32 FPWPP.DLL /s
regsvr32 WUAPI.DLL /s
regsvr32 wups2.dll /S
regsvr32 WUAUENG.DLL /s
regsvr32 ATL.DLL /s
regsvr32 WUCLTUI.DLL /s
regsvr32 WUPS.DLL /s
regsvr32 WUWEB.DLL /s
regsvr32 wshom.ocx /s
regsvr32 wshext.dll /s
regsvr32 vbscript.dll /s
regsvr32 scrrun.dll mstinit.exe /setup /s
regsvr32 msnsspc.dll /SspcCreateSspiReg /s
regsvr32 msapsspc.dll /SspcCreateSspiReg /s
proxycfg –d
sc sdset wuauserv
D:(A;;CCLCSWRPWPDTLOCRRC;;;SY)(A;;CCDCLCSWRPWPDTLOCRSDRCWDWO;;;BA)(A;;CCLCSWLOCRRC;;
;AU)(A;;CCLCSWRPWPDTLOCRRC;;;PU)
regsvr32 mshtml.dll /s
net start cryptsvc
net start wuauserv
2. Now click on File then select Save As.

3. From Save as type drop-down select “All Files” and navigate where you want to save the file.
4. Name the file as fix_update.bat (.bat extension is very important) and then click Save.

5. Right-click on the fix_update.bat file and select Run as Administrator.
6. This will restore and register your DLL files fixing the Windows 10 Updates extremely slow issue.
Method 8: If all else fails then install the Updates Manually
1. Right-click on “This PC” and select Properties.

2. Now in System Properties, check the System type and see if you have a 32-bit or 64-bit OS.

3. Press Windows Key + I to open Settings then click on Update & Security icon.
![]()
4. Under Windows Update note down the “KB“ number of the update which fails to install.

5. Next, open Internet Explorer or Microsoft Edge then navigate to Microsoft Update Catalog website.
6. Under the search box, type the KB number you noted in step 4.

7. Now click on Download button next to the latest update for your OS type, i.e. 32-bit or 64-bit.
8. Once the file is downloaded, double-click on it and follow on-screen instructions to complete the installation.
Recommended:
- Set up Yahoo email account in Windows 10 Mail App
- How to Check Your CPU Temperature in Windows 10
- Print Screen Not Working? 7 Ways to Fix it!
- Disable OneDrive on Windows 10 PC
I hope this article was helpful and should solve your problem: Why are Windows 10 Updates extremely slow or why your Windows update got stuck? If you still have any questions regarding this tutorial, please feel free to ask them in the comment’s section.