
Fix Desktop Icons Keep Rearranging in Windows 10: If you are facing this problem where the desktop icons keep rearranging themselves or auto arrange after every restart or even by refreshing then you are at the right place as today we are going to discuss on how to resolve this issue. Well in most cases, if Windows keeps moving the desktop icons automatically and rearrange them then most probably the Auto-arrange feature might be turned ON. But if even after disabling this option the desktop icons auto arrange themselves then you are in a big trouble as something is really messed up in your PC.
![]()
There is no particular reason because of which this issue is caused but in most cases, it seems to be caused by outdated, corrupted or incompatible drivers, faulty video card or an outdated driver for the video card, corrupt user profile, corrupt Icon Cache etc. So the issue depends on the user system configuration and environment. Anyway, without wasting any time let’s see how to actually Fix Desktop Icons Keep Rearranging in Windows 10 with the below-listed troubleshooting steps.
Fix Desktop Icons Keep Rearranging in Windows 10
Make sure to create a restore point just in case something goes wrong.
Method 1: Disable Align icons to grid and Auto arrange icons
1.Right-click on an empty space on the desktop then select View and uncheck Align icons to grid.
![]()
2.If not then from the View option uncheck Auto arrange icons and everything will work out.
3.Reboot your PC and see if the above settings hold on or they are automatically changing.
Method 2: Change the Icon View
1.Right-click on the desktop then select View and change the view from your currently selected view to any other. For example if “Medium” is currently selected then click on “Small.”

2.Now again select the same view which was earlier selected for example we would select Medium again.
3.Next, select “Small” in the View option and you would immediately see the changes in the icon on the desktop.
![]()
4.After this, the icon won’t rearrange themselves automatically.
Method 3: Delete Icon Cache
1.Make sure to save all the work and close all the present applications or folder windows.
2.Press Ctrl + Shift + Esc together to open Task Manager.
3.Right-click on Windows Explorer and select End Task.

4.Click File then click on Run new task.
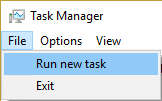
5.Type cmd.exe in the value field and click OK.

6.Now type the following command in cmd and hit Enter after each one:
CD /d %userprofile%\AppData\Local
DEL IconCache.db /a
EXIT
![]()
7.Once all the commands are successfully executed close command prompt.
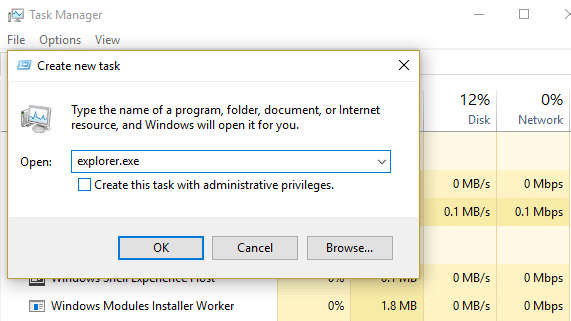
8.Now again open the Task Manager if you have closed then click File > Run new task.
9.Type explorer.exe and click OK. This would restart your Windows Explorer and Fix Desktop Icons Keep Rearranging in Windows 10.
Method 4: Uncheck Allow themes to change desktop icons
1.Right-click on an empty area on Desktop and then select Personalize.

2.From the left-hand menu select Themes and then click Desktop icon settings.
![]()
3.Now in the Desktop Icon Settings window uncheck the option “Allow themes to change desktop icons” in the bottom.
![]()
4.Click Apply followed by OK.
5.Reboot your PC to save changes and see if you are able to Fix Desktop Icons keep rearranging automatically issue.
Method 5: Uninstall Graphic Card Drivers
1.Press Windows Key + R then type devmgmt.msc and hit Enter to open Device Manager.
2.Expand Display adapters and then right-click on your NVIDIA graphic card and select Uninstall.
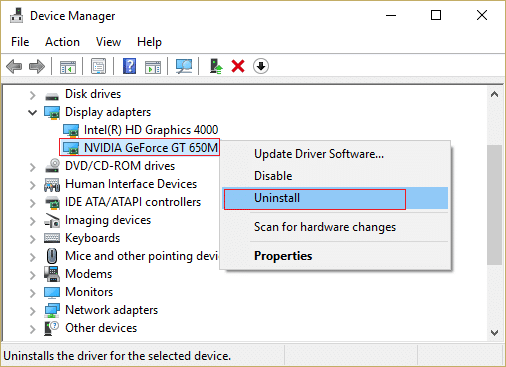
2.If asked for confirmation select Yes.
3.Press Windows Key + X then select Control Panel.

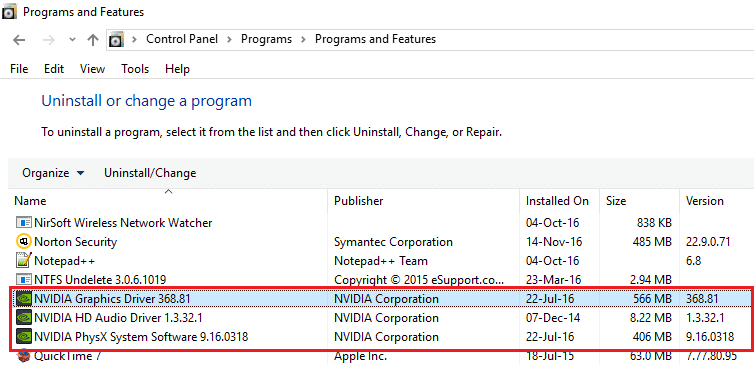
4.From Control Panel click on Uninstall a Program.
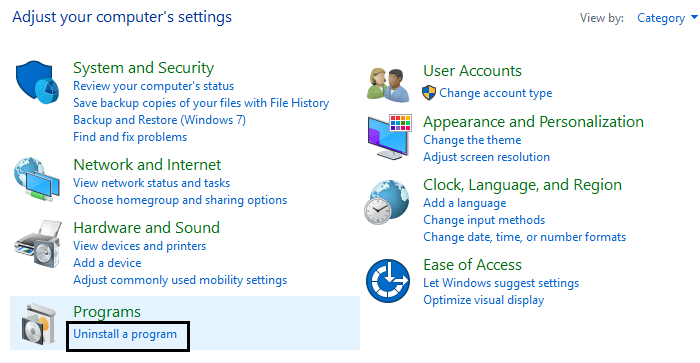
5.Next, uninstall everything related to Nvidia.
6.Reboot your system to save changes and again download the setup from the manufacturer’s website.
5.Once you are sure that you have removed everything, try installing the drivers again. The setup should work without any problems and you will be able to Fix Desktop Icons Keep Rearranging issue in Windows 10.
Method 6: Update Display Drivers (Graphic Card)
1.Press Windows Key + R then type “devmgmt.msc” (without quotes) and hit enter to open Device Manager.

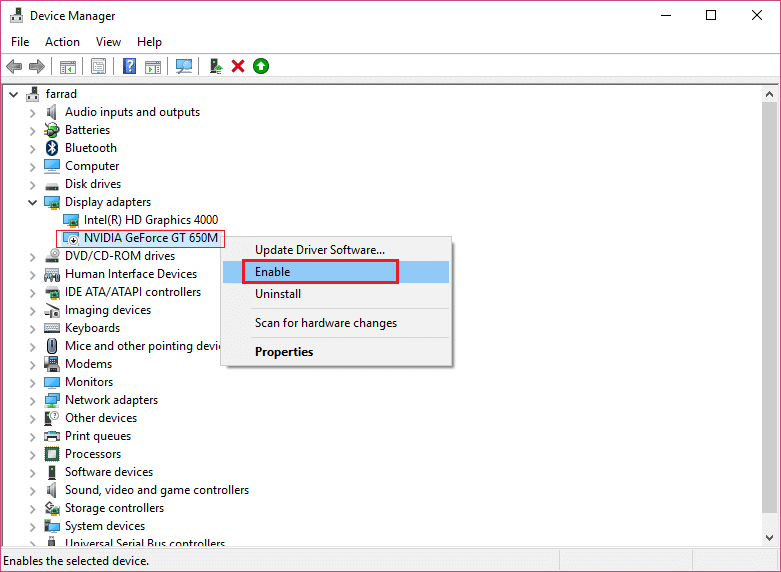
2.Next, expand Display adapters and right-click on your Nvidia Graphic Card and select Enable.
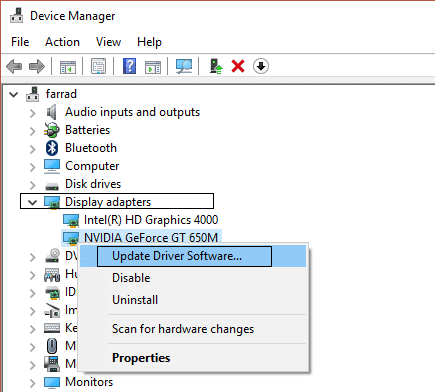
3.Once you have done this again right-click on your graphic card and select “Update Driver Software.“
4.Select “Search automatically for updated driver software” and let it finish the process.

5.If the above step was able to fix your problem then very good, if not then continue.
6.Again select “Update Driver Software” but this time on the next screen select “Browse my computer for driver software.“

7.Now select “Let me pick from a list of device drivers on my computer.”

8.Finally, select the compatible driver from the list for your Nvidia Graphic Card and click Next.
9.Let the above process finish and restart your PC to save changes. After updating Graphic card you may be able to Fix Desktop Icons Keep Rearranging in Windows 10.
Method 7: Update DirectX
To fix this issue, you should always try to update your DirectX. The best way to make sure you have the latest version installed is to download DirectX Runtime Web Installer from Microsoft’s official website.
Method 8: Run SFC and DISM commands
1.Press Windows Key + X then click on Command Prompt(Admin).

2.Now type the following in the cmd and hit enter:
Sfc /scannow
sfc /scannow /offbootdir=c:\ /offwindir=c:\windows (If above fails then try this one)

3.Wait for the above process to finish and once done restart your PC.
4.Next, type the following command in cmd and hit enter after each one:
a) Dism /Online /Cleanup-Image /CheckHealth
b) Dism /Online /Cleanup-Image /ScanHealth
c) Dism /Online /Cleanup-Image /RestoreHealth

5.Let the DISM command run and wait for it to finish.
6. If the above command doesn’t work then try on the below:
Dism /Image:C:\offline /Cleanup-Image /RestoreHealth /Source:c:\test\mount\windows
Dism /Online /Cleanup-Image /RestoreHealth /Source:c:\test\mount\windows /LimitAccess
Note: Replace the C:\RepairSource\Windows with the location of your repair source (Windows Installation or Recovery Disc).
7.Reboot your PC to save changes.
Method 9: Create a new User Account
1.Press Windows Key + I to open Settings and then click Accounts.

2.Click on Family & other people tab in the left-hand menu and click Add someone else to this PC under Other people.

3.Click I don’t have this person’s sign-in information in the bottom.

4.Select Add a user without a Microsoft account in the bottom.

5.Now type the username and password for the new account and click Next.

Sign in to this new user account and see if you are able to fix the issue with Icons. If you are successfully able to Fix Desktop Icons Keep Rearranging themselves automatically issue in this new user account then the problem was with you old user account which might have got corrupted, anyway transfer your files to this account and delete the old account in order to complete the transition to this new account.
Method 10: For users using ESET NOD32
1.Press Windows Key + R then type regedit and hit Enter to open Registry Editor.

2.Navigate to the following Registry Key:
HKEY_CLASSES_ROOT\Wow6432Node\CLSID\{42aedc87-2188-41fd-b9a3-0c966feabec1}\InProcServer32\

HKEY_CLASSES_ROOT\CLSID\{42aedc87-2188-41fd-b9a3-0c966feabec1}\InProcServer32\
3.Double click on (Default) and replace “%SystemRoot%\SysWow64\shell32.dll” with “%SystemRoot%\system32\windows.storage.dll” in both the destinations.
4.Reboot your PC to save changes.
Method 11: Repair Install Windows 10
This method is the last resort because if nothing works out then this method will surely repair all problems with your PC. Repair Install just uses an in-place upgrade to repair issues with the system without deleting user data present on the system. So follow this article to see How to Repair Install Windows 10 Easily.
Recommended for you:
- Fix Audio Problems Windows 10 Creators Update
- How To Fix Icons missing their specialized image
- Fix Desktop Icons keep getting rearranged after Windows 10 Creators Update
- Fix Missing Photos or Picture Icons after Creators Update
That’s it you have successfully Fix Desktop Icons Keep Rearranging in Windows 10 but if you still have any queries regarding this guide then feel free to ask them in the comment’s section.


I found this article useful , thanks
Well done article but i believe W10 will not allow anything other than auto arrange so ‘fixing’ it is likely not possible because it is not broken and is what it is.
What is needed is a program that specifically can enable re-arrange of icons and then take control and keep them where a user wants.
I solved this by renaming the icons. All other solutions about windows settings did not help. Maybe the problem is the language
hay, thank you very much!
Dear Aditya
Bravo… Very comprehensive article.
Clear indication of your expertise and the in depth knowledge you have.
Thank you
Microsoft learns nothing from user ! The same problems all over again and again ! Its the faulty os design and constant MS need to overwrite user settings. If then so why then MS doesn’t lock freeze desktop permanently (if they cant solve it once and for all) ?