How to Delete System Error Memory Dump Files: Whenever your system runs into some kind of issue such as it crashes randomly or you see a Blue Screen of Death error then the system stores a copy of your computer memory at the time of the crash in order to help you later diagnose the reason behind the crash. These saved files (memory dumps) are known as System Error Memory Dump files. These are automatically stored in the C drive (where Windows is installed).

These are the four different types of memory dumps:
Complete memory dump: This is the largest type of memory dump among its peers. It contains a copy of all the data used by Windows in physical memory. This dump file requires a pagefile that is at least as large as your main system memory. The Complete Memory Dump file is written to %SystemRoot%\Memory.dmp by default.
Kernel memory dump: Kernel memory dump: It is significantly smaller than the complete memory dump and according to Microsoft, the kernel memory dump file will be around one-third the size of the physical memory on the system. This dump file does not include any memory allocated to user-mode applications and any unallocated memory. It only includes the memory allocated to the Windows kernel and Hardware Abstraction Level (HAL), as well as memory allocated to kernel-mode drivers and other kernel-mode programs.
Small memory dump: It is smallest memory dump and is exactly 64 KB in size and requires only 64 KB of pagefile space on the boot drive. The small memory dump file contains very little information about the crash. However, this kind of dump file is very helpful when the disk space is very limited.
Automatic memory dump: This memory dump contains the exact same information as a kernel memory dump. The difference between the two is not in the dump file itself, but in the way that Windows sets the size of the system paging file.
Now as Windows saves all these memory dump files, after some time your disk will start to fill up and these files will start taking a big chunk of your hard disk. You may even go out of space if you don’t clear out the old system error memory dump files. You can use disk cleanup utility to delete the dump files and free up some space on your hard disk. But few users reported that they aren’t able to delete the dump files, so that’s why we have put together this guide in which we will discuss 6 different ways to Delete System Error Memory Dump Files on Windows 10.
6 Ways to Delete System Error Memory Dump Files
Make sure to create a restore point just in case something goes wrong.
Method 1: Use Elevated Disk Clean-up
You can easily delete system error memory dump files using Elevated Disk Cleanup:
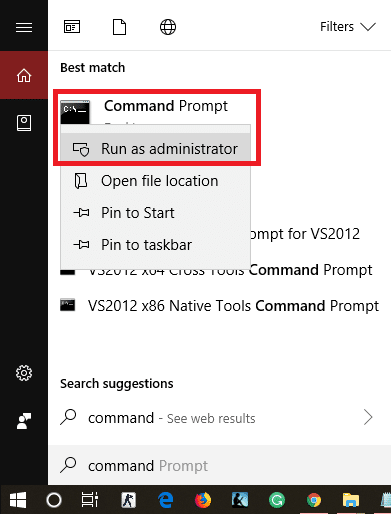
1.Type Disk Cleanup in Windows Search then right-click on it from the search result and select Run as administrator.

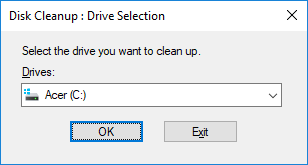
2.Next, select the drive for which you want to run the Disk Cleanup for.
3.Once the Disk Cleanup windows open, click on the “Clean up system files” button at the bottom.

4.If prompted by UAC, select Yes then again select the Windows C: drive and click OK.
5.Now check or uncheck items you want to delete and then click OK.
Note: Make sure to checkmark System error memory dump files.

Method 2: Run Extended Disk Cleanup
1.Press Windows Key + X then select Command Prompt (Admin).

2.Type the following command into cmd and hit Enter:
cmd.exe /c Cleanmgr /sageset:65535 & Cleanmgr /sagerun:65535

Note: Make sure you don’t close Command Prompt until the Disk Cleanup is complete.
3.Now check or uncheck items you want to include or exclude from Disk Clean up then click OK.

Note: Extended Disk Cleanup gets far more options than normal Disk Cleanup.
4.Disk Cleanup will now delete the selected items and once finished, you can close cmd.

5.Reboot your PC to save changes.
This will easily delete system error memory dump files using Extended Disk Cleanup, but if you’re still stuck then continue with the next method.
Method 3: Physically Deleting the Dump Files
You can also manually delete the dump files by finding the location of the memory dump files. To delete system error memory dump files follow the below steps:
1.Click on the Start button or press the Windows key.
2.Type Control Panel and press enter.

3.From the “View by:” drop-down select Large Icons.
4.Find and click on System.

5.From the left-hand side window pane click on the Advanced System Settings link.

6.In the new window under Startup and Recovery click on Settings.

7.Under Dump file you will find the location where your dump file is stored.

8.Copy this address and paste in the Run.
9.To access run press Windows Key + R, paste the address which you copied.

10.Right-click on the Memory.DMP file and select Delete.

That’s it you will be able to delete the dump files with this method.
Method 4: Disable Indexing
Indexing is a technique which improves file retrieval time and enhances performance. Every file stored in the system has an index value by which it can be found easily. Indexing may sound like a very good concept, however, this can eat a lot of memory space of your system. Maintaining records of a large number of files can consume a lot of memory. To disable the indexing follow these steps.
1.Press Windows key + E simultaneously.
2.Right-click on the local drive C and select Properties.

3.In the bottom of the new window uncheck the option “Allow files on this drive to have contents indexed in addition to file properties“.

4.To save the changes click on Apply.
To disable indexing on all the drives you need to follow this guide: Disable Indexing in Windows 10.
Method 5: Remove the unnecessary files using CMD
To delete the unwanted files from your system follow these steps.
1.Click on the Start button or press the Windows key.
2.Type Cmd. and then right-click on Command Prompt and select Run as Administrator.
3.When the window opens type these commands one after the other and press enter after each command.
fsutil usn deletejournal /d /n c:
del “%temp%*” /s /f /q
del “C:$Recycle.bin*” /s /f /q
del “%systemroot%temp*” /s /f /q
vssadmin delete shadows /for=c: /all /quiet
Dism /Online /Cleanup-Image /StartComponentCleanup /ResetBase


4.Restart the computer and the unwanted files will be gone by now.
Method 6: Delete the Temporary files on Windows 10
The main cause of system slow performance or if Task Manager consumes a lot of memory is Temporary files. These Temporary files are accumulated over time and can cause a lot of trouble for PC users. You need to delete the temporary files from time to time in order to ensure the proper functioning of the PC. The following steps should be followed in order to delete the temporary files:
1.Press Windows key and R to open the run dialog box.
2.Type %temp% in the run dialog box.

3.A new window will appear, press Ctrl+A to select all the files and then press Left shift+Del to delete all the selected files & folders.

4.All the files will be deleted and your system will be free from all the temporary files.

The process should be regularly performed in order to delete the temporary files present on the system as these files accumulate over time and take up a huge chunk of your hard disk and increase the processing time for applications.
Find out what is actually taking up the disk space
Now, before you clean up some space on your drive, you probably need to figure out which files are actually eating up all your disk space. This crucial information is made available to you by Windows itself which provides a disk analyzer tool to find which files you need to get rid of. To analyze your disk space, read this guide: 10 Ways to Free Up Hard Disk Space On Windows 10.

Recommended:
- Fix Page Fault In Nonpaged Area Error in Windows 10
- Fix Enter Network Credentials Error on Windows 10
- 5 Best Video Editing Software For Windows 10
- What is BIOS and how to update BIOS?
I hope this article was helpful and you can now easily Delete System Error Memory Dump Files on Windows 10, but if you still have any questions regarding this tutorial then feel free to ask them in the comment’s section.