If you are worried about losing your text messages, then stop. Android won’t allow that to happen. It automatically backs up all your SMS text messages. As long as you are logged in to your device using your Google Account, your messages are being saved on the cloud. Android uses Google Drive to back up all your data, including SMS text messages. As a result, switching to a new device is completely hassle-free, and there is absolutely no need to worry about losing your personal data. Google automatically creates a downloadable file that will restore all the old text messages. Log in to your Google account on the new device and download the backup file.
The popularity of SMS is on the decline, and it is rapidly being replaced by online chatting apps like WhatsApp and Messenger. Not only are these apps absolutely free to use but offer a wide range of additional services and features. Free text size, sharing all kinds of media files, documents, contacts, and even live location. However, there are a good number of people who still rely on SMS to have text-based conversations. They find it safer and more reliable. If you are one of them, you wouldn’t want your conversation threads and messages to get lost. In the event of our phone getting lost, stolen, or damaged, the primary concern still remains data loss. Therefore, we will address this situation and discuss the various ways in which you can make sure that your messages are getting backed up. We will also show you how to restore old messages if they accidentally get deleted.

How to back up and restore text messages on Android
Step 1: Backing up your Text Messages using Google
By default, the Android operating system uses your Google account to back up your text messages on Google Drive. It also saves other personal data like Call history, device settings, and App data. This ensures that no data is lost in the transition while switching to a new device. Unless and until you have manually turned off backup to Google, your data and that includes SMS text messages are safe. However, there is nothing wrong with double-checking. Follow the steps given below to confirm that everything is getting backed up on the cloud.
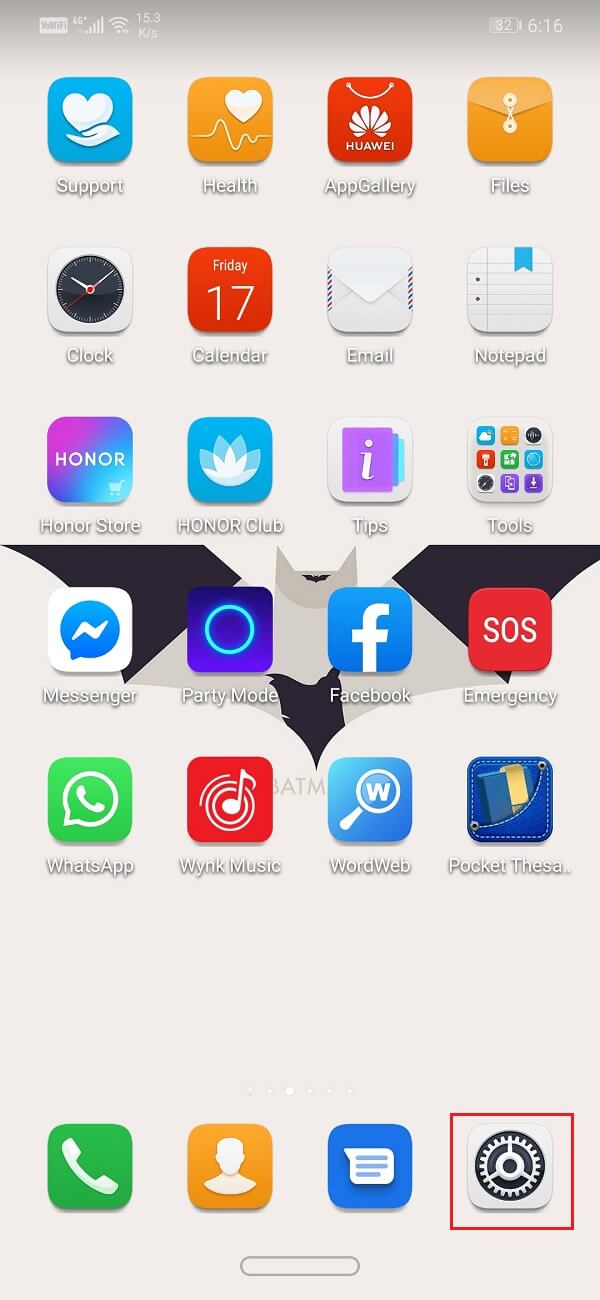
1. Firstly, open Settings on your device.
2. Now tap on the Google option. This will open the list of Google services.

3. Check if you are logged in to your account. Your profile picture and email id on the top indicates that you are logged in.
4. Now scroll down and tap on the Backup option.

5. Here, the first thing that you need to make sure is that the toggle switch next to Backup to Google Drive is turned on. Also, your Google account should be mentioned under the account tab.

6. Next, tap on the name of your device.
7. This will open a list of items that are currently getting backed up to your Google Drive. Make sure “SMS text messages” is present in the list.

8. Finally, if you want, you can tap on the Back up now button on the way out to backup any new text messages.
Step 2: Making Sure that Back up Files exist on Google Drive
As mentioned earlier, all your backup files, including your text messages, are saved on Google Drive. If you want to make sure that these files actually exist, you can do that easily by browsing through the contents of Google Drive. Follow the steps given below to see how:
1. Firstly, open Google Drive on your device.

2. Now tap on the hamburger icon on the top left-hand side of the screen.
![]()
3. After that, click on the Backups option.

4. Here, tap on your device’s name to see the items that are currently being backed up.

5. You will see that SMS has been listed, among other items.

Step 3: How to restore messages from Google Drive
Now, if you accidentally delete certain text messages, the natural reaction would be to restore them from Google Drive. However, the Android operating system does not have any provision that allows you to do so. The backup that is saved on Google Drive can only be downloaded in the event of transferring data to a new device or in case of a factory reset. Yes, you heard it right. Even though your messages are safely backed up on the drive, it isn’t for you to access at normal times.
As mentioned earlier, the only workaround for this problem is to reset your device to factory settings. Doing so will wipe all your data and automatically trigger the backup restoration process. This will bring back any SMS text message that you had deleted accidentally. However, it is quite a steep price to pay to get restore some messages. The other easier alternative is to use a third-party app to back up and restore text messages. We are going to discuss this in the next section.
Also Read: Send Picture via Email or Text Message on Android
How to Back up and Restore Text Messages using a Third-party App
The only way to restore messages as and when required is to save them on some other cloud server. Several third-party apps on the Play Store offer cloud storage to backup your SMS text messages. All you need to do is download and install the app from the Play Store and grant necessary permissions to the app. All of these apps work similarly. They connect to your Google Drive account and integrate Google Drive’s backup features with itself. After that, it creates a copy of messages saved on Google Drive and makes it available for download as and when required. One of the best apps that you can use for this purpose is the SMS Backup and Restore. You can download the app by clicking on the link. Once the app has been installed, follow the steps given below to set up the app.
How to Backup messages using SMS Backup and Restore
1. When you open the app for the first time, it will ask for a number of access permissions. Grant all of them.
2. Next, tap on the “Set Up A Backup” option.

3. This app can back up not only your SMS text messages but also your call logs. You can choose to disable the toggle switch next to Phone calls to back up your messages.
4. After that, tap on the Next option.

5. Here, you will find a list of Cloud storage apps to choose from. Since your data is stored in Google Drive, enable the toggle switch next to it. However, if you are using some other cloud storage app to back up your data, select that app from the list. Finally, press the Next button.

6. Now tap on the login button to connect your Google Drive to this app.

7. A pop-up menu will now be displayed on your screen, asking you to select the type of access to Google Drive. We will suggest you choose restricted access, i.e., only the files and folders created by SMS Backup and Restore.

8. After that, you need to select the Google Drive account that is linked to your smartphone.

9. Google Drive will ask permission from you before granting access to SMS Backup and Restore. Tap on the Allow button to grant access.

10. Now tap on the Save button.

11. If you want your SMS text messages to be backed up only over Wi-Fi, then you need to toggle on the switch next to Over Wi-Fi under the Only Upload section. Tap on the Next button to proceed.
12. The next would require you to select a cloud storage app to save any messages that you receive in the future. Feel free to choose Google Drive and then tap on the Next button.
13. The app will now start backing up your messages to Google Drive, and you will receive a notification when it is completed.
14. SMS Backup and Restore also allow you to set up a schedule for backing up your messages. You can choose between daily, weekly, and hourly options depending on how frequently you want your notes to be backed up.

Also Read: Recover Deleted Text Messages on an Android Device
How to Restore messages using SMS Backup and Restore
In the previous section, we discussed in detail the shortcomings of Android’s automatic backup, i.e., you cannot restore messages on your own. This was the primary reason behind choosing a third-party app like SMS Backup and Restore. In this section, we will provide a step-wise guide as to how you can use the app to restore your messages.
1. Firstly, open the SMS Backup and Restore app on your device.
2. Now tap on the hamburger icon on the top left-hand side of the screen.
![]()
3. After that, select the Restore option.

4. By default, the app will restore the most recent messages, usually the ones received on the same day. If you are okay with that, then toggle on the switch next to the Messages option.

5. However, if you wish to restore older messages, you need to tap on the Select Another Backup option.
6. Once you have selected the data that you wish to restore, tap on the Restore button.
7. A message will now pop-up on your screen, asking permission to temporarily set SMS Backup and Restore as your default messaging app. You can change it back once the restoration process is complete.

8. Tap on the Yes option to grant permission.
9. This will commence the SMS restoration process and once it is completed, tap on the Close button.
10. Now you will again receive a pop-up message to set Messages as your default messaging app.

11. Go back to your home screen and tap on the Messages app icon to open it.
12. Here, tap on the Set as Default option.

13. A pop-up message asking you to confirm your decision to change the SMS app will appear on your screen. Tap on the Yes option to set Messages as your default messaging app.

14. Once everything is done, you will start receiving the deleted text messages as new messages.
15. You might have to wait as long as an hour to get back all the messages. These messages will be displayed in your default Messages app, and you can access them from there.
Recommended:
With that, we come to the end of this article. We hope that you find this article helpful and were able to back up and restore text messages on your Android phones. We are pretty sure that after reading this article and following the instructions laid out, you will never have to worry about losing your text messages. It is heartbreaking to lose personal conversation threads, and the only way to prevent something like that from happening is to regularly backup your text messages.
Apart from that, there are times when we accidentally delete a particular set of messages that contained an important activation code or password. This could have serious consequences on your professional life. Due to this reason, more and more people are switching to online chatting apps like WhatsApp as it is more secure and reliable. Apps like these always back up their data, and thus you do not need to worry about losing your messages ever.