
Experiencing mouse lag can be frustrating, especially when you’re in the middle of important tasks or gaming sessions. This guide offers a comprehensive walkthrough on how to address and fix mouse lag issues in Windows 10. We’ll cover a range of solutions, from basic troubleshooting steps to more advanced techniques, ensuring that you can restore smooth and responsive mouse performance on your Windows 10 system. Whether you’re a casual user or a tech enthusiast, these steps will help you eliminate mouse lag and enhance your overall computing experience.

6 Ways to Fix Mouse Lag on Windows 10
We start our quest to a lag-free world by updating the mouse drivers to the latest version followed by ensuring the mouse is properly configured and unnecessary features are disabled. Hopefully, these tweaks will fix any lag but if they don’t, we can try disabling NVIDIA’s High Definition Audio process and Cortana assistant.
Before moving ahead, try simply plugging the mouse into another USB port (preferably a USB 2.0 port since not all mice are compatible with USB 3.0 ports) and removing any other connected devices as they (external hard drive) may interfere with the mouse. You can also connect the mouse to another computer altogether to ensure the device itself isn’t at fault. If you are using a wireless mouse, switch the old batteries for a new pair and check for any frays or tears in wired ones.
Another thing you should check if you have a wireless mouse is its frequency/DPI value. Lower down the frequency from the associated application and check if that resolves the lag. If nothing is wrong with the hardware side of things, move on to the below software solutions.
How do I fix my mouse from lagging, freezing, and jumping on Windows 10?
You can use the below-listed methods to troubleshoot and fix Windows 10 Mouse Lag issues. Make sure to create a restore point before you continue.
Method 1: Update Mouse Drivers to fix Mouse Lag
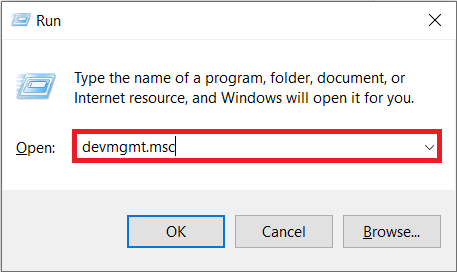
1. Press Windows key + R to open the Run command box then type devmgmt.msc and click on OK to open the Device Manager.
2. Expand Mice and other pointing devices then Right-click and select Properties from the ensuing options.

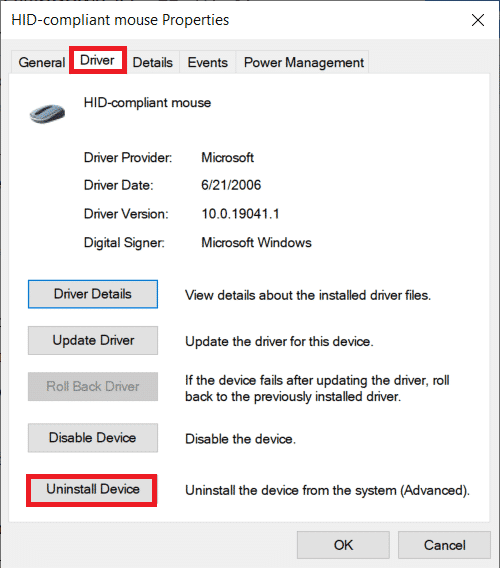
3. Switch to the Driver tab and click on the Roll Back Driver button if available. If not, then click on Uninstall Device option. Confirm your action by clicking on the Uninstall button again in the following pop-up.
4. Now, Click on the Scan for the hardware changes button.

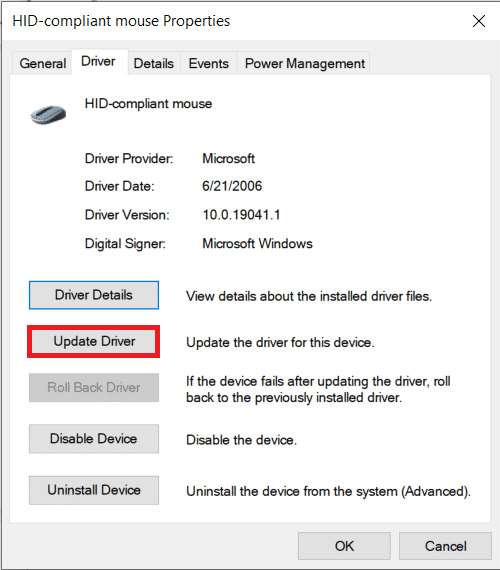
5. To have Windows automatically install the latest mouse drivers, simply restart your computer or click on the Update Driver option.
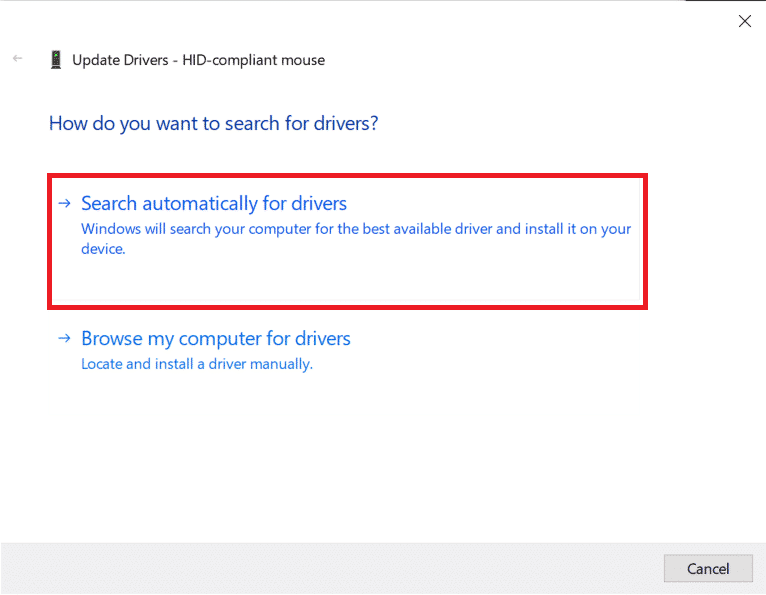
6. Select Search automatically for drivers.
Once the drivers have been updated, check if your mouse continues to lag.
Method 2: Disable Scroll Inactive Windows
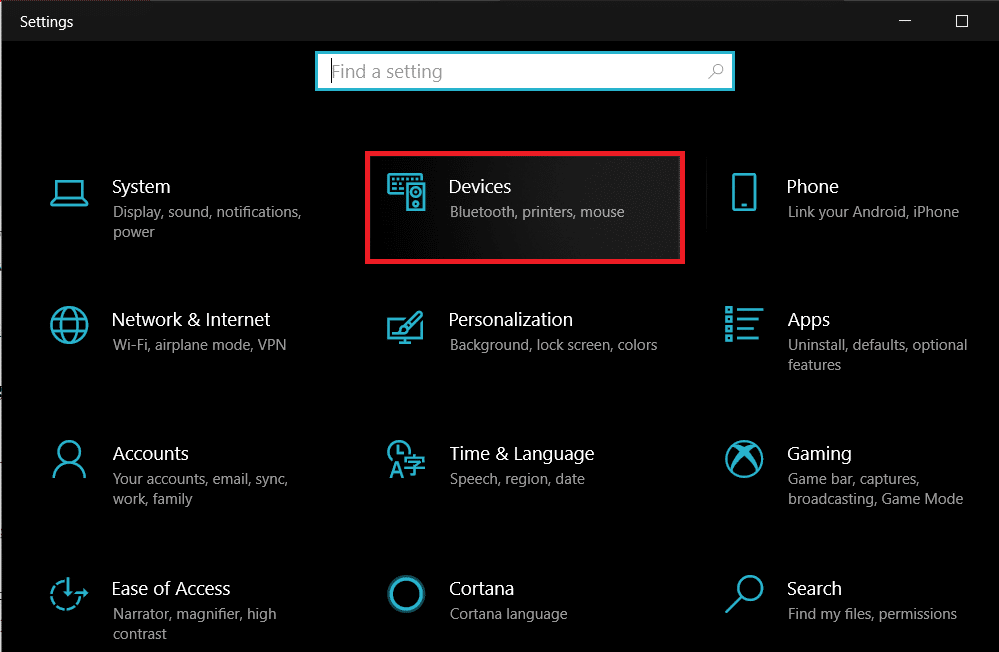
1. Press the Windows key + I to launch Windows Settings then click on Devices.
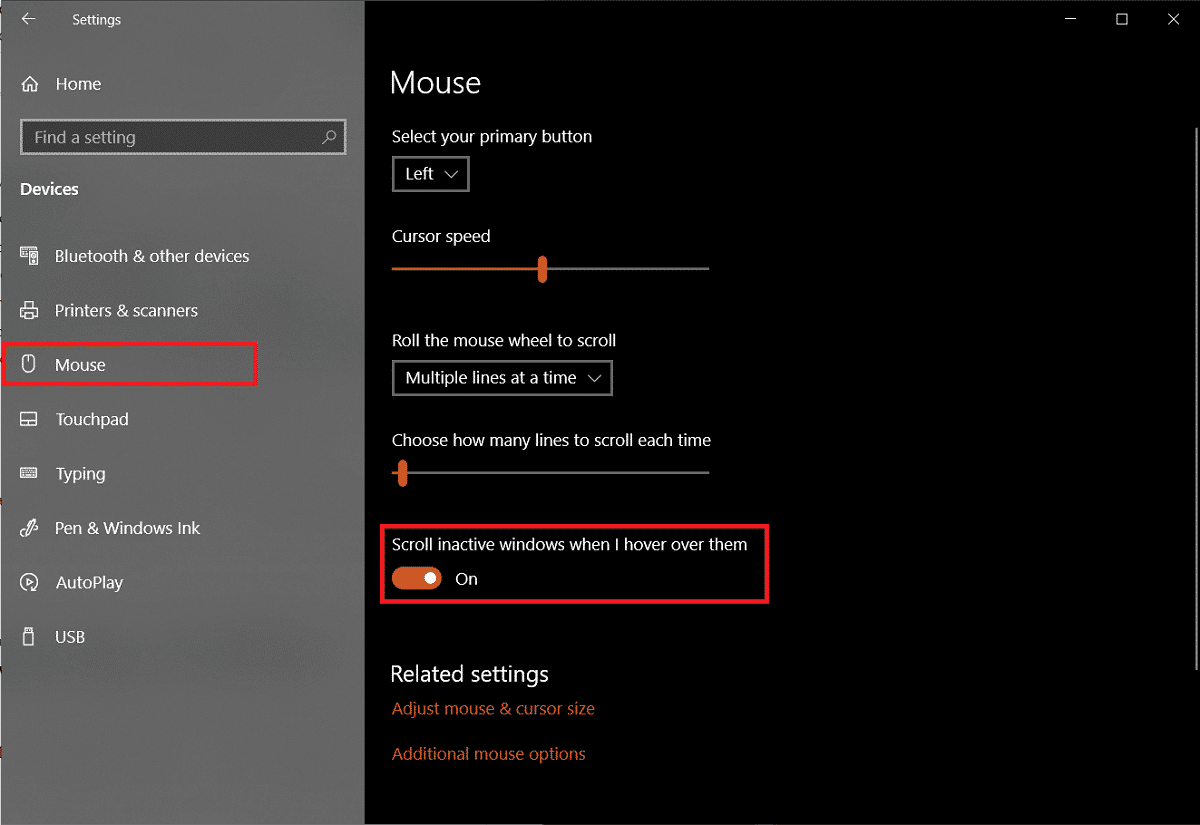
2. Move to the Mouse & Touchpad settings page (or only Mouse, depending on your Windows version) and toggle off the switch under Scroll inactive Windows when I hover over them.
If disabling doesn’t fix the issue instantly, try enabling and disabling the feature a couple of times and check if it fixes the laggy mouse.
Also Read: Fix Logitech Wireless Mouse Not Working
Method 3: Change Touchpad Delay and Palm Check Threshold
To avoid users from accidentally moving the pointer while they type, the touchpad is automatically disabled. The touchpad only gets re-enabled after the last keypress with a slight delay and this delay is known as Touchpad Delay (duh!). Setting the delay to a lower value or to zero altogether can help you negate any touchpad lags. (Note: The Touchpad delay feature is driver-specific and may bear a different name on your laptop.)
1. Press the Windows key + I to launch Windows Settings then click on Devices.
2. Expand the drop-down list under the Touchpad section and select No delay (always on).
Note: If you are on the latest Windows build, simply set the Touchpad sensitivity to ‘Most sensitive’.

Another similar feature to avoid accidental touchpad taps is Palm Check Threshold. Lowering the threshold value to the minimum can be helpful in getting rid of mouse lag.
1. Open Mouse Settings once again and click on Additional mouse options.
2. Switch to Touchpad (or Clickpad) tab and click on the Properties button.
3. The palm check threshold option is most likely to be listed on the Advanced tab. Switch to it and drag the slider all the way to the left.
Method 4: Terminate & Disable Realtek Audio
A rather odd fix that seems to be working for multiple users is disabling the Realtek HD Audio Manager process. Interference from the Realtek process may be causing the lag and if that is indeed the case, simply terminating the process should resolve the issue.
1. Press the Ctrl+Shift+Esc keys simultaneously to launch the Windows Task Manager. If required, click on More Details to expand the application window.

2. On the Processes tab, locate the Realtek HD Audio Manager process, select it and then click on the End Task button at the bottom right.

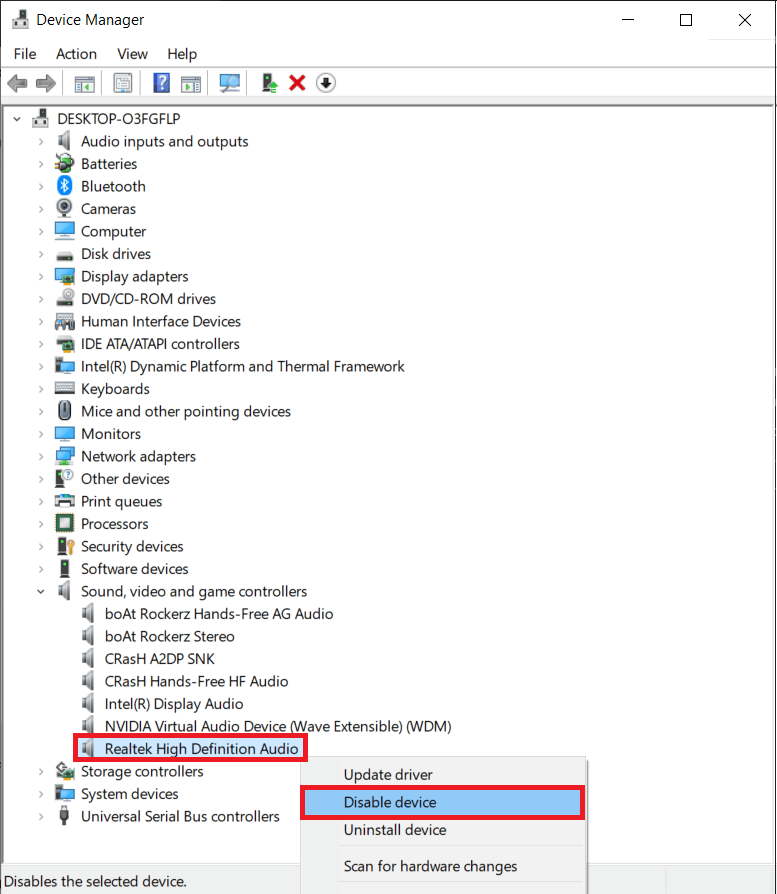
3. Now, check if the mouse continues to lag. If yes, open the Device Manager (Step 1 of Method 1) and expand Sound, video and game controllers.
4. Right-click on Realtek High Definition Audio and select Disable device.
Also Read: Mouse Lags or Freezes on Windows 10? 10 Effective ways to fix it!
Method 5: Disable Cortana Assistant
Similar to the last one, yet another unrelated feature that may be interfering with your mouse is the Cortana Assistant. If you seldom use Cortana then disabling it can help you free up some system memory and help boost performance along with solving any mouse lags.
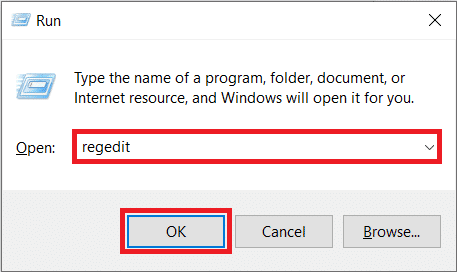
1. Open the Registry Editor by typing regedit in the Run command box and press enter.
2. Head down the below path using the sidebar on the left or simply copy-paste the path in the address bar on the top:
HKEY_LOCAL_MACHINE\SOFTWARE\Policies\Microsoft\Windows\Windows Search
Note: Some users may not find the Windows Search key under the Windows folder, simply right-click on Windows, select New followed by Key, and name the newly created key as Windows Search.
3. If an AllowCortana value is already present on the right-panel, double-click to change its properties and set the Value data to 0. If the value isn’t present, right-click anywhere and select New > DWord (32-bit) Value, set the Value data to 0 to disable Cortana.
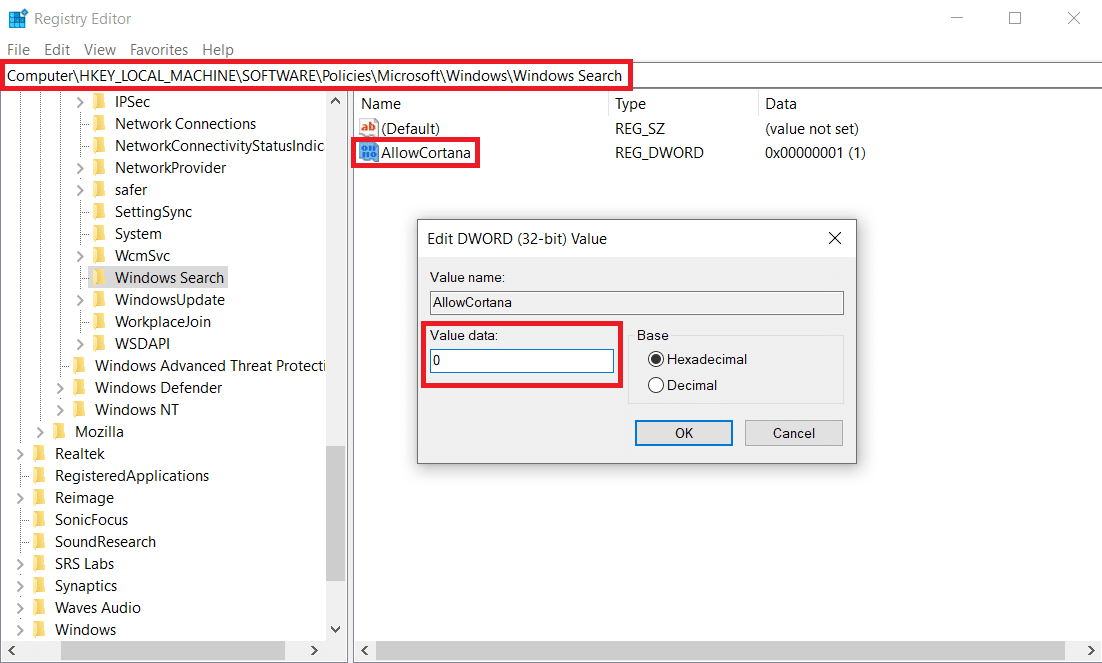
4. Restart your computer and check if the lag has been resolved.
Method 6: Change Power Management Settings
Another setting that is often overlooked is how aggressively your computer is trying to save power. Computers often disable USB ports in an attempt to save power which in turn results in a slight delay/lag when you move the mouse after a little while. Prohibiting the computer from disabling the USB port to which the mouse is connected can help with the lag.
1. Open the Device Manager application by following step 1 of method 1.
2. Expand Universal Serial Bus controllers and double-click on the USB Device to open its Properties.
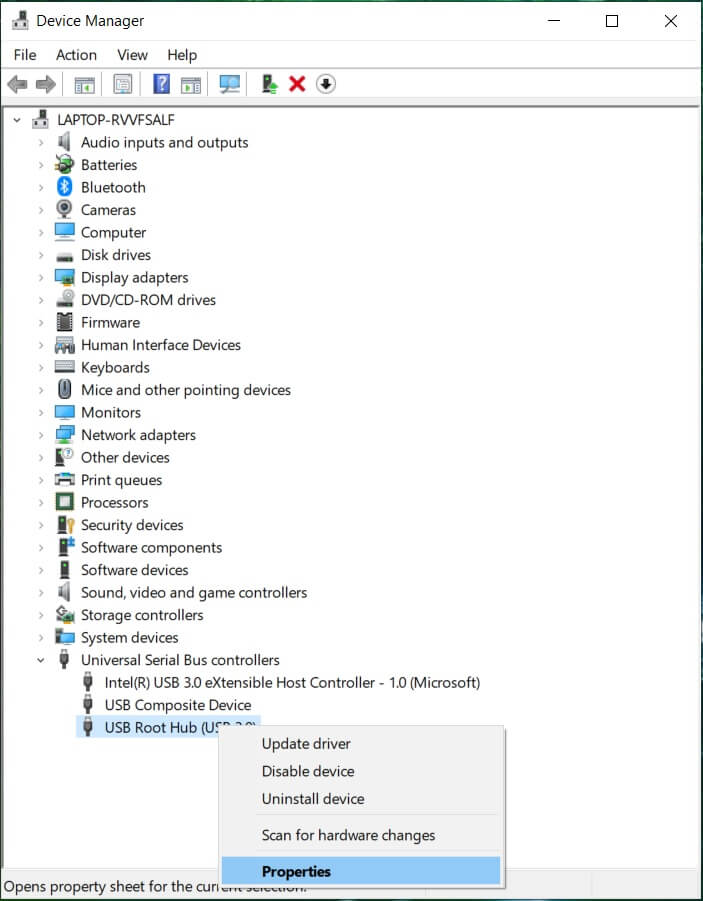
3. Switch to the Power Management tab and untick the box next to Allow the computer to turn off this device to save power.
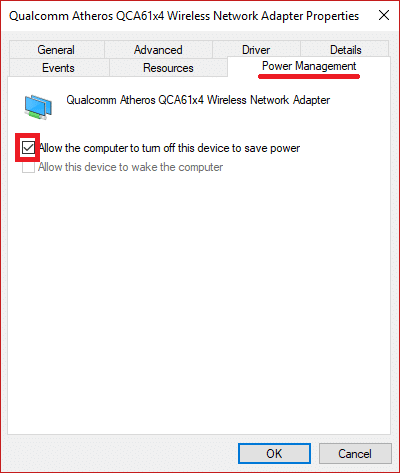
4. Click on OK to save and exit.
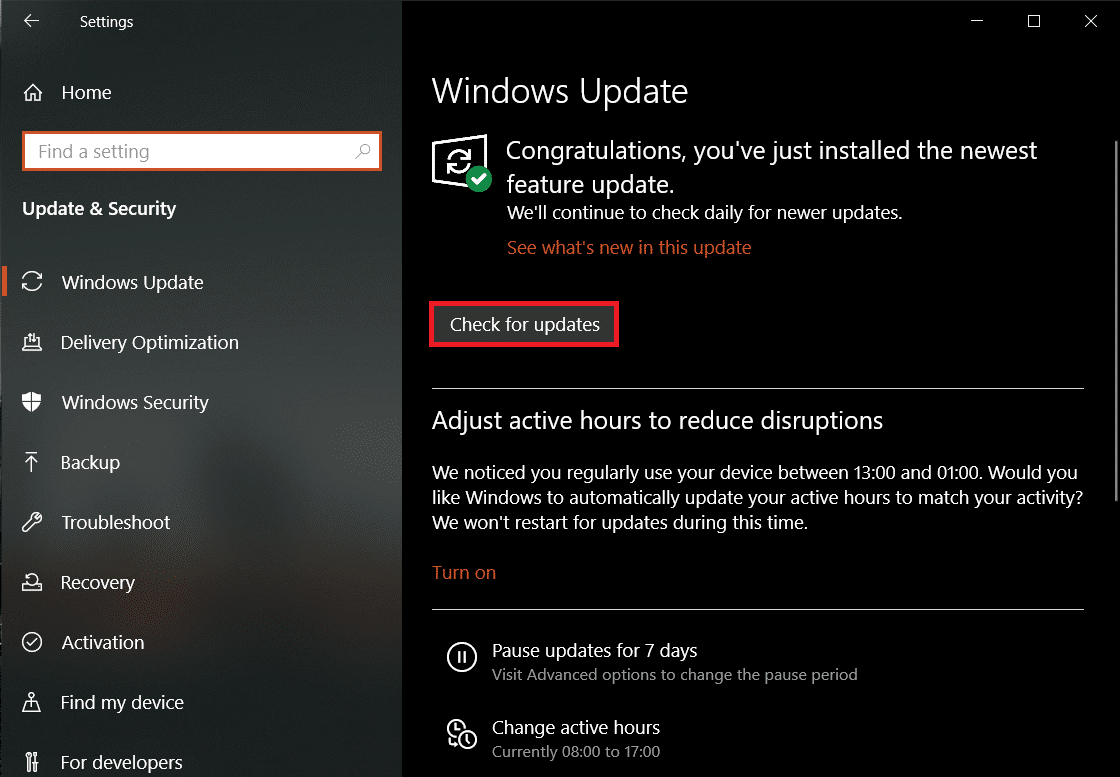
You can also try updating Windows if there is an update available (Windows Settings > Update & Security > Windows Update > Check for Updates).
Recommended: Fix Mouse Cursor Disappearing in Google Chrome
We hope this guide was helpful and you were able to fix the Mouse Lag problem on Windows 10. We hope that one of the above-explained solutions has smoothened out your mouse lag issues, comment down below to get assistance on any other mouse-related problems being encountered.


