If you have a Dell laptop, then you must have seen that the SupportAssist feature helps run diagnostics and keep your system running smoothly. But recently, sometimes users face an issue where the system check gets stuck, preventing the computer from starting up normally. The problem is frustrating, but there are reliable ways to fix the Dell SupportAssist Pre-Boot System Performance Check stuck. How? Let’s find out!
Fix Dell SupportAssist Pre-Boot System Performance Check Stuck
Where your problem is due to corrupted files, hardware glitches, or pending updates, let’s take a look at all possible solutions!
Method 1: Power Reset
The quickest way to bring back settings to normal is by power resetting your desktop. Then, shut it the laptop and remove the battery. Hold the power button for 30 seconds to drain any charge and reconnect the battery. Finally, power on the laptop and check for improvements.
Method 2: Check Hardware Issues
Before you take big steps, ensure that your device does not have physical damage on its skin or around the display that is causing the issue.
Method 3: WiFi Power Cycle
A WiFi power cycle may be used if your computer’s WiFi connectivity is preventing it from connecting to the internet.
- Turn off your computer and modem or wireless router.
- Wait for 30-40 seconds.
- Then, turn on the modem or wireless router.
- Now, turn on your computer.
Check for any improvements.
Method 4: Run Hardware Diagnostics
If SupportAssist is stuck, try running Dell’s built-in hardware diagnostics.
- Restart your laptop
- Press F12 key repeatedly as you see the Boot Options menu.
- Choose Diagnostics from the boot menu.
This test checks your hardware for issues and can point out if something is causing the freeze.
Method 4: Perform Real Time Clock (RTC) reset
An RTC reset clears certain hardware settings and helps fix boot-related issues. To do this, power off your laptop, unplug it, and hold the power button for about 30 seconds. Then, release to reset the system’s RTC.
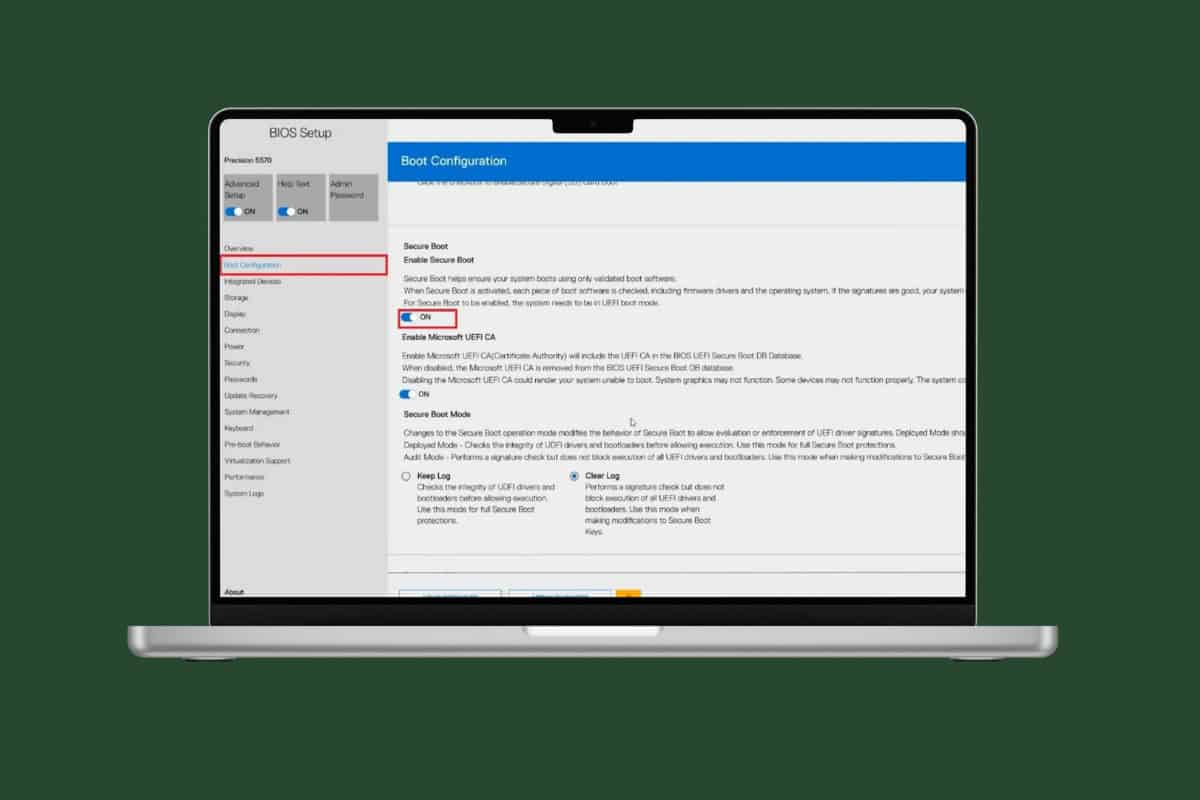
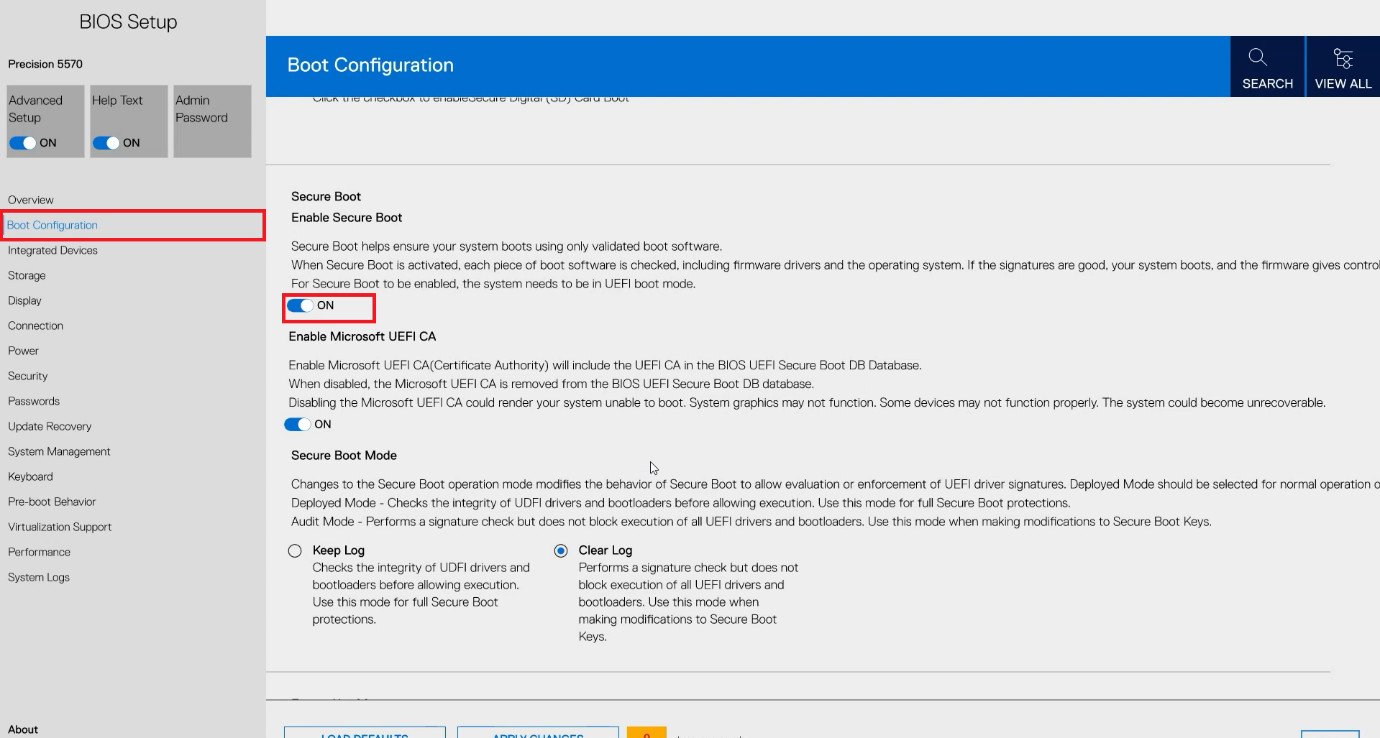
Method 5: Enable Secure Boot
Secure Boot makes sure only trusted software runs at startup. If it’s disabled, SupportAssist may fail during pre-boot.
- Restart your system and press F2 repeatedly during startup to enter the BIOS/UEFI settings.
- Click on Boot Configuration from the left menu.
- Now turn the toggle on for Enable Secure Boot.
- Click on Apply.
Restart your system and check if the problem is resolved.
Method 6: Reset the BIOS
Misconfigured BIOS settings can cause SupportAssist to freeze.
- Open the Pre-Boot System Performance Check screen and turn off the PC by holding the power button.
- Turn on the PC, and as soon as the display lights up, repeatedly press the F12 key to access the BIOS.
- Click on LOAD DEFAULTS at the right corner.
- Select the BIOS Defaults.
- Click on OK.
- Select the reason of your choice and click on Continue.
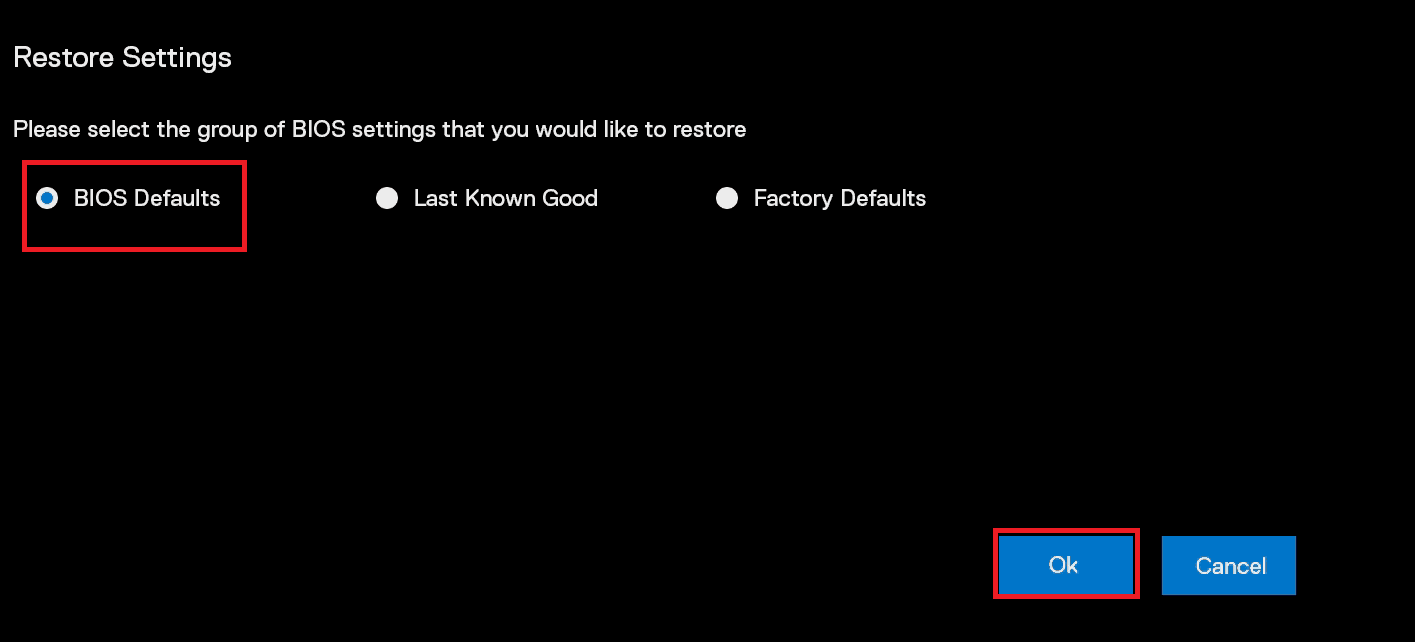
Once the reason is fixed, the screen should be working normally.
Method 7: Update BIOS
Outdated BIOS firmware can also trigger boot problems. Visit Dell’s support site, download the latest BIOS for your model, and update it carefully. Make sure your laptop is connected to power while updating.
Method 8: Disable Dell Reliable Memory Technology in BIOS
Dell’s Reliable Memory Technology (RMT) feature can sometimes interfere with SupportAssist. Go into the BIOS, locate the RMT setting under Performance, and disable it. This might stop SupportAssist from getting stuck during pre-boot.
Method 9: Disable the Dell SupportAssist Pre-Boot System Performance Check
If nothing else works, you can turn off the SupportAssist pre-boot check entirely.
- Restart your computer.
- As soon as it starts, repeatedly press the BIOS entry key.
- Once inside the BIOS/UEFI, look for sections labeled Boot, Advanced, Diagnostics, or SupportAssist.
- Disable options like SupportAssist Pre-Boot System Performance Check, SupportAssist OS Recovery, Pre-Boot Diagnostics, Always Perform Integrity Check.
- Uncheck SupportAssist OS Recovery. Please note that in some cases, you can bypass the pre-boot check by setting the Secure Boot option to AUDIT mode or disabling it altogether
- deselect any HTTP(s) Boot options in the Boot Configuration tab.
- Press F10 to save changes and exit the BIOS/UEFI.
Your system should now boot without running the pre-boot system performance check.
Also Read: How to Unlock Dell Laptop Keyboard on Windows 10/11
Now you will no longer have a difficult time figuring out fix the Dell SupportAssist Pre-Boot System Performance Check stuck after following this guide. For more helpful tips and tricks, stay tuned, and feel free to share your suggestions in the comments below.